Rust 语言入门 Introduction to Rust
本文档使用大量的图片和代码片段, 尝试帮助阅读者建立 Rust 的知识体系, 理清难点.
本文档包括以下几个部分的内容:
- 第一部分: 语言基础
- 第二部分: 自定义类型
- 第三部分: 标准库
- 第四部分: 内存管理
- 第五部分: 并发编程
- 第六部分: 异步编程
- 第七部分: 工程实践
- 第八部分: Rust语言的生态
反馈问题
本文档到目前为止还没有完成, 中间有不少章节是缺失的, 如果发现错误, 欢迎 反馈问题, 或者提交 PR.
搭建本地环境
想在本地搭建本文档的环境也是很容易的, 这些文档记录以 markdown 文件为主, 并使用 mdbook 生成网页.
- 用 cargo 来安装它:
cargo install mdbook mdbook-linkcheck mdbook-pagetoc - 运行
mdbook build命令, 会在book/目录里生成完整的电子书的网页版本 - 使用
mdbook serve命令监控文件变更, 并启动一个本地的 web 服务器, 在浏览器中打开 http://localhost:3000
生成 PDF
如果想生成 pdf, 需要安装 mdbook-pandoc:
- 运行
./tools/install-pdf-deps.sh脚本安装相应的依赖包 - 运行
./tools/generate-pdf.sh脚本, 就会生成book-pandoc/pdf/IntroductionToRust.pdf
版权
文档采用 知识共享署名 4.0 国际许可协议 发布, 源代码依照 GPL 3.0 协议 发布.
配置开发环境
开始学习 Rust 语言之前, 需要先配置开发环境.
本文档中引用的一些资源路径, 假定是 linux 或者 macos 等 unix 类系统; 但对于 windows 系统的用户来说, 其差别微乎其微.
本章目标:
- 安装 rust 工具链
- 编写 hello.rs, 编译并运行
- 安装并配置一个 IDE 环境
使用 rustup 安装 Rust 工具链
rustup 用于管理 Rust 工具链, 类似于用于管理 Node 环境的 nvm 以及用于管理 Python 环境的 pyenv.
安装 rustup
对于 Windows 平台, 请访问官网, 下载 exe 文件, 跟据对话框提示即可安装.
在 linux/macos 平台, 使用 rustup 官方的安装脚本最为方便, 只需要在终端运行以下命令即可.
curl --proto '=https' --tlsv1.2 -sSf https://sh.rustup.rs | sh
要注意的是, 默认情况下该脚本会从官网下载 Rust 工具链, 大陆用户直接访问它们会非常慢, 可以考虑使用 中科大的镜像源来加速, 使用方法也很简单, 只需要先在终端里定义两个环境变量即可:
export RUSTUP_DIST_SERVER=https://mirrors.ustc.edu.cn/rust-static
export RUSTUP_UPDATE_ROOT=https://mirrors.ustc.edu.cn/rust-static/rustup
之后在该终端里运行以下指令:
curl --proto '=https' --tlsv1.2 -sSf https://sh.rustup.rs | sh
当下载完脚本后便会自动运行它, 在终端里一路回车即可.
默认情况下, rustup 会安装最新的稳定版 (stable), 安装的目录是 ~/.rustup, 使用的
cargo 目录是 ~/.cargo.
为了之后方便使用中科大等第三方镜像源, 我们可以将以上的环境变量追加到 ~/.bashrc 里.
安装完之后, 在终端里运行 rustc --version 查看一下版本号, 如果该命令有输出, 则
表明已经正常安装了 Rust 工具链.
$ rustc --version
rustc 1.78.0 (9b00956e5 2024-04-29)
更新 rustup
rustc 通常每六周就发布一个大版本, 有时期间还会发布一些补丁版本.
经常更新 Rust 工具链是个好习惯, 更新方法也很简单:
rustup update
有时我们也需要更新 rustup 工具本身, 此时需要用到另一个命令:
rustup self update
配置自动补全 (可选)
rustup 命令可以生成 bash 环境的自动补全脚本:
mkdir ~/.local/share/bash_completion.d
rustup completions bash > ~/.local/share/bash_completion.d/rustup
source ~/.local/share/bash_completion.d/rustup
这样就可以生成命令补全脚本并载入到当前 bash 环境了. 当然也可以在初始化 bash 时
自动载入它, 只需要在 ~/.bashrc 文件中加入以下代码即可:
# Load rustup completion script
if [ -f ~/.local/share/bash_completion.d/rustup ]; then
	. ~/.local/share/bash_completion.d/rustup
fi
第一个 rust 程序 hello world
配置好工具链之后, 开始编写第一个 rust 程序: hello-world.rs.
首先, 使用 cargo 创建项目:
cargo new hello-world
它会生成 hello-world 的项目目录:
$ tree hello-world/
hello-world/
├── Cargo.lock
├── Cargo.toml
└── src
    └── main.rs

2 directories, 3 files
其中:
Cargo.toml是项目的配置文件, 里面保存项目名称, 版本号, 依赖的库等等src/main.rs是默认生成的程序入口
用文本编辑器打开 src/main.rs, 可以看到该文件包含了以下内容:
fn main() {
  println!("Hello, world!");
}
然后切换到终端, 执行下面的命令开始编译并运行它:
cargo run
一切正常的话, 就会在终端内输出:
Hello, world!
完成了!
然而, 整个操作并不算很连续:
- 使用文本编辑器也不方便, 没有自动补全, 语法高亮
- 在编译时还要在终端执行, 而且编译出错时又要切回到文本编辑器
- 文本编辑器不支持代码跳转, 重构代码也很繁琐
- ...
可以使用 IDE 来解决以上列出来的部分问题.
RustRover IDE
RustRover 是 JetBrains 推出的一款 Rust IDE 工具, 我认为它是目前最易用的. 它几乎开箱即用, 不需要单独的配置. 但因为 IDE 使用了 Java 编写, 有时反应会慢一些, 并且比较消耗内存.
安装 Toolbox App, 用它来安装并更新 JetBrains 所有的 IDE 工具.

下载 toolbox app 并安装之后, 它会自动启动, 界面如下图所示:

在 IDE 列表里面选择 RustRover 并安装, 等待一会儿后就安装成功了, 点击 RustRover 的图标来启动它.
然后在 RustRover 里打开我们刚刚创建的 hello-world 项目:
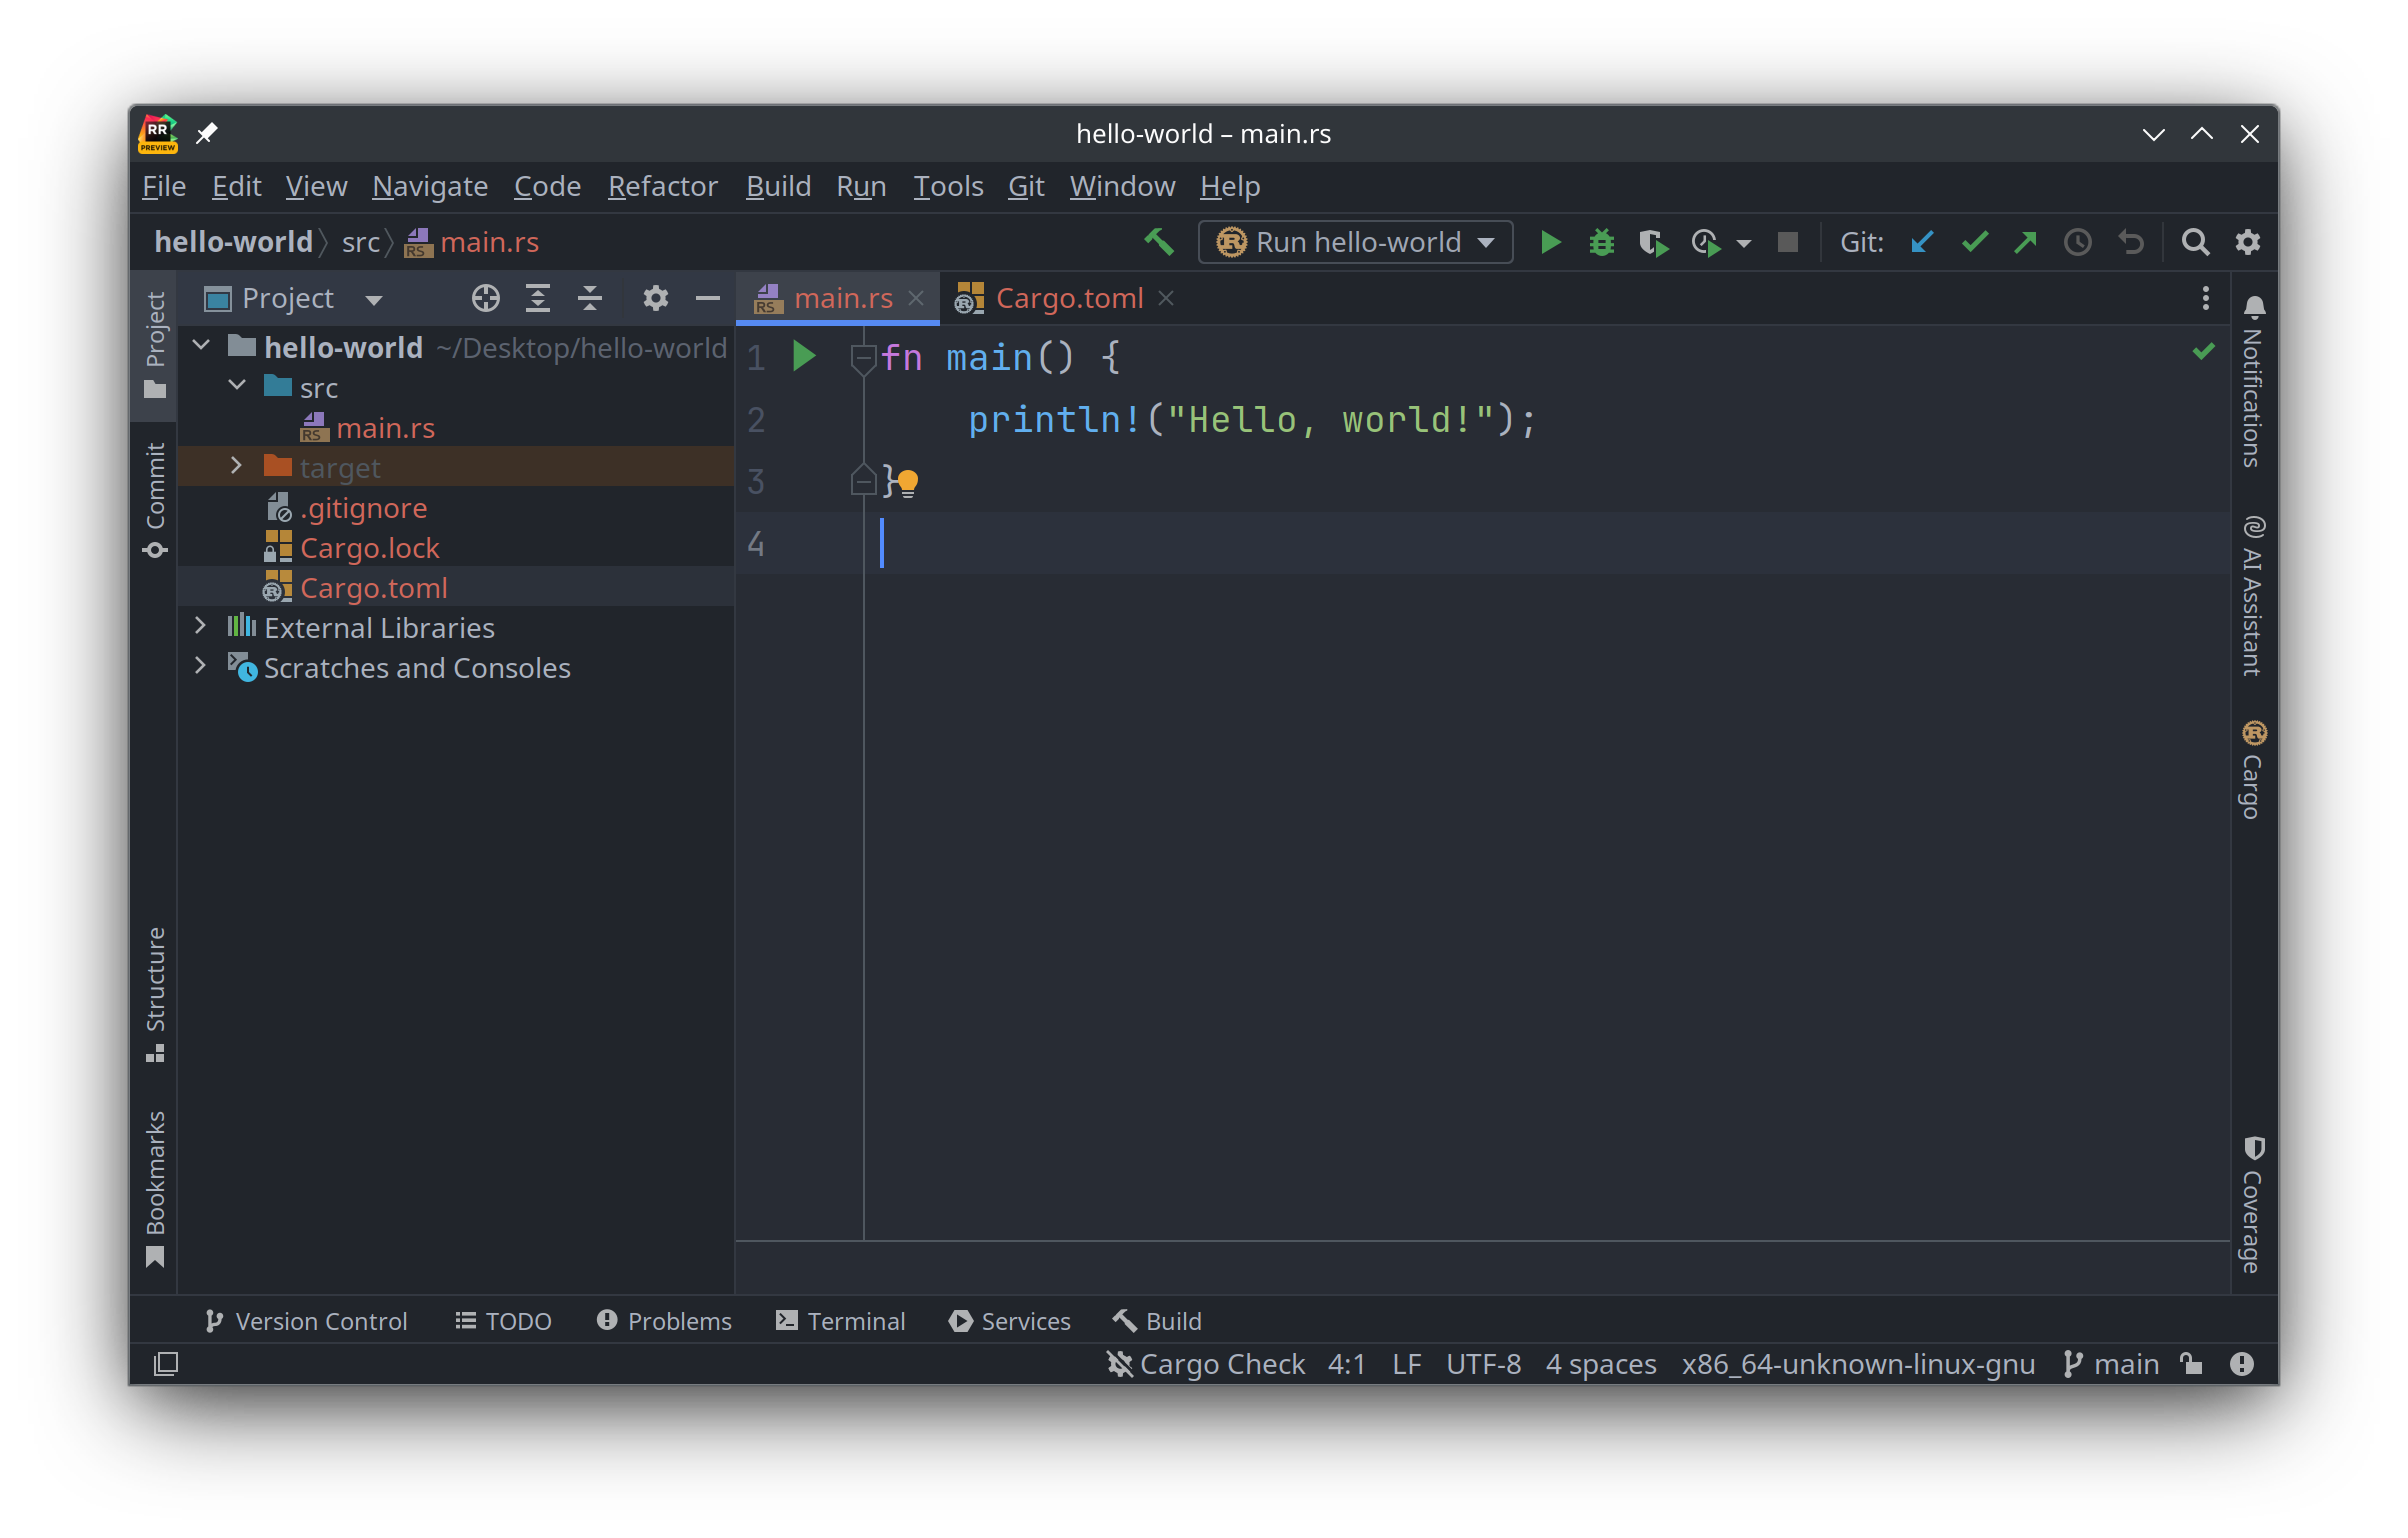
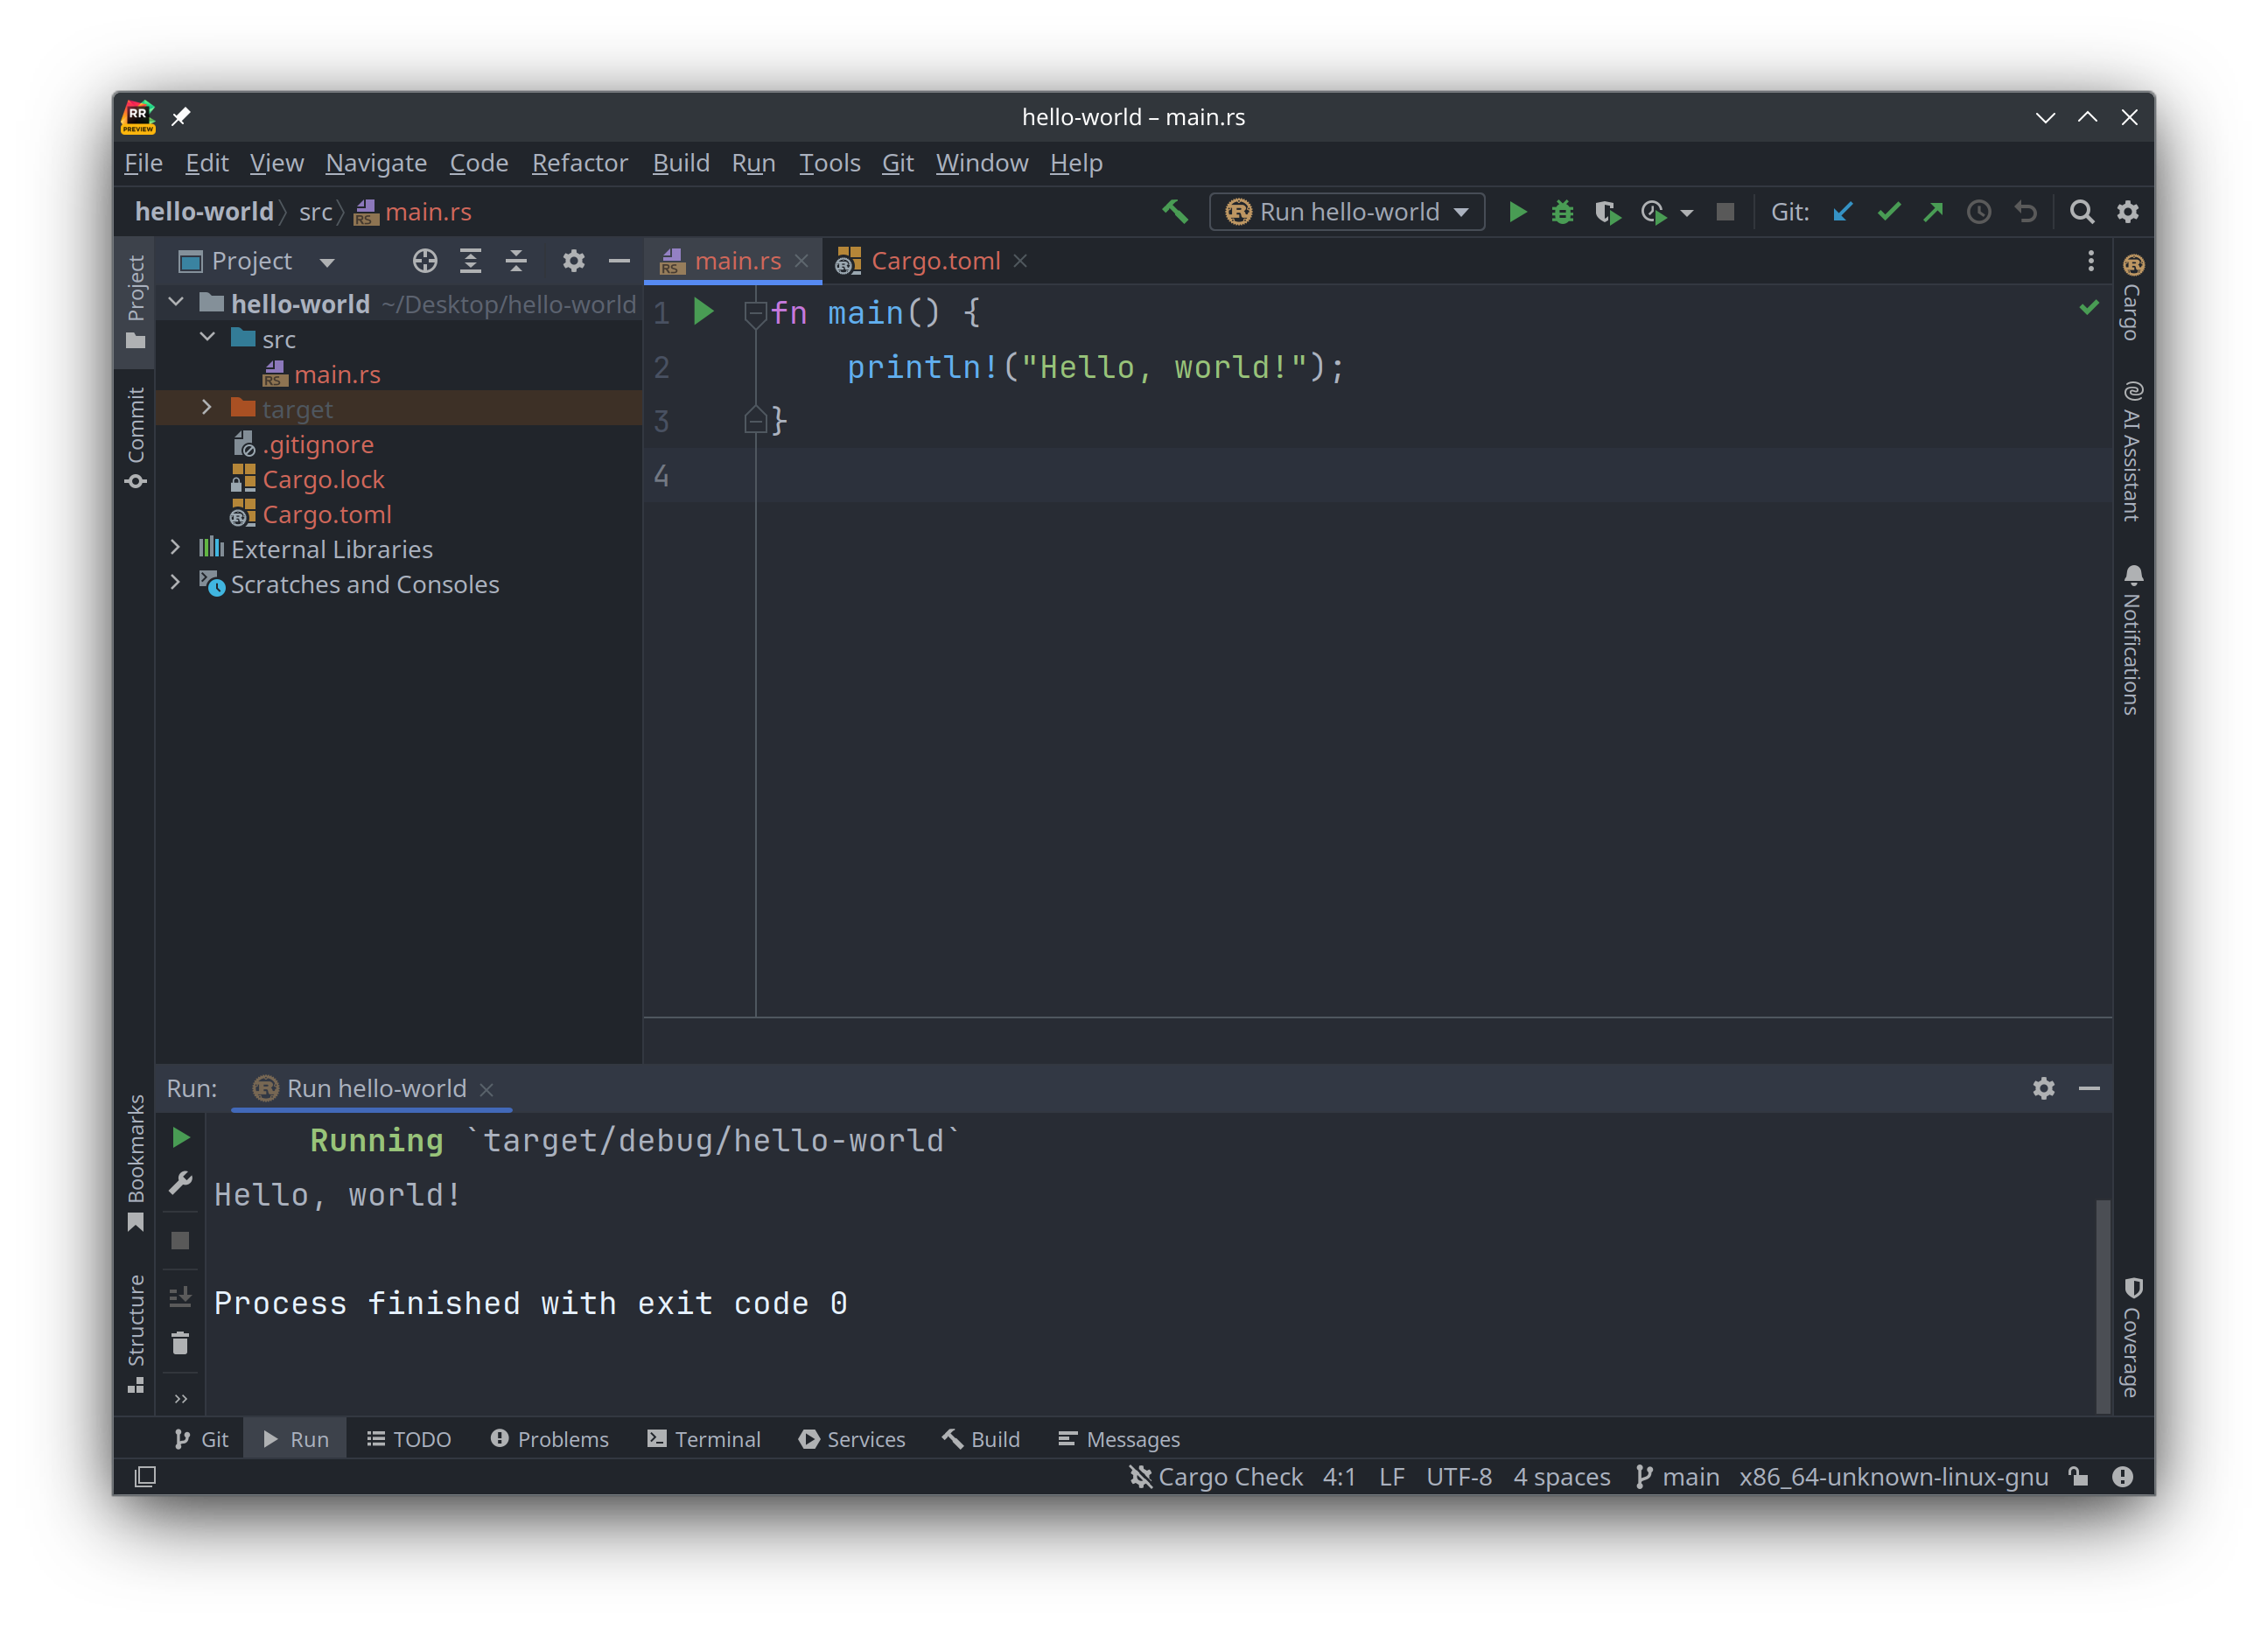
可以在源码编辑区域编写代码, 然后点击工具栏上面的那个绿色的"运行"安钮 ▶️, 就可以运行代码:
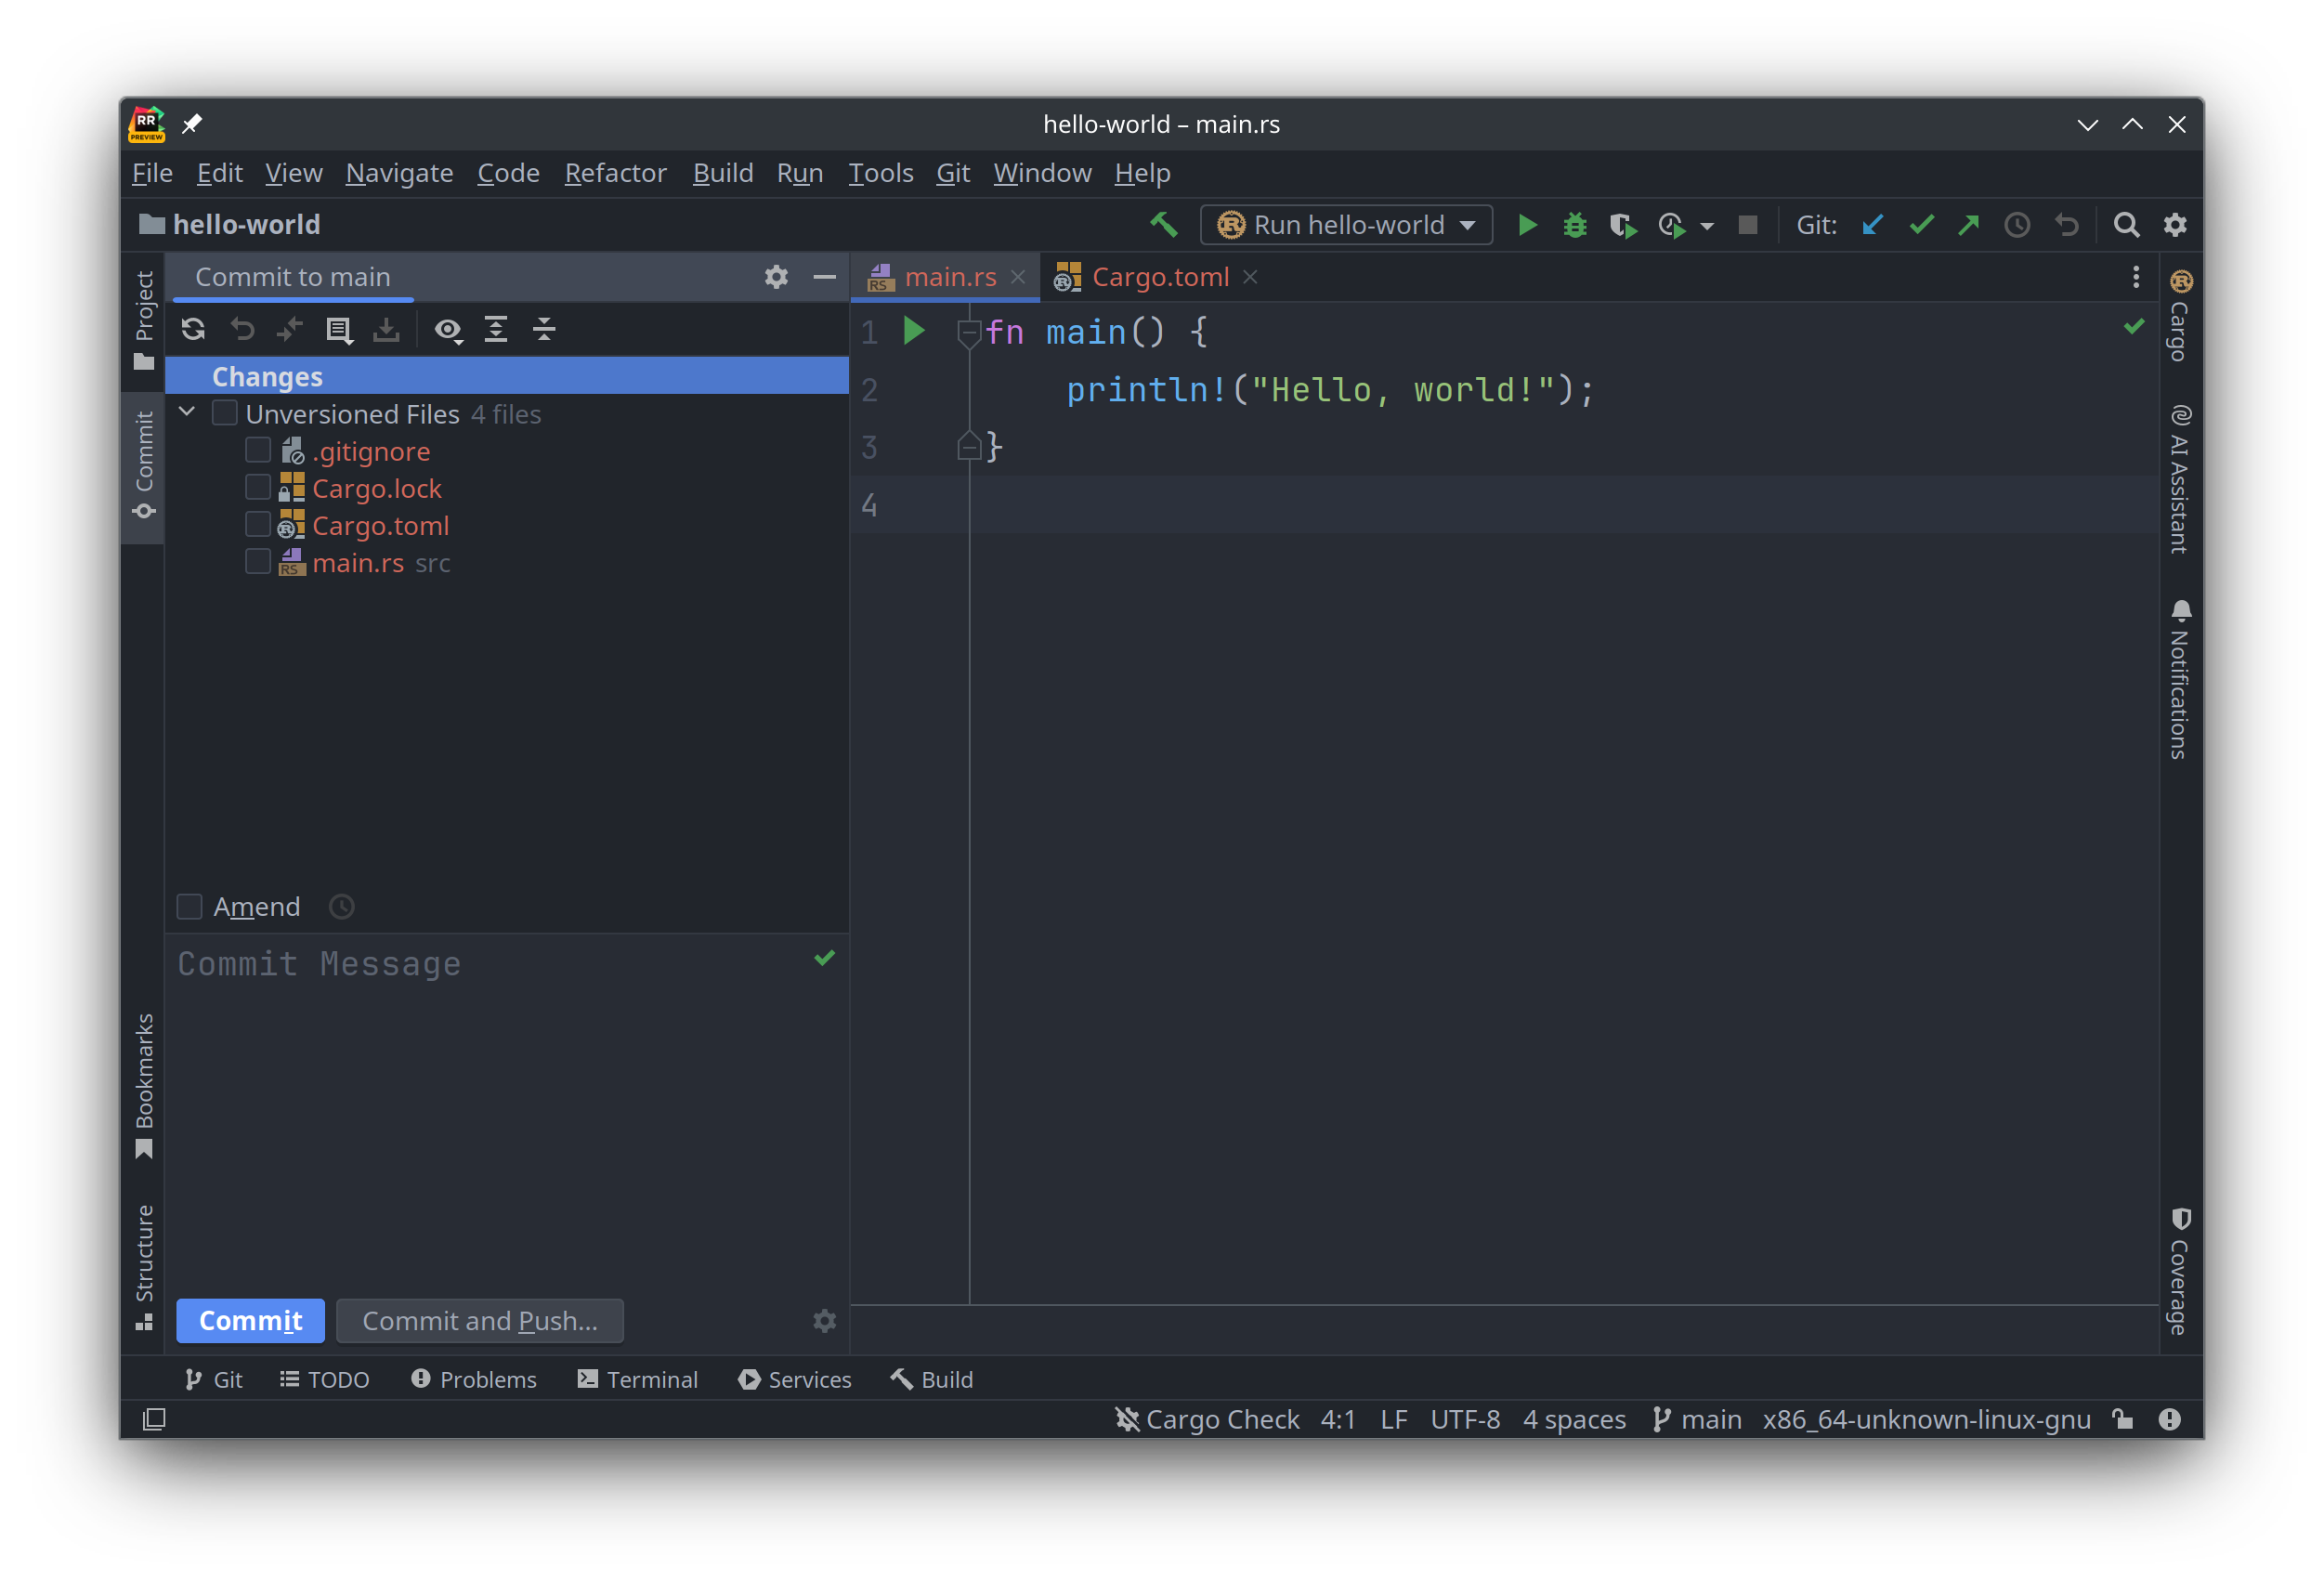
仔细观察可以发现, 在窗口左侧侧边栏里显示的源代码目录结构, 其文件名都是橘红色的. 因为它们都是新创建的, 还没有保存到 git 里, 可以在合适的时候把修改的代码提交到 git 仓库:
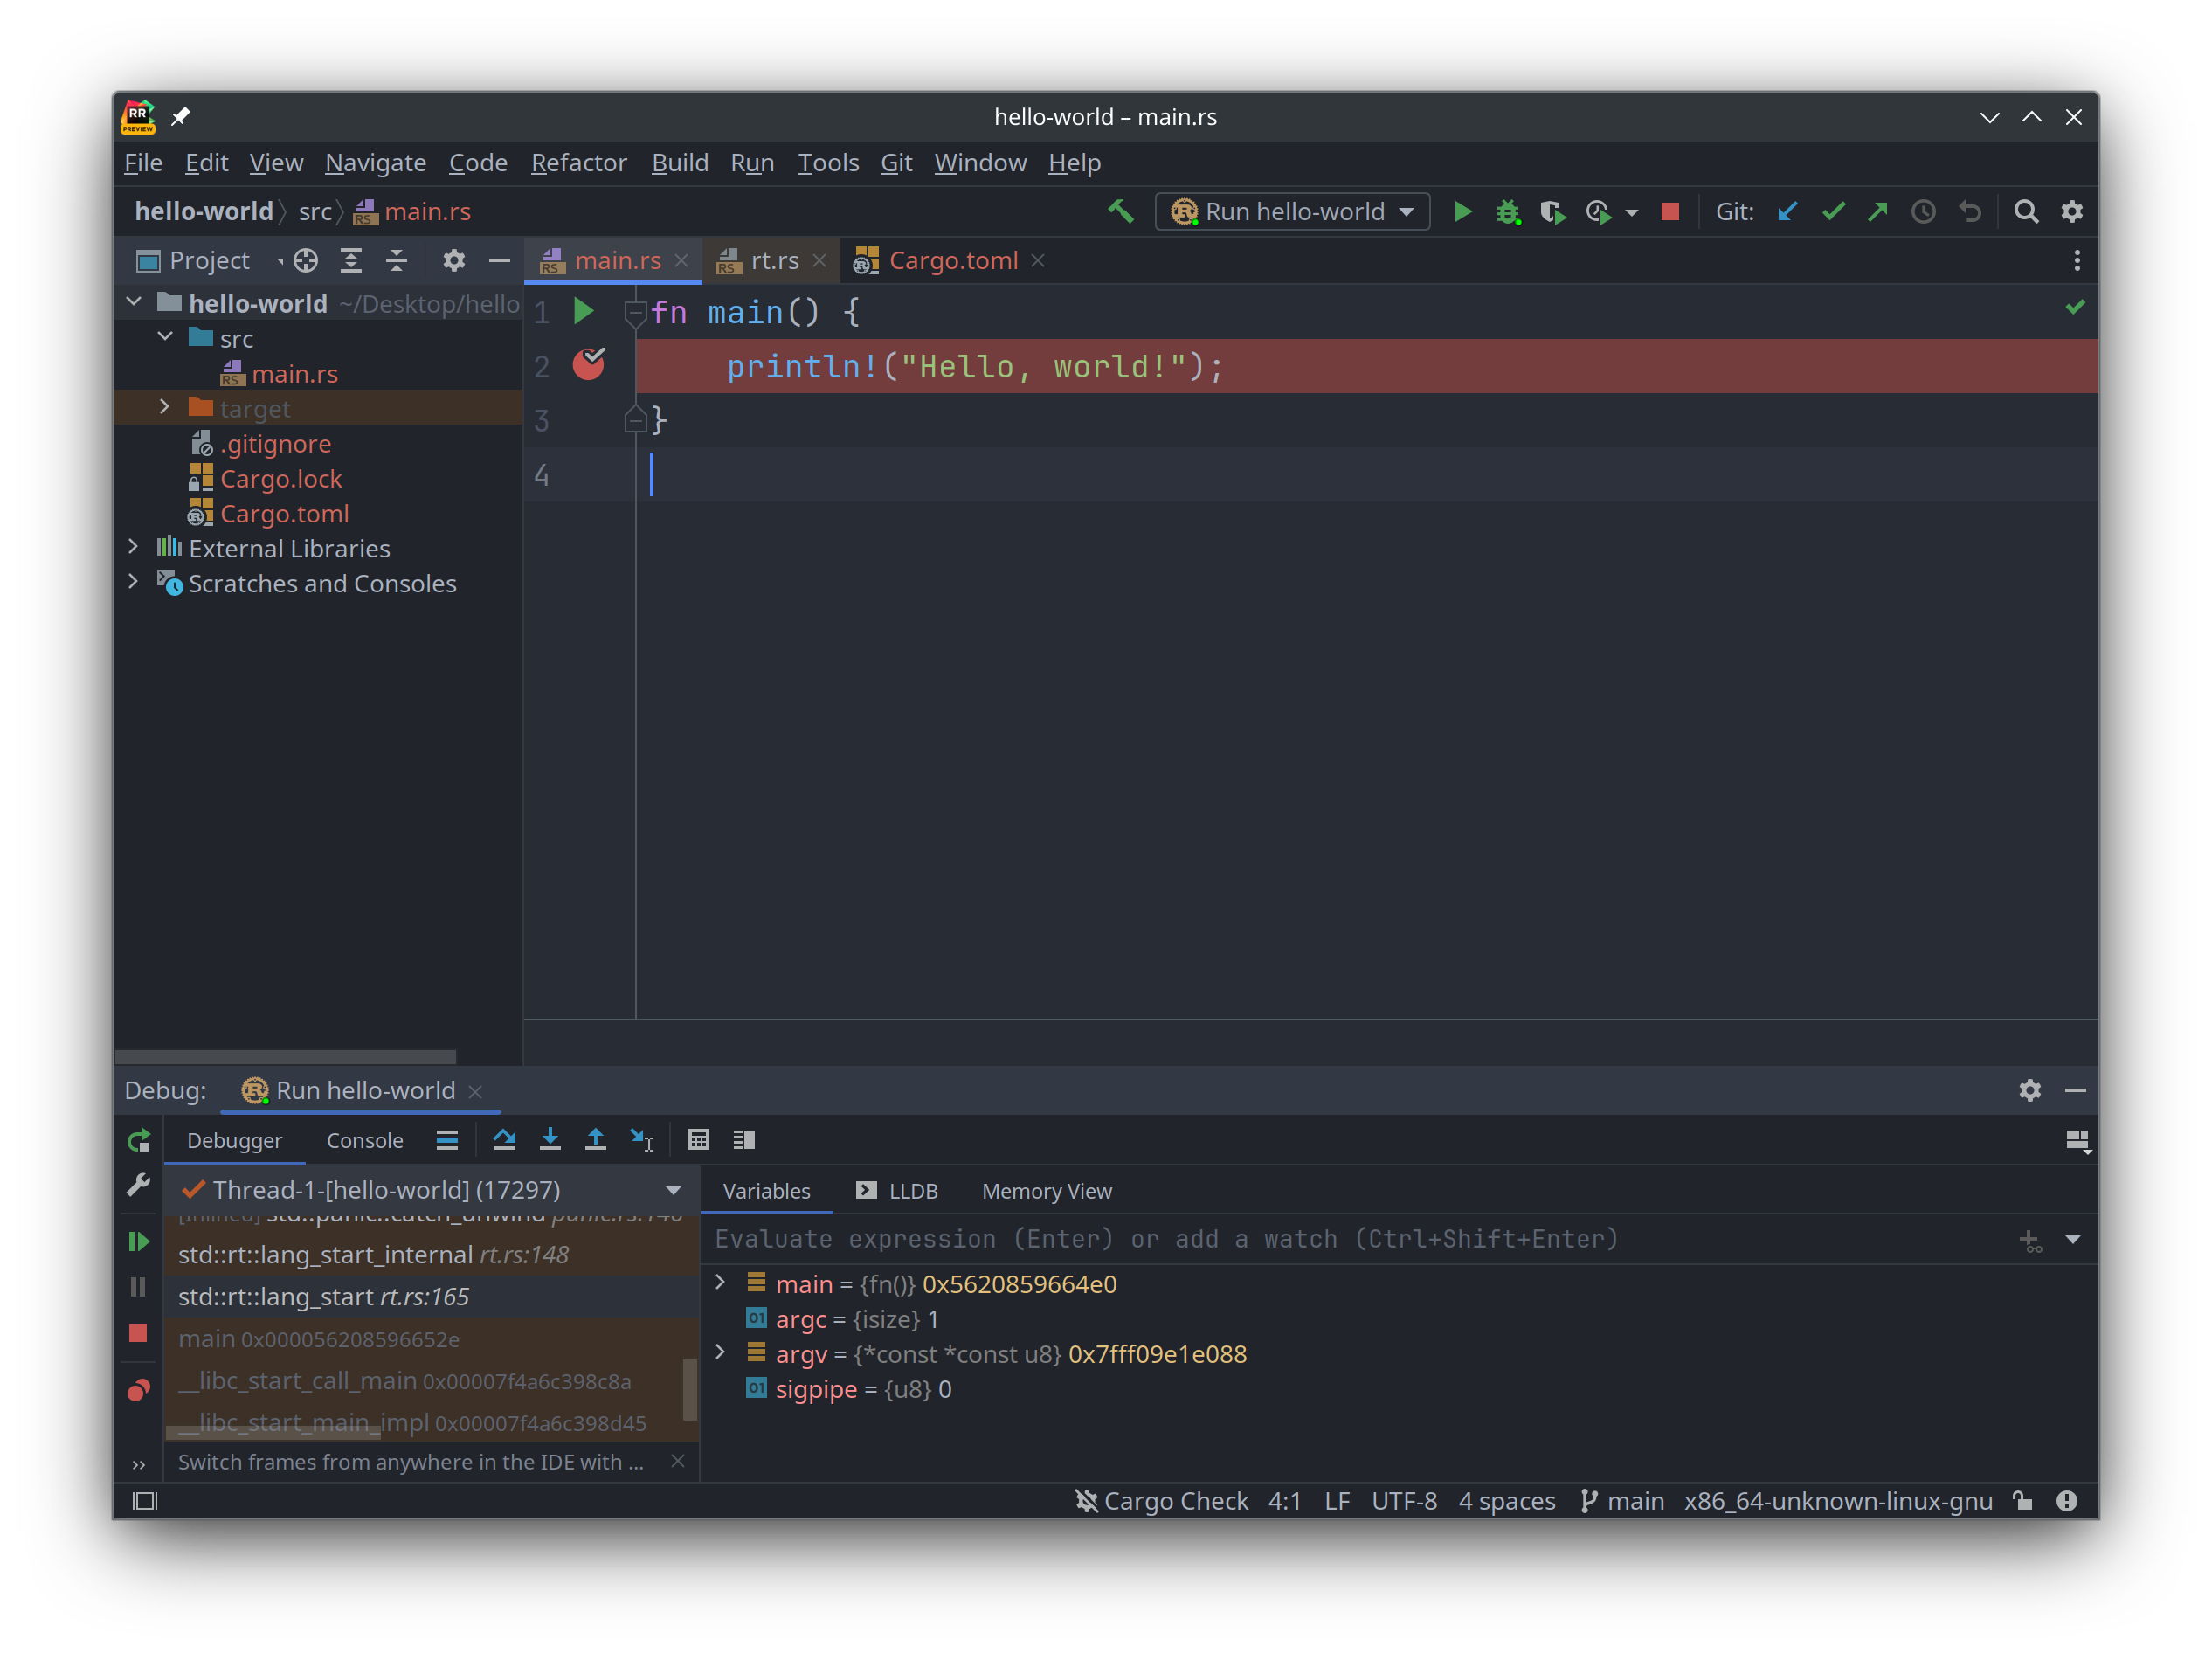
在 RustRover 里面调试代码也很方便, 首先在源代码编辑窗口的左侧, 加入一个断点 (breakpoint), 然后点击工具栏上的"以调试方式运行"的绿色按钮 🪲, 就可以打开调试模式, 在该模式下可以查看本地变量, 内存区块中的值, 以及手动执行 lldb 调试器:
VS Code
VS Code 是微软主导开发并且开源的一款跨平台的相对轻量级的文本编辑器, 但是它支持安装扩展. 安装几个扩展包后, 可以把它拼装成 Rust IDE.
访问官方网站, 下载与操作系统兼容的版本:

安装好之后, 就可以打开它了, 它的界面比较简洁. 首先给它安装扩展, 在窗口左侧栏, 切换到管理扩展的标签, 然后依次搜索并安装以下扩展包:
- Even Better TOML, 编辑 toml 文件
- rust-analyzer, Rust 语言服务器
- crates, 管理 crates 里的依赖包
- Prettier-Code Formatter, 代码格式化工具
- CodeLLDB, 支持 LLDB 调试器
安装好扩展之后, 大概是这个样子的效果:

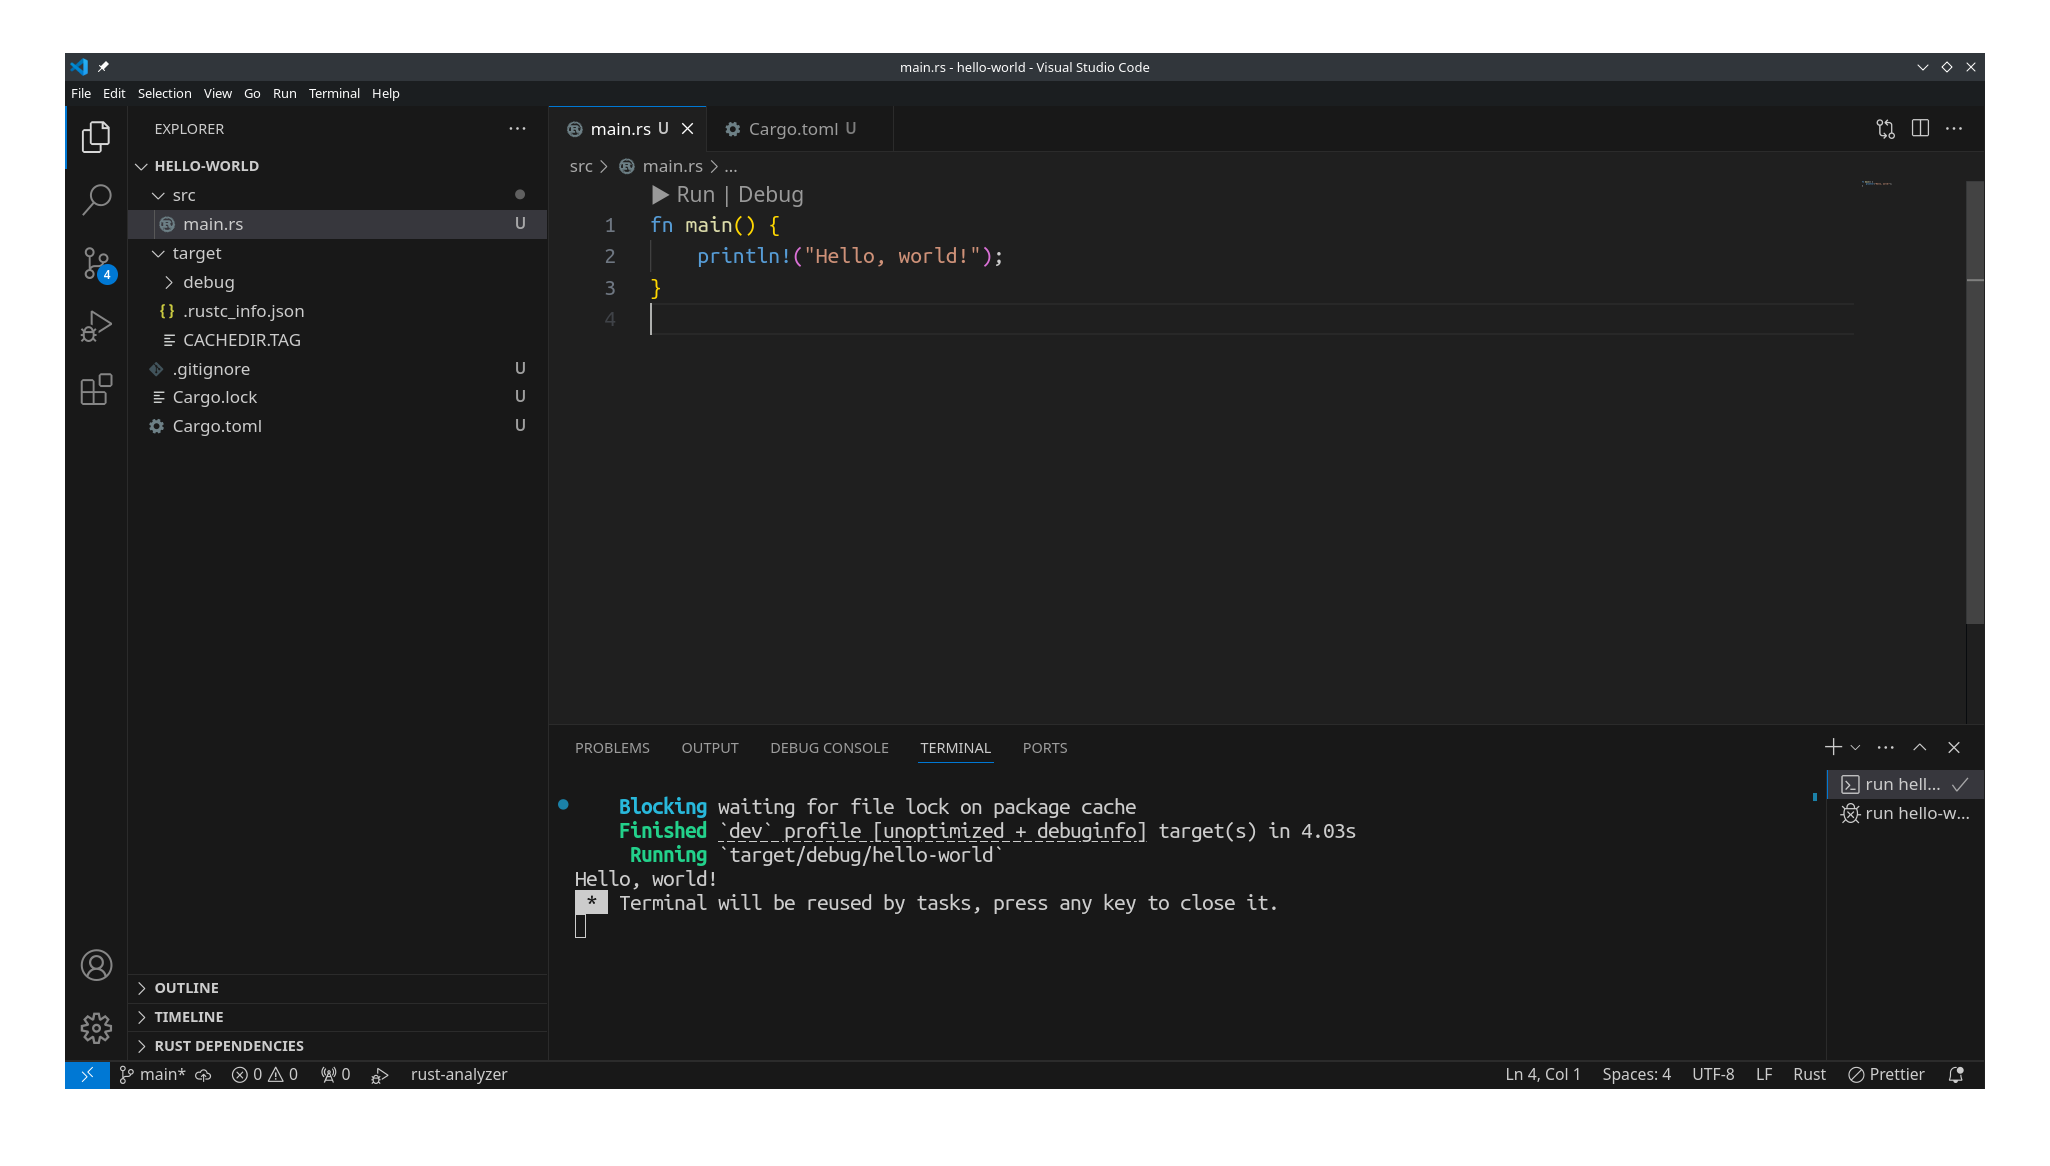
现在就可以用 VS Code 打开 hello-world 项目目录了. 打开项目后, 打开 src/main.rs 源码文件,
并点击"运行"按钮, 就可以运行程序了, 一切正常的话, 会在窗口下半部的终端标签里, 输出 "Hello, world!":
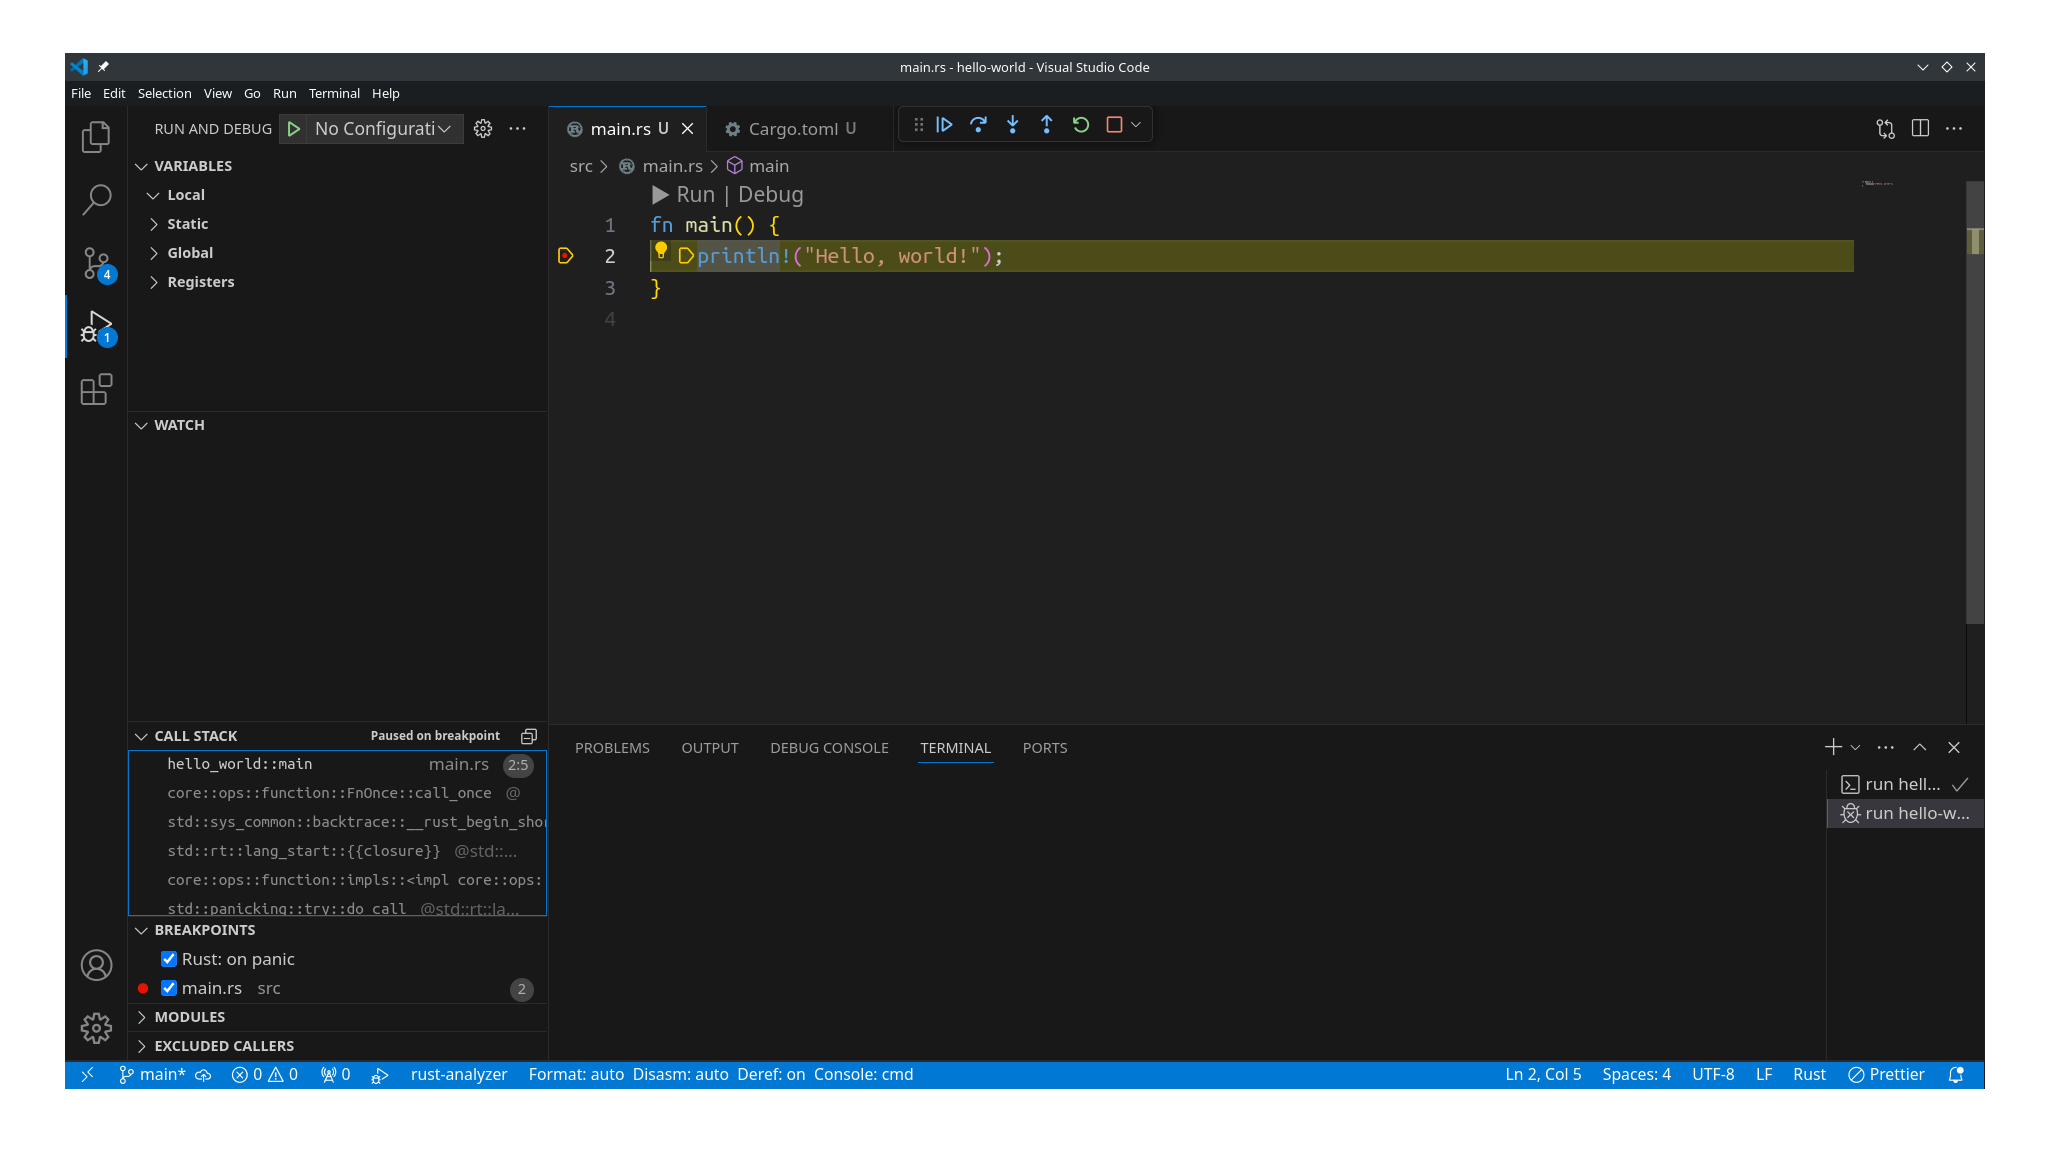
上面已经安装了 CodeLLDB, 可以用它来启动调试模式. 首先在源代码编辑窗口的左侧栏, 用鼠标点击加入一个新的断点; 再点击窗口上的"调试"按钮, 就会进入调试模式:
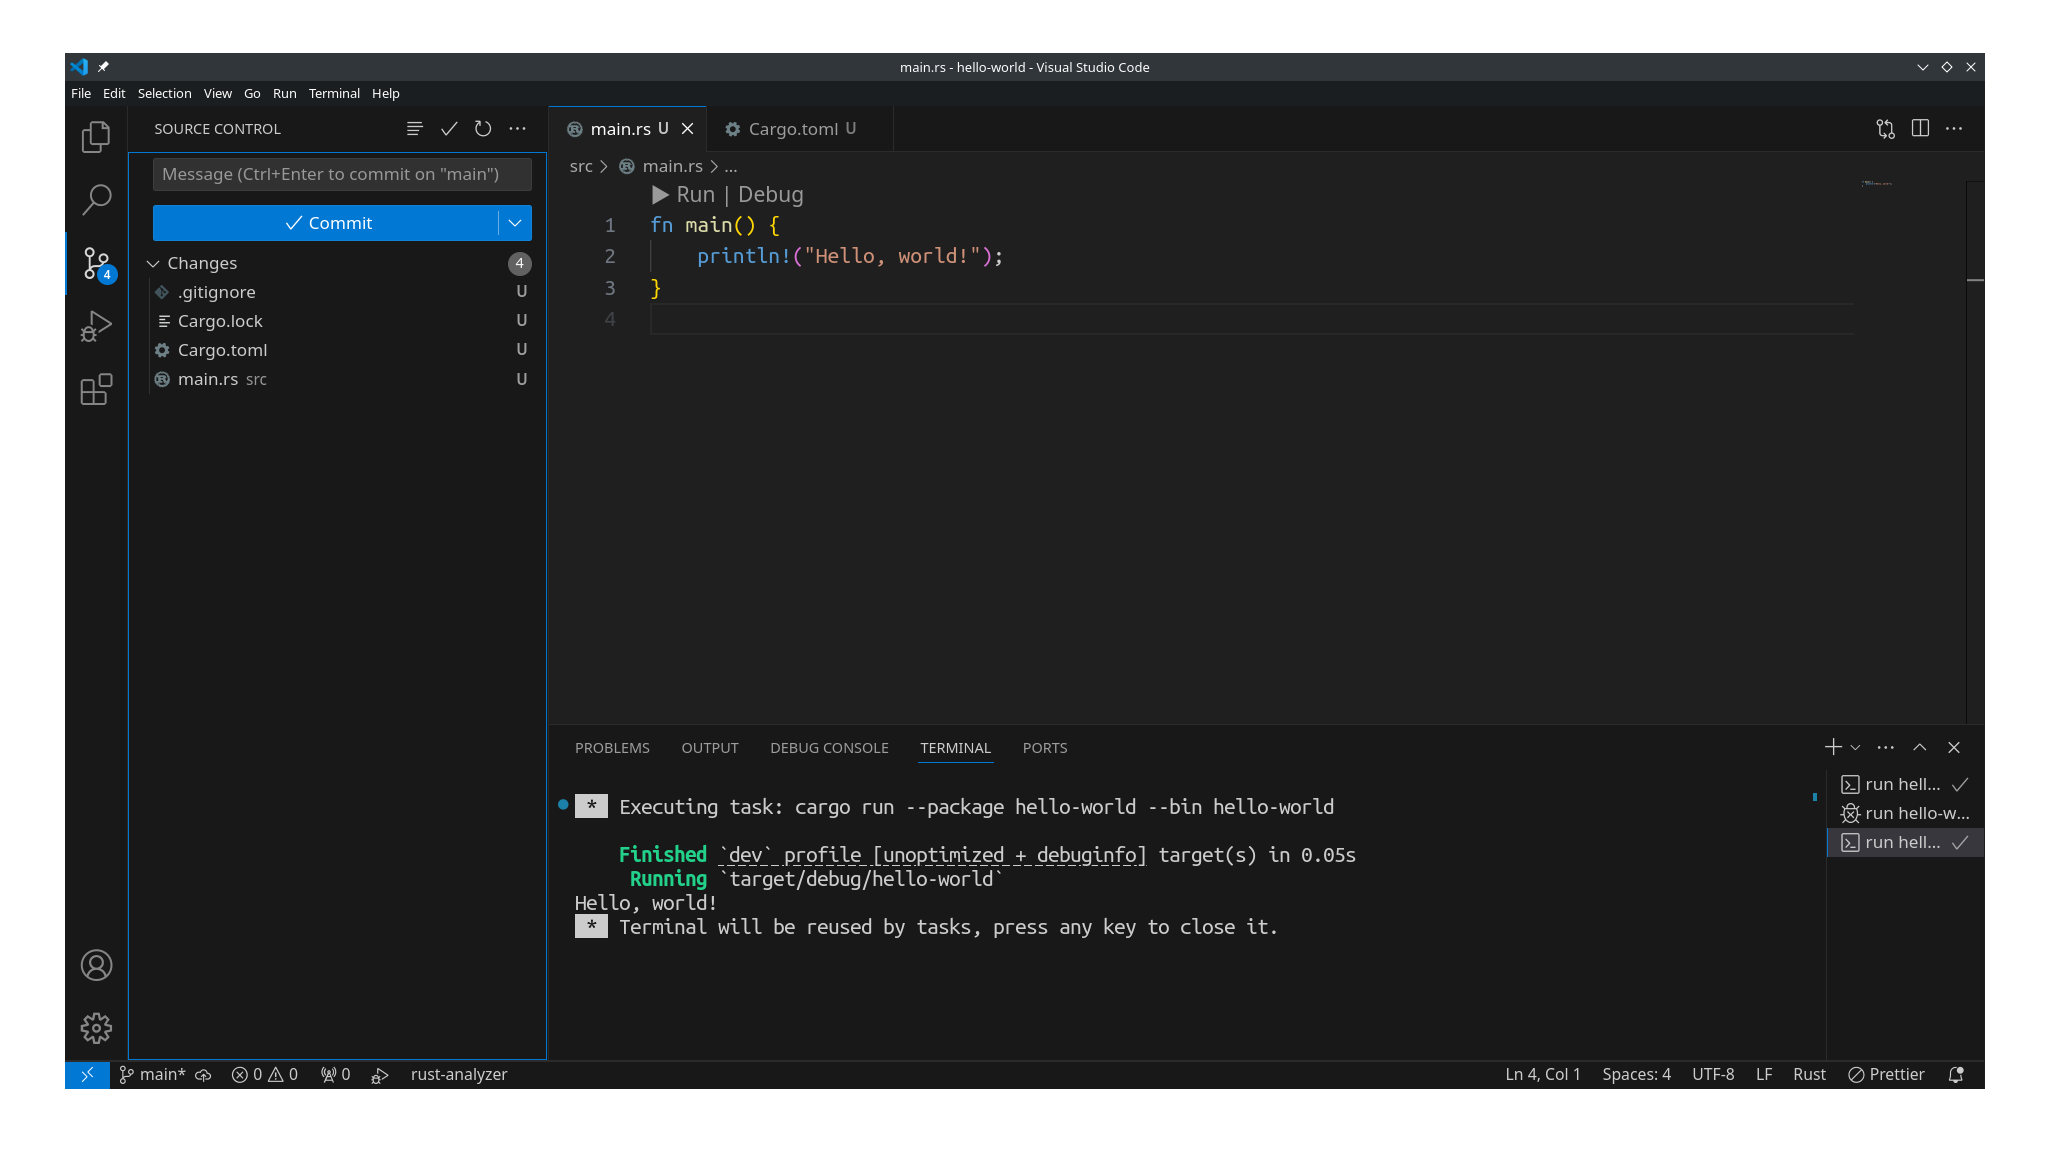
VS Code 自带了对 git 源代码托管工具的支持, 在 VS Code 窗口左侧栏, 切换到"源代码管理"标签, 它会列出来哪些 文件做了修改在等待提交:
基础数据类型 Primitives
本章介绍Rust的基础数据类型, 比如整数, 浮点数, 元组等, 后面的章节会接触到更复杂的类型, 比如Box, Vec, Atomic等, 以及结构体, 枚举, traits.
常见的编程语言都有相似的基础数据类型, 我们以 C/C++ 以及 Python 为参考对象, 列出了 Rust 与它们的相同点和不同点.
更详细的信息, 可以参考标准库的文档
本章目标:
- 了解基础数据类型有哪些, 及其常用的操作函数
- 理解这些数据类型的内存布局
- 熟练掌握切片 (slice) 的用法, 因为它在日常的编码过程中使用频率非常高
- 了解类型别名和类型转换
整数类型 Integers
Rust 支持的整数类型比较全面, 下面的表格对比了rust/python/c++的整数类型的差异:
| 有符号整数 | 无符号整数 | C++ 同类型 (有符号) | C++ 同类型 (无符号) | 占用的字节数 |
|---|---|---|---|---|
| i8 | u8 | int8_t | uint8_t | 1 |
| i16 | u16 | int16_t | uint16_t | 2 |
| i32 | u32 | int32_t | uint32_t | 4 |
| i64 | u64 | int64_t | uint64_t | 8 |
| i128 | u128 | __int128 | unsigned __int128 | 16 |
| isize | usize | ptrdiff_t | size_t | word, 4或8 |
这里的 word, 在64bit的系统里, 占用8字节; 32bit的系统里, 占用4字节. 可以看到, 除了 usize/isize 之外, 其它的整数类型都是有固定位宽/字节数的.
u8 可用于表示二进制字节数据; 而在 C++ 里, 通常使用 char, 或者 unsigned char, 比如下面的片段:
const size_t kBufLen = 4096;
char buf[kBufLen];
数值可以有一些修饰, 比如:
0x前缀表示十六进制整数,0xdeadbeef0o前缀表示八进制整数,0o40960b前缀表示二进制整数,0b0110- 可以有后缀, 用于指定数据类型,
42u32 - 将整数值赋给一个变量时, 可以同时用整数类型作为后缀,
let x = 42u64; - 对于数值的操作符, 比如
<<,&等, 跟在 C++ 中一致 - 可以用下划线分隔, 更易读,
123_456_000_i64
Rust 几乎不会进行隐式类型转换, 比如, i32 转为 i64, 都需要显式地写明:
let x = 42i32;
assert_eq!(x as i64, 42i64);
整数类型的内存布局 - 大小端
什么是大小端?
- 大端 big endian: 把数据的高字节位(MSB, most significant byte)保存在内存的低地址中; 而把低字节位(LSB, least significant byte)保存在内存的高低地址中
- 小端 little endian: 把数据的高字节位保存在内存的高低地址中; 而把低字节位保存在内存的低地址中
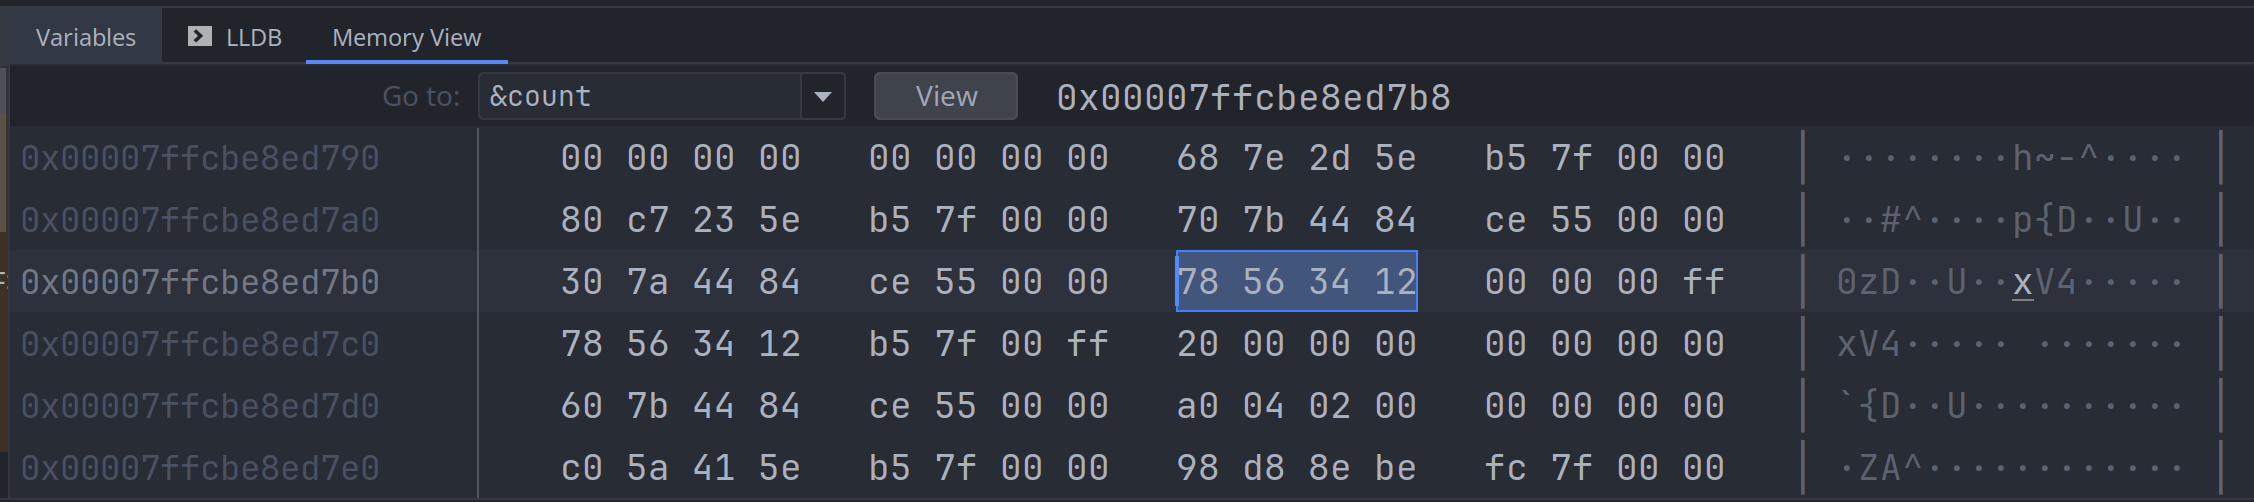
我们以 let count: i32 = 0x12345678; 为例来说明它的内存结构.
use std::mem::size_of_val;

#[allow(unused_variables)]
fn main() {
    let count: i32 = 0x12345678;
    let alpha: u8 = 0xff;

    assert_eq!(size_of_val(&count), 4);
    assert_eq!(size_of_val(&alpha), 1);
}
在常用的小端的系统里, 它的布局是这样的:

我们可以通过调试器来检查:
在不常见的大端系统里, 它是这样的:

数值运算时溢出 overflow/underflow/wrapping
先看一段C代码:
uint8_t x = 20;
uint8_t y = x * x;
这里的变量 y会得到什么值? 可以看到相乘时, x * x == 400;, 发生了
整数溢出, 即uint8_t 能表示的最大
值是 256, 而相乘会得到 400, 超出了数值范围. 此时的处理方式是 wrap around:
- 将计算结果对 2^N 取模, 只保留最低有效位
400 % 2.pow(8) == 144;, 所以这里的y == 144;
但是, C语言中的以上处理方式, 只针对无符号数值才是有效的; 如果是有符号数值出现了溢出, 那计算结果 是未知的, 这是一个未定义行为 (undefined behavior, UB).
但是针对这个问题, Rust语言提供了更加安全的处理方法. 使用同样的代码片段:
let x: u8 = 20;
#[allow(arithmetic_overflow)]
let y: u8 = x * x;
assert_eq!(y, 144u8);
Rust playground 默认是以 debug 编译模式运行的, 以上代码运行时会异常退出 (panic), 这种行为
是已知的确定的. 另外, #[allow(arithmetic_overflow)] 这行代码用于禁用rustc编译器的溢出检查,
这样才能编译这部分代码.
但是, 保存这部分代码到本地文件并命名为overflow.rs, 我们用 release 模式编译它:
rustc -O overflow.rs
生成的二进制文件 ./overflow 是可以正常运行的, 而且 y == 144;, 这个结果跟C语言一致.
除了以上的默认行为之外, Rust还提供了四组方法, 用于应对整数运算的溢出, 它们有不同的前缀:
checked_xxx(), 返回值是Option<T>, 当溢出发生时, 返回None, 比如:assert_eq!((u8::MAX - 2).checked_add(3), None)
overflowing_xxx(), 返回值是(T, bool), 当发生溢出时, 返回(wrapped-value, true), 比如:assert_eq!(u8::MAX.overflowing_add(1), (0, true))
saturating_xxx(), 返回T, 当溢出发生时, 返回该数值类型的边界值 (saturating value),u8::MAX,i8::MIN, 比如:assert_eq!(u8::MAX.overflowing_add(1), (0, true))
wrapping_xxx(), 返回T, 当溢出发生时, 返回溢出后的值(通过取模), 比如:assert_eq!(25u8.wrapping_mul(12), 44)
这里的xxx()后缀代表了不同的数值运算操作:
| 后缀 | 功能 | 示例代码 |
|---|---|---|
add | 加 | assert_eq!(100_u8.checked_add(2), Some(102)) |
sub | 减 | assert_eq!(2_u8.checked_sub(5), None) |
mul | 乘 | assert_eq!(100_u8.saturating_mul(4), 255) |
div | 除 | assert-eq!((-128i8).wrapping_div(-1), -128) |
rem | 求余 | assert_eq!(5u8.checked_rem(2), Some(1)) |
neg | 否定 | assert_eq!(2i8.overflowing_neg(), (-2, false)) |
abs | 绝对值 | assert_eq!((-10i8).overflowing_abs(), (10, false)) |
pow | 指数 | assert_eq!(3u8.overflowing_pow(5), (243, false)) |
shl | 左移 | assert_eq!(0x1u8.overflowing_shl(132), (0x10, true)) |
shr | 右移 | assert_eq!(0x10u8.checked_shr(129), None) |
常用的函数
abs(), 返回绝对值count_ones(), 计算比特值是1的数量count_zeros(), 计算比特值是0的数量max(), 返回两个值的最大值min(), 返回两个值的最小值pow(), 进行指数运算reverse_bits(), 反转比特位to_le(), 按小端(little-endian)顺序来解读该数值
一些常量值
MAX, 该整数类型能表示的最大值, 比如assert_eq!(u8::MAX, 255)MIN, 该整数类型能表示的最小值, 比如assert_eq!(i8::MIN, -128)BITS, 该整数类型的比特数, 比如assert_eq!(i32::BITS, 32)
参考
浮点类型 Floating Point Numbers
与 C/C++ 一样, Rust 支持 IEEE 754 标准中要求的单精度 (single precision) 和双精度 (double precision) 浮点数, 分别是 f32 和 f64.
| 数据类型 | 精度 | C 语言中的类型 | 占用的字节数 |
|---|---|---|---|
| f32 | 单精度 | float | 4 字节 |
| f64 | 双精度 | double | 8 字节 |
浮点数值字面量 floating pointer literals
- 使用
.分隔整数位与小数位,3.14159 - 可以加上类型后缀, 如果忽略的话, 默认是 f64,
3.14_f32,2.71828f32 - 支持科学计数法的写法
1.2e4,3.84e9
IEEE 754
IEEE 754 标准定义的浮点数, 在常见的编程语言中均有实现, 例如 c/c++/python/java/golang.
它规定了浮点数有三部分组成:
- 符号位 (Sign), 占用 1 bit, 0 代表正数, 1 代表负数
- 指数位 (Exponent), 指数部分,
- 有效位 (Mantissa), 或者称作有效位数, 或者尾数. 它是浮点数具体数值的表示
(Sign) * Mantissa * 2 ^ (Exponent)
| 类型 | 符号位 Sign | 指数位 Exponent | 有效位 Mantissa | 偏移量 Bias | 数值范围 Range |
|---|---|---|---|---|---|
| 单精度 | 1 (第31位) | 8 (30-23位) | 23 (22-0位) | 127 = 2^8-1 | -3.410^38 到 3.410^38 |
| 双精度 | 1 (第63位) | 11 (62-52 位) | 52 (51-0位) | 1023 = 2^12-1 | -1.810^308 到 1.810^108 |
总之, 32 比特的单精度浮点数的内存如下图所示:

64 比特的双精度浮点数的内存如下图所示:

特殊的浮点数值:
| 数值 | 符号位 | 指数位 | 有效位 | f32 | f64 |
|---|---|---|---|---|---|
| 0 | 0 | 0 | 0 | 0.0_f32 | 0.0_f64 |
| -0 | 1 | 0 | 0 | 0.0_f32 | 0.0_f64 |
| 无穷大 (∞) | 0 | 255 | 0 | f32::INFINITY | f64::INFINITY |
| 负无穷 (−∞) | 1 | 255 | 0 | f32::NEG_INFINITY | f64::NEG_INFINITY |
| 非浮点数 (NAN) | 0 | 255 | 非 0 | f32::NAN | f64::NAN |
浮点数常用的函数
sqrt(),cbrt(), 计算浮点数的二次方根和三次方根powi(),powf(), 进行指数运算exp(),exp2(), 分别以自然常数e和2为底做指数运算log(),log2(),ln(),log10()等, 做对数计算sin(),cos(),tan()等, 做三角函数计算round(),ceil(),floor(), 浮点数四舍五入近似计算, 转为整数is_finite(),is_infinite(),is_nan()等判断特殊整数is_sign_negative(),is_sign_positive(),signum()等处理浮点的符号位min(),max(),clamp()用于限制浮点数的取值范围
比较两个浮点数是否相等
两个浮点数之间并不能直接比较它们是否相等, 也不能直接判断一个浮点数是不是等于 0.0,
因为浮点数不是精确的数, 浮点数并没有实现 Ord trait.
total_cmp() 方法可以缓解一部分限制, 它基于 IEEE 754 中的 totalOrder 规则,
该方法常用于浮点数的排序.
use std::cmp::Ordering;

fn main() {
    let a: f64 = 0.15 + 0.15 + 0.15;
    let b: f64 = 0.1 + 0.1 + 0.25;
    println!("{a} != {b}");
    // a 和 b 并不精确相等.
    assert_ne!(a, b);
    assert_eq!(a.total_cmp(&b), Ordering::Less);
}
有时还需要比较浮点数值之间是不是近似相等:
#[must_use]
#[inline]
pub fn nearly_equal_tolerance(p1: f64, p2: f64, tolerance: f64) -> bool {
    (p1 - p2).abs() < tolerance
}

#[must_use]
#[inline]
pub fn nearly_equal(p1: f64, p2: f64) -> bool {
    nearly_equal_tolerance(p1, p2, f64::EPSILON)
}

#[must_use]
#[inline]
pub fn nearly_is_zero(p: f64) -> bool {
    nearly_equal(p, 0.0)
}

fn main() {
    let a: f64 = 0.15 + 0.15 + 0.15;
    let b: f64 = 0.1 + 0.1 + 0.25;
    println!("{a} != {b}");
    // a 和 b 并不精确相等.
    assert_ne!(a, b);
    assert!(nearly_equal(a, b));
    assert!(!nearly_equal(f64::INFINITY, f64::INFINITY));
    assert!(!nearly_equal(f64::NAN, f64::INFINITY));
}
或者使用第三方库 float_cmp.
参考
布尔类型
bool, 可以是 true 或 false, bool 占用一个字节, 即:
use std::mem::size_of;
assert_eq!(size_of::<bool>(), 1);
可以将 bool 值转换为整数, true 的值是 1, false 的值是 0. 但不能反过来将整数转为 bool 类型:
assert_eq!(true as i32, 1);
assert_eq!(false as i32, 0);
与 C++ 不同, Vec<bool> 并没有被单独优化.
bool 的内存布局
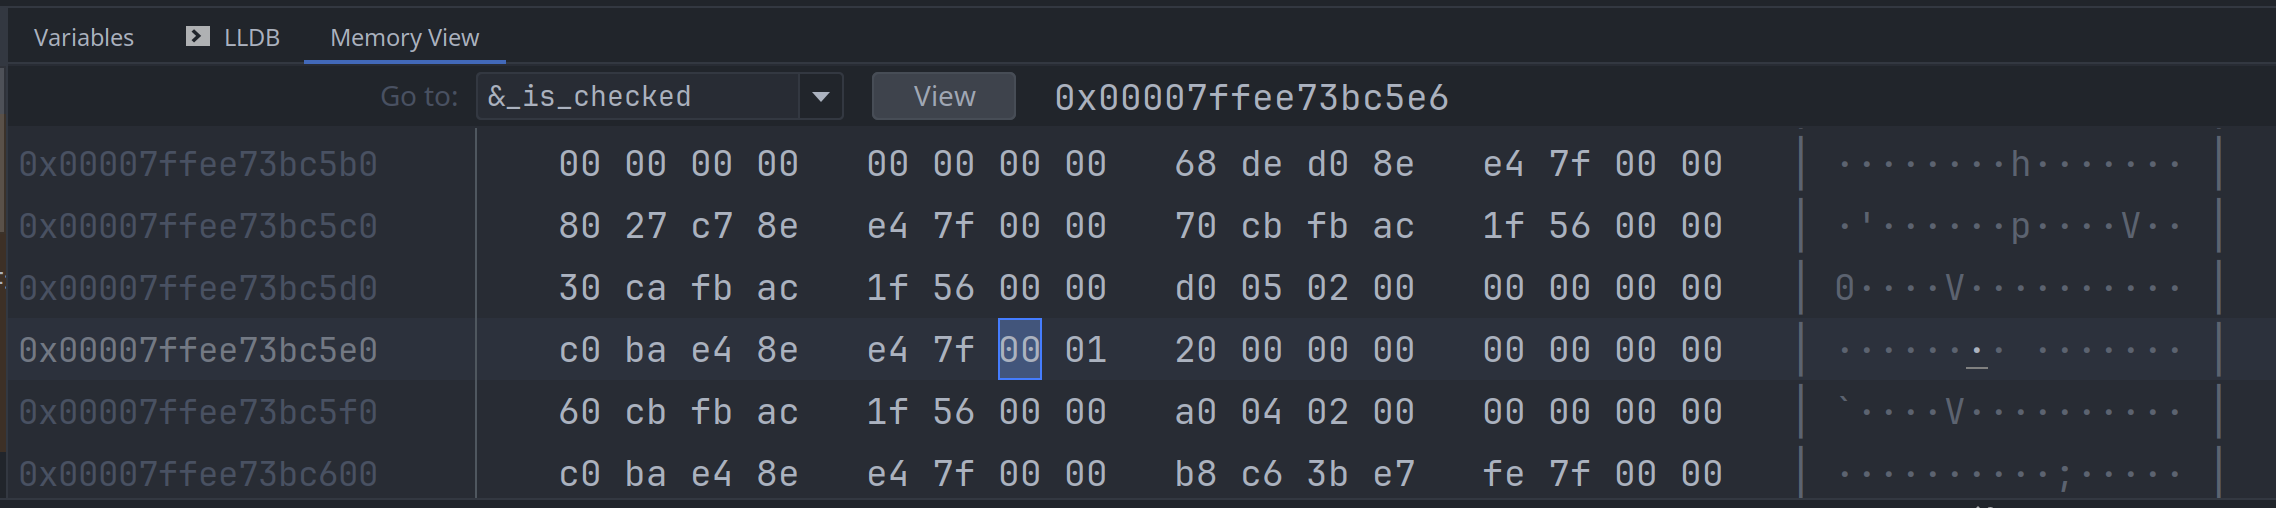
bool 占用一个字节, 在二进制层面, 它只取两个值:
0b01表示 true0b00表示 false
比如, 下面的代码:
fn main() {
  let _is_checked = false;
  let _is_hover = true;
}
我们在调试器检查, 它们的内存分别如下:
常用的函数
与 C/C++ 语言不同, Rust 为 bool 类型提供了一些好用的函数, 方便编写函数式风格的代码.
then_some(t)
如果为 true, 就返回 Some(t); 否则直接返回 None:
assert_eq!(false.then_some(0), None);
assert_eq!((1 + 1 == 2).then_some(2), Some(2));
then(f)
如果为 true, 就执行函数并返回 Some(f()); 否则直接返回 None:
assert_eq!(false.then(|| 0), None);
assert_eq!(true.then(|| 0), Some(0));
字符 char
char, 表示 Unicode 单个字符, 比如 a, 使用 32-bit 的空间, 即 4 个字节, 使用单引号引用.
use std::mem::size_of_val;
let char_a = 'a' as char;
assert_eq!(size_of_val(&char_a), 4);
一个 char 表示一个 Unicode code point, 范围是:
- 0x0000 - 0xD7FF
- 0xE000 - 0x10FFFF
只有 u8 类型可以用 as 来转换成 char.
char 的内存布局
上面提到了, char 占用4个字节. 我们可以用代码来验证它:
use std::mem::size_of_val;
#[allow(unused_variables)]
fn main() {
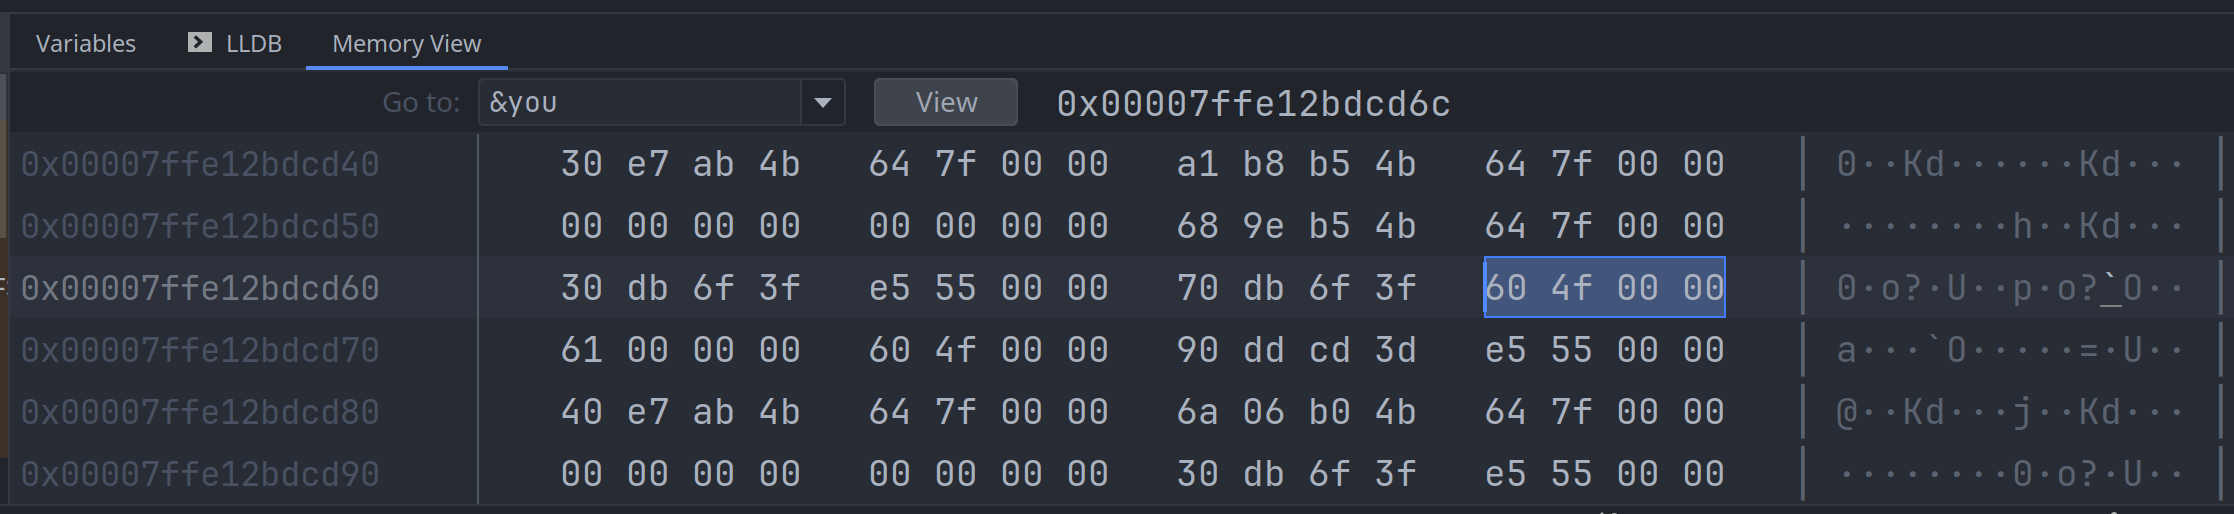
let you: char = '你';
let char_a: char = 'a';
assert_eq!(size_of_val(&you), 4);
}然后在调试器中, 分别查看两个变量的内存, 可以看到 '你' 的内存值是 0b0000 4f60:
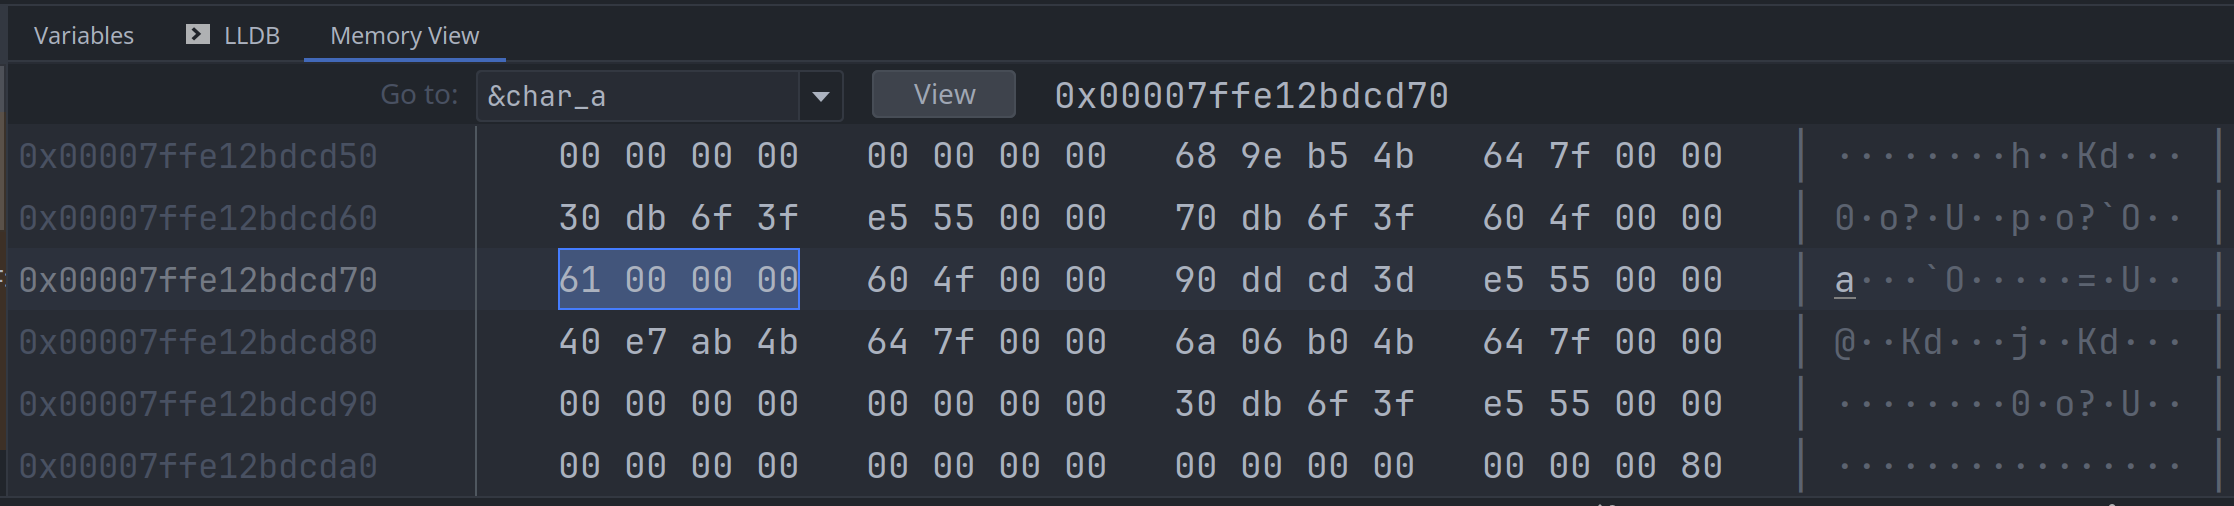
而字符'a'的内存值是 0b0000 0061:
char 的常用方法
- 大小写转换
to_lowercase()to_uppercase()to_ascii_lowercase()to_ascii_uppercase()make_ascii_lowercase()make_ascii_uppercase()
- 从
u32转成 char, 因为 char 的取值范围更小from_u32()from_u32_unchecked()
- 判断字符的范围
is_alphabetic()is_alphanumeric()is_ascii_alphabetic()is_ascii_alphabetic()is_ascii()is_control()is_ascii_control()is_digit()is_ascii_digit()is_lowercase()is_uppercase()is_ascii_lowercase()is_ascii_uppercase()is_whitespace()is_ascii_whitespace()
char 转换为整数
to_digit(self, radix: u32) -> Option<u32>, 将字符转换成 u32 类型的整数is_ascii_digit(&self) -> bool, 判断字符的范围是不是位于'0' ..= '9'
参考
数组 Array
数组 (array), 用于存在固定长度的相同数据类型的列表.
let arr: [i32; 4] = [1, 1, 2, 3];其类型声明可以写成:
pub use type Array<T, N> = [T; N];数组内存是分配在栈空间的, 内存是连续分配的, 它的类型及大小是在编译期间就确定的.
[T; N] 在编译期确定元素类型及个数, 且元素个数不可变; 另外, 数组在编译期就需要初始化.
有两种方法来创建数组:
- 可以显式地指定所有元素的值,
let arr = [1, 2, 3, 4, 5]; - 可以一次性初始化成相同的值,
let arr = [42; 100];会创建有100个元素的数组, 元素的值都是42
看下面的一个示例程序, 用于计算 10000 以内的所有质数:
// See: https://en.wikipedia.org/wiki/Sieve_of_Eratosthenes
fn main() {
    const MAX_NUM: usize = 10_000;
    const NUM_SQUARED: usize = 100;
    let mut primes: [bool; MAX_NUM] = [true; MAX_NUM];
    primes[0] = false;
    primes[1] = false;
    for i in 2..=NUM_SQUARED {
        if primes[i] {
            for j in ((i * i)..MAX_NUM).step_by(i) {
                primes[j] = false;
            }
        }
    }

    println!("primes <= {MAX_NUM}: [");
    let mut count: i32 = 0;
    for (index, is_prime) in primes.iter().enumerate() {
        if *is_prime {
            print!("{index}, ");
            count += 1;
        }
        if count == 10 {
            println!();
            count = 0;
        }
    }
    println!("]");
}
数组的内存布局
以下面的代码片段作为示例:
use std::mem::size_of_val;
use std::ptr;

fn main() {
    let local_start: i32 = 0x1234;
    let arr: [i32; 6] = [1, 1, 2, 3, 5, 8];
    let addr: *const [i32; 6] = ptr::addr_of!(arr);
    let arr_ref: &[i32] = arr.as_slice();
    let addr2: *const i32 = arr.as_ptr();
    let local_end: i32 = 0x5678;
    assert_eq!(size_of_val(&arr), 24);
    assert_eq!(addr as *const (), addr2 as *const ());
    assert_eq!(arr_ref.as_ptr(), addr2);
    assert!(local_start < local_end);
}
在调试器里查看 arr 的内存, 结果如下图:

看内存里的内容, 可以发现 arr 确实是一个存储相同元素大小 (i32) 连续内存块, 其占用的内存大小为
4 * 6 = 24 24个字节.
其它几个变量都是指针类型, 但里面的指针都指向的是 arr 的内存地址:
addr, 直接调用addr_of!()宏, 返回对象的内存地址, 它不需要创建临时对象arr_ref, 是一个胖指针 (fat pointer), 是一个切片引用&[T], 除了包含 buffer 地址之外, 还存储了切片中元素的个数, 为6个addr2, 通过调用slice::as_ptr()方法, 创建一个切片临时对象, 并返回切片的 buffer 地址
把上面的内存块经过抽像处理后, 可以得到各变量的内存布局图:

另外, arr 直接存储在栈内存. 所以数组占用的空间不能太大, 否则会出现 stack overflow 问题,
linux 平台线程的栈内存默认只有 8MB 的空间:
fn main() {
    const ARR_LEN: usize = 1_000_000_000;
    let arr = [0i32; ARR_LEN];
    println!("arr length: {}", arr.len());
}
这个程序会运行失败, 输出如下错误:
thread 'main' has overflowed its stack
fatal runtime error: stack overflow
Aborted (core dumped)
数组的常用方法
数组的操作方法, 比如 arr.len(), 都是隐式地将它先转换成相应的 切片 slice, 再调用切片提供的方法.
as_slice(),as_mut_slice(), 显式地转换成切片 ([T]), 这样就可以调用切片的方法each_ref(),each_mut(), 转换成新的数组, 新数组中每个元素的值是对当前数组中同一个位置元素的引用
fn main() {
    let mut distro_list: [String; 3] = [
        "Debian".to_owned(),
        "Ubuntu".to_owned(),
        "Fedora".to_owned(),
    ];

    let distro_ref: [&mut String; 3] = distro_list.each_mut();
    for entry in distro_ref {
        entry.push_str(" Linux");
    }

    println!("distro list: {distro_list:?}");
}
参考
元组 Tuple
元组 tuple, 比如 (1, 'a', 3.14, true), 用于存放定长的不同数据类型.
元组与数组 (array) 的比较:
- 可以组合各种不同类型的数据, 而数组只能存放相同类型的数据
- 与数组一样, 编译期即可确定其元素个数
- 与数组一样, 使用下标访问元素, 而不是像 struct 那样使用元素名来访问
- 常使用它做为函数返回值, 这样函数就可以返回多个不同类型的值
默认可以使用下标访问元组中的元素:
let tuple = (1, 'a', 3.14, true);
assert_eq!(tuple.0, 1);
assert_eq!(tuple.1, 'a');
assert!(tuple.3);
但下标的语法可读性并不好, 可以使用模式匹配的方式.
比如 fn split_once(&self, delimiter: Pattern) -> Option<(&str, &str)>; 用来分隔字符串:
let entry = "key=42";
if let Some((key, value_str)) = entry.split_once('=') {
  assert_eq!(key, "key");
  let value: i32 = value_str.parse().unwrap();
  assert_eq!(value, 42);
}
Rust 允许在使用逗号的地方, 在最后一个元素尾部多加一个逗号以方使书写. 比如:
fn foo(a: i32, b:i32,);(48, 42,)enum Colors { Red, Green, Blue, }
空的元组 Unit type
空的元组不包含任何元素, 写成 (), 也称为 unit type, 有点类似于C中的 void.
比如, 一个函数如果没有任何返回值, 那它返回的就是 unit type, 它的返回值类型可以省去.
fn main() {
  println!("hello, world");
}
就相当于:
fn main() -> () {
  println!("hello, world");
}
tuple 的内存布局
先看下面的示例代码:
use std::mem::size_of_val;
#[allow(clippy::approx_constant)]
fn main() {
let tuple: (i32, f64, bool, char) = (1, 3.14, true, 'a');
assert_eq!(size_of_val(&tuple), 24);
assert_eq!(size_of_val(&tuple.0), 4);
assert_eq!(size_of_val(&tuple.1), 8);
assert_eq!(size_of_val(&tuple.2), 1);
assert_eq!(size_of_val(&tuple.3), 4);
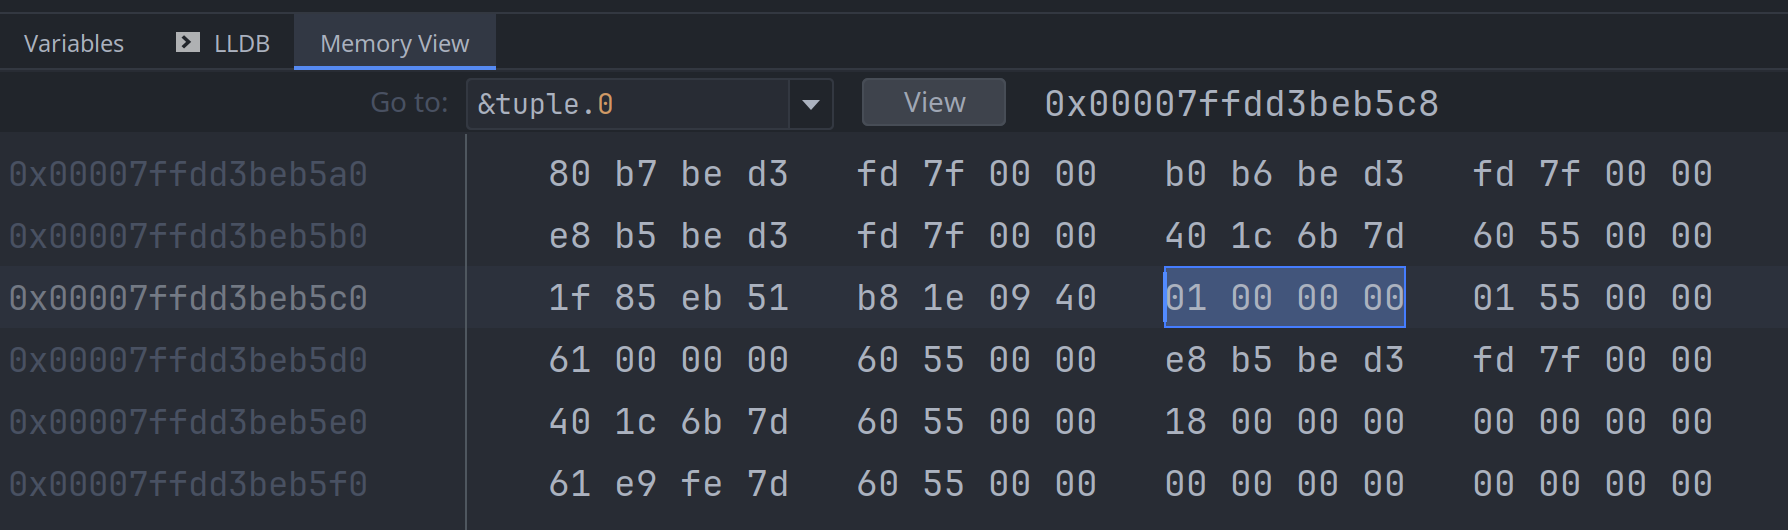
}整个元组的内存布局情况如下图所示, 一共占用了24个字节:
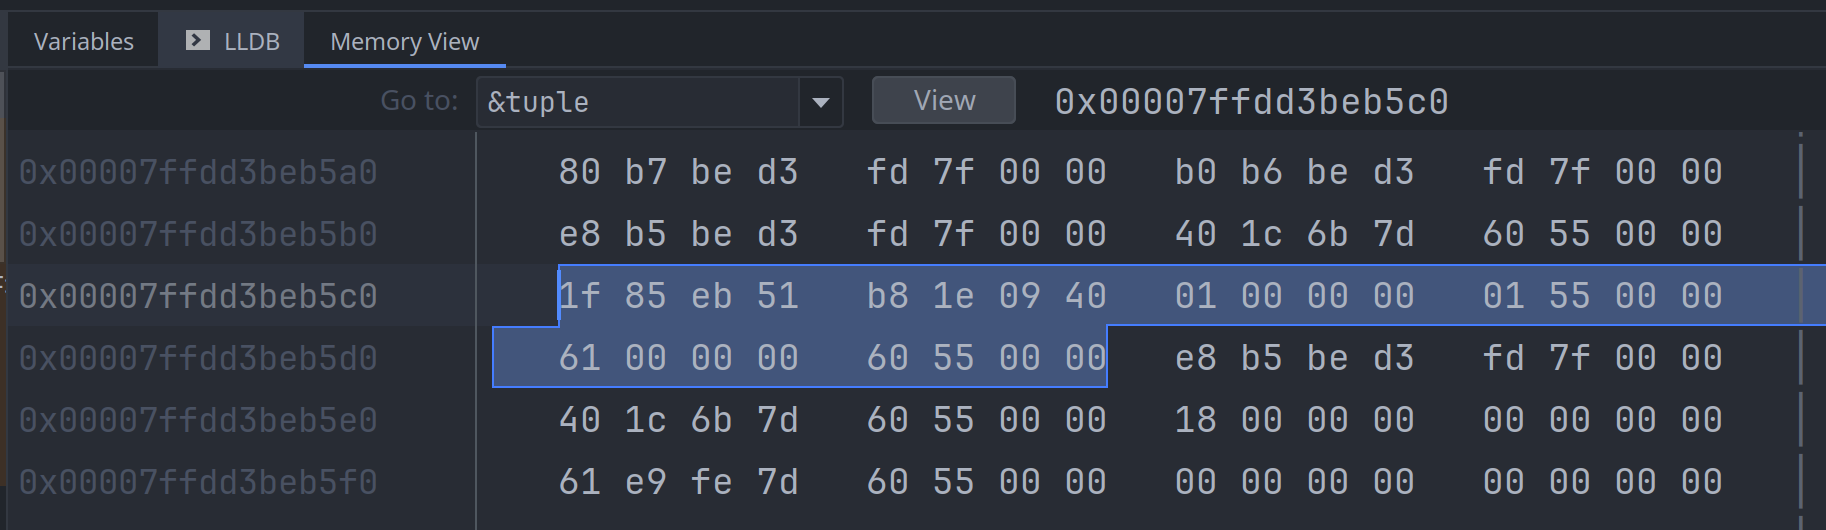
先查询第一个元素, tuple.0 是一个整数, 占4个字节:
接下来查询第二个元素, tuple.1 是一个双精度浮点值, 占用8个字节:
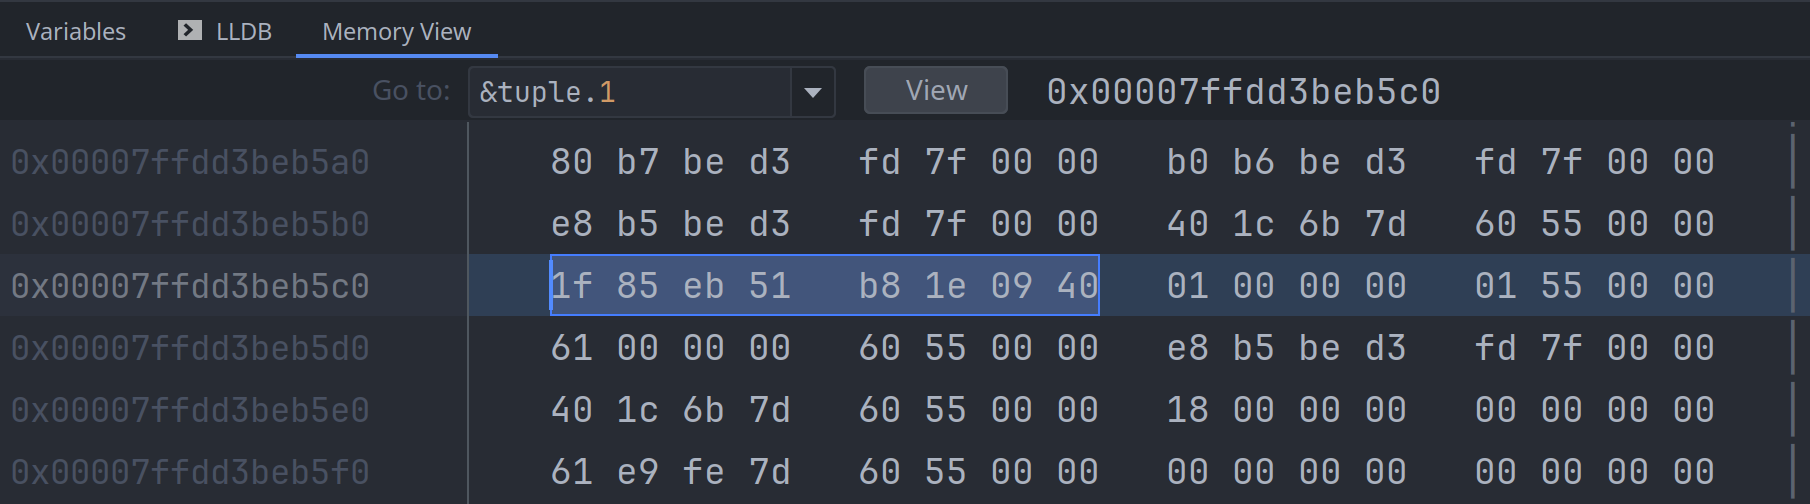
可以看到 tuple.0 和 tuple.1 在内存中的顺序与在代码声明里的顺序是相反的, 这个是 rustc 编译器
自行处理的, 这是与C/C++编译器不一样的地方, rustc 不保证元素在内存中的实际顺序与其声明顺序一致.
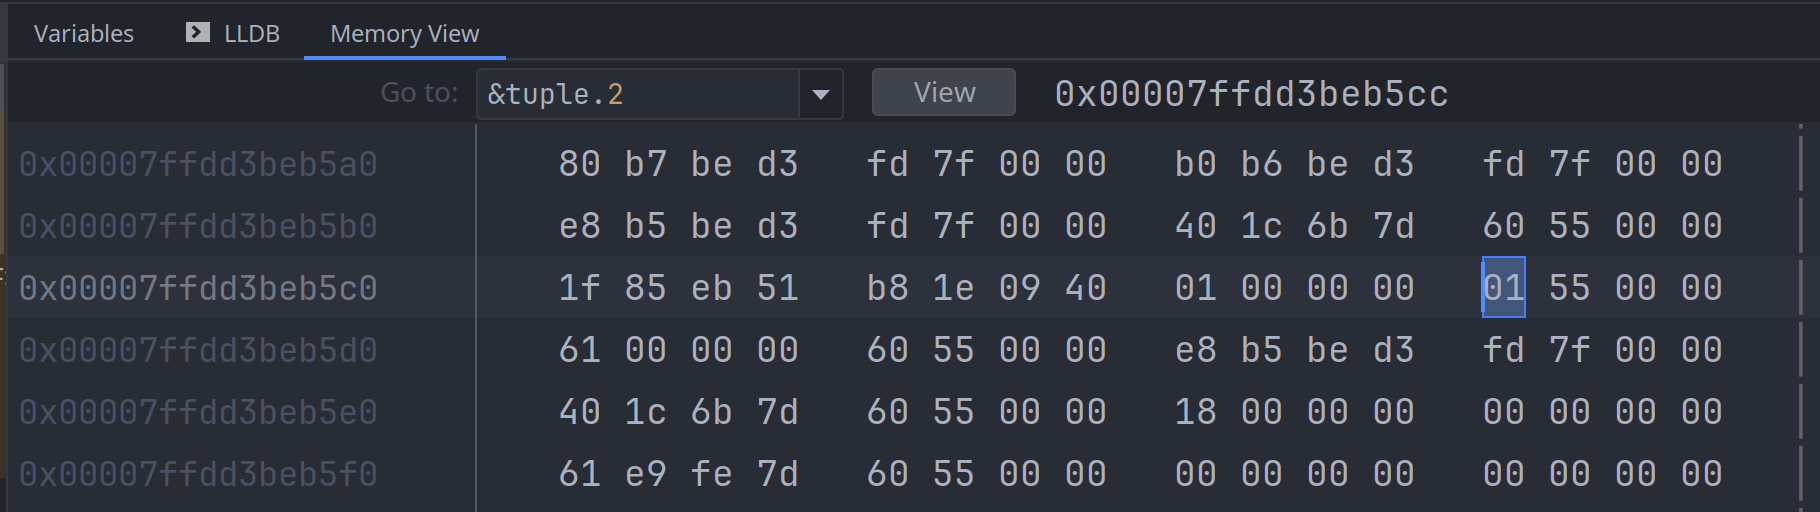
再来看第三个元素, tuple.2, 是一个布尔值, 它本身只占1个字节:
最后一个元素, tuple.3, 是一个字符, 占用4个字节:
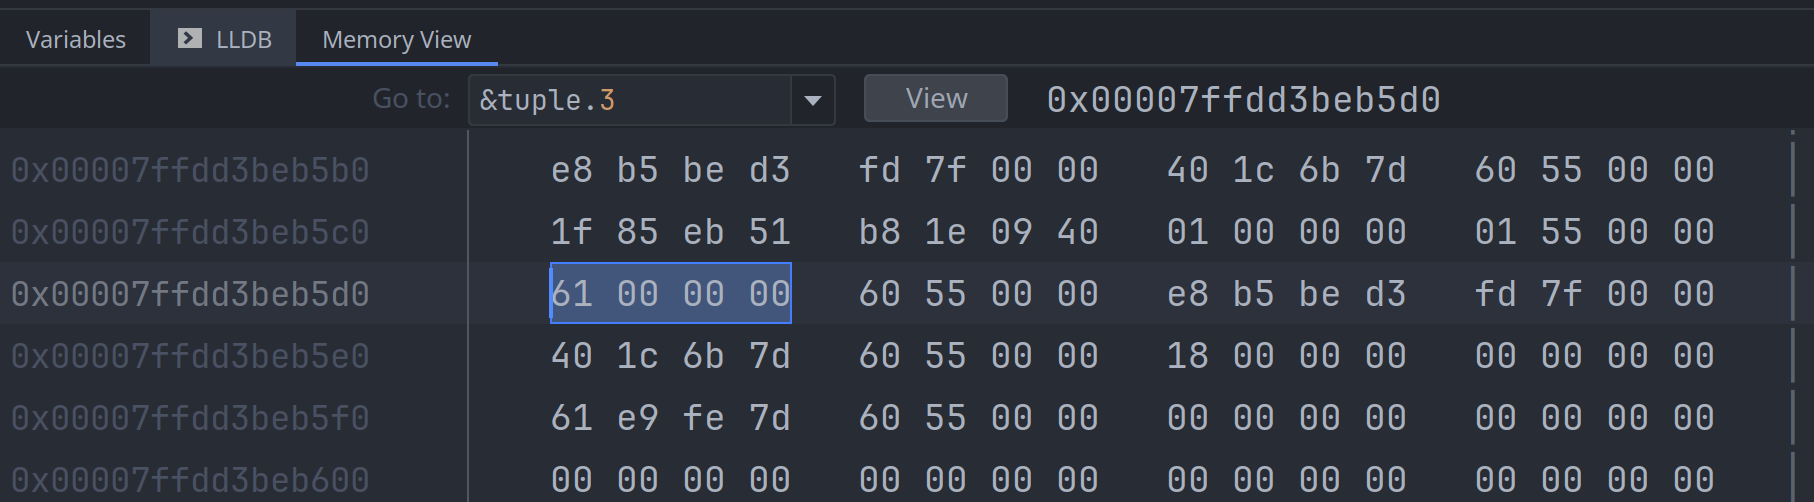
上面例子中, 元组里每个元素占用的字节数加起来是 4 + 8 + 1 + 4 = 17 17个字节; 但整个元组为什么
占用了24个字节呢? 这个与内存对齐 (memory alignment) 有关系:
- 尽管
tuple.2是bool类型, 但它占了4个字节, 其中的3个字节用作填充 (padding) tuple.3是char类型, 它本身只需要4个字节, 但它后面又多出了4个字节, 后面的4个字节也被用作填充

切片 slice
切片 slice, 可以认为是对连续存储元素的访问代理 (比如 [T; N] 或者 Vec<T>), 本身并不存储实际的数据,
即它只是对原有数据的引用, 并不拥有所有权.
它是一种动态大小的类型(dynamic sized type, DST), 即在编译期不能确定所占用的内存大小. 它的类型是: [T].
切片写作 [T], 只指定了元素类型, 并没有指定其长度; 所以它不能直接存储为变量或作为函数参数, 而应该以引用的方式来使用,
否则会遇到类似 "doesn't have a size known at compile-time" 的报错.
常用的切片引用形式有以下三种:
&[T], 共享引用的切片(shared slice), 通常我们所说的切片就是这种, 它表示不可变切片, 一个值可以有多个不可变切片, 因为它们都是只读的&mut [T], 可变引用切片, 可以改变切片中元素的值, 它表示可变切片, 即可修改元素的值. 一个值只能最多有一个可变切片Box<[T]>, boxed slice, 后面的章节会有详细的介绍
引用切片, 属于一种胖指针 (fat pointer), 有两部分组成:
- 指向具体数据的一个指针
- 可以访问的元素数目, 类型是 usize
可以将数组通过引用的方式自动转为切片引用:
let xs = [42u64; 10];
let s = &xs;
也可以指定数据代理访问的范围, 即只允许访问其部分元素:
let xs = [42; 10];
let s = &xs[1..5];
数组 array 可以直接转换成数组切片:
fn do_something(slice: &[i32]) { }

let xs = [1, 1, 2, 3, 5];
do_something(&xs);
也可以只将数组中的一部分元素转为切片:
fn do_something(slice: &[i32]) { }

let xs = [1, 1, 2, 3, 5];
do_something(&xs[1..3]);
动态数组(vector) 也可以转换成切片:
let nums: Vec<i32> = vec![1, 1, 2, 3, 5, 8];
let part: &[i32] = &vec[1..3];
assert_eq!(part, &[1, 2]);
在下一节还会介绍字符串切片(string slice).
切片的内存布局
以下面的代码片段为例, 来演示引用切片的内存布局.
fn main() {
    let nums: Vec<i32> = vec![1, 1, 2, 3, 5, 8];
    let part: &[i32] = &nums[1..3];
    println!("part: {part:?}");
    assert_eq!(part, &[1, 2]);
}
上文已经提到了, 引用切片 &[T] 是一个胖指针, 包含两个部分:
- 指向 buffer 的指针
- 连续存储的元素个数

切片常用方法
切片本身提供了很丰富的函数, 操作数组(array), 动态数组(vector)以及字符串时, 会非常频繁地使用这些接口.
is_empty(), len()
这两个函数都会访问切片的 length 属性, 使用方法也很简单. 但有一点要注意的, 这两个函数都是常量函数.
pub const fn len(&self) -> usize;
pub const fn is_empty(&self) -> bool;
as_ptr(), as_mut_ptr()
这两个函数将引用切片转换成原始指针, 原始指针指向的内存地址就是切片的 buffer ptr 属性指向的地址,
它们返回的指针类型分别是 *const T 和 *mut T.
fn main() {
    let nums = &mut [1_i32, 2, 3];
    let nums_ptr = nums.as_mut_ptr();
    unsafe {
        for i in 0..nums.len() {
            // num = num ^ 2;
            *nums_ptr.add(i) = (*nums_ptr.add(i)).pow(2);
        }
    }
    assert_eq!(nums, &[1, 4, 9]);
}
iter(), iter_mut()
这一组函数获取切片的迭代器, 它们经常被使用, 分别返回不可变更迭代器 (immutable iterator) 和可变更迭代器.
pub fn iter(&self) -> Iter<'_, T>;
pub fn iter_mut(&mut self) -> IterMut<'_, T>;
上面 as_mut_ptr() 的示例代码, 可以用迭代器来重写:
fn main() {
    let nums = &mut [1_i32, 2, 3];
    for num in nums.iter_mut() {
        *num = (*num).pow(2);
    }
    assert_eq!(nums, &[1, 4, 9]);
}
contains(), starts_with(), ends_with()
这一组函数用于检查切片中是否包含某个或某些元素:
pub fn contains(&self, x: &T) -> bool where T: PartialEq;
pub fn ends_with(&self, needle: &[T]) -> bool where T: PartialEq;
pub fn starts_with(&self, needle: &[T]) -> bool where T: PartialEq;contains(), 遍历切片, 依次检查元素是否与给定的值相等, 时间复杂度是O(n)starts_with(), 检查切片是否以某个子切片开始, 用于判断前缀ends_with(), 检查切片是否以某个子切片结尾, 用于判断后缀
看下面的示例代码:
fn main() {
    let s = [1, 1, 2, 3, 5, 8, 13];
    assert!(s.starts_with(&[1, 1]));
    assert!(s.ends_with(&[13]));
    assert!(s.contains(&5));
}
操作过程如下图所示:

get(), get_mut(), first(), first_mut(), last(), last_mut()
这一组方法用于获取切片中某个索引位置的元素, 它们都会返回 Option<T> 值, 因为不确定索引是否有效.
pub fn get<I>(&self, index: I) -> Option<&<I as SliceIndex<[T]>>::Output>
  where I: SliceIndex<[T]>;
pub fn get_mut<I>(&mut self, index: I) -> Option<&mut <I as SliceIndex<[T]>>::Output>
  where I: SliceIndex<[T]>;
pub const fn first(&self) -> Option<&T>;
pub fn first_mut(&mut self) -> Option<&mut T>;
pub const fn last(&self) -> Option<&T>;
pub fn last_mut(&mut self) -> Option<&mut T>;get()和get_mut(), 需要指定元素的索引位置, 分别返回不可变引用和可变引用first()和first_mut(), 返回切片中的第一个元素, 如果切片是空的, 就返回Nonelast()和last_mut(), 返回切片的最后一个元素, 如果切片是空的, 就返回 None
看一下示例程序:
fn main() {
    let nums = [1, 1, 2, 3, 5, 8, 13];
    assert_eq!(nums.first(), Some(&1));
    assert_eq!(nums.last().copied(), Some(13));
    assert_eq!(nums.get(4), Some(&5));
}
操作过程如下图所示:

swap(), swap_with_slice()
这一组方法用于交换切片中的元素, 但它们有明显的区别:
swap()用于交换切片内的不同位置的元素swap_with_slice()用于交换两个相同长度的切片的所有元素
pub fn swap(&mut self, a: usize, b: usize);
pub fn swap_with_slice(&mut self, other: &mut [T]);
以下代码片段演示了 swap() 的用法:
let nums = [0, 5, 3, 2, 2];
nums.swap(1, 3);
assert_eq!(nums, [0, 2, 3, 5, 2]);
交换的方式如下图所示:

比如, 下面的插入排序算法就会频繁地调用 swap() 方法:
pub fn insertion_sort<T>(slice: &mut [T]) where T: PartialOrd {
    for i in 1..slice.len() {
        for j in (1..=i).rev() {
            if slice[j - 1] > slice[j] {
                slice.swap(j - 1, j);
            } else {
                break;
            }
        }
    }
}

fn main() {
    let mut nums = [0, 5, 3, 2, 2];
    insertion_sort(&mut nums);
    assert_eq!(nums, [0, 2, 2, 3, 5]);

    let mut chars: Vec<char> = "EASYQUESTION".chars().collect();
    insertion_sort(&mut chars);
    assert_eq!(
        chars,
        ['A', 'E', 'E', 'I', 'N', 'O', 'Q', 'S', 'S', 'T', 'U', 'Y']
    );
}
reverse(), rotate_left(), rotate_right()
这一组函数用于批量移动切片中的元素, 它们的函数声明如下:
pub fn reverse(&mut self);
pub fn rotate_left(&mut self, mid: usize);
pub fn rotate_right(&mut self, k: usize);
其中, reverse(), 原地前后互转切片中的所有元素, 第一个元素与最后一个互换, 第二个元素与倒数第二个互换, 以此类推.
看一个 reverse() 的示例:
fn main() {
    let mut nums = vec![1, 2, 3, 5, 8];
    nums.reverse();
    assert_eq!(nums, [8, 5, 3, 2, 1]);
}
过程如下图所示:

函数 rotate_left(mid), 将所有的元素原地左移 mid 个位置, 这样的话原本处于 mid 位置的元素就被移到了左侧第一个位置.
看一个示例程序:
fn main() {
    let mut nums = vec![1, 2, 3, 5, 8];
    nums.rotate_left(2);
    assert_eq!(nums, [3, 5, 8, 1, 2]);
}
整个过程如下图所示:

函数 rotate_right(k), 将所有的元素原地右移 k 个位置, 这样的话原本处于从右数第 k 个位置的元素就被移到了左侧第一个位置.
看一个示例代码:
fn main() {
    let mut nums = vec![1, 2, 3, 5, 8];
    nums.rotate_right(2);
    assert_eq!(nums, [5, 8, 1, 2, 3]);
}
整个过程如下图所示:

split(), split_at(), split_at_mut()
这一组函数将切片分隔开来. 它们的函数声明如下:
pub fn split<F>(&self, pred: F) -> Split<'_, T, F> ⓘ
    where F: FnMut(&T) -> bool;
pub const fn split_at(&self, mid: usize) -> (&[T], &[T]);
pub fn split_at_mut(&mut self, mid: usize) -> (&mut [T], &mut [T]);
其中 split() 以给定的函数来分隔切片, 并返回一个迭代器. 看一个例子:
fn main() {
    let line = b"root:x:0:0:root:/root:/bin/bash";
    let mut iter = line.split(|byte| *byte == b':');
    // user name
    assert_eq!(iter.next(), Some(b"root".as_slice()));
    // password placeholder
    assert_eq!(iter.next(), Some(b"x".as_slice()));
    // uid
    assert_eq!(iter.next(), Some(b"0".as_slice()));
    // gid
    assert_eq!(iter.next(), Some(b"0".as_slice()));
    // default group
    assert_eq!(iter.next(), Some(b"root".as_slice()));
    // home directory
    assert_eq!(iter.next(), Some(b"/root".as_slice()));
    // default shell
    assert_eq!(iter.next(), Some(b"/bin/bash".as_slice()));
    assert_eq!(iter.next(), None);
}
整个操作如下图所示:

而 split_at() 和 split_at_mut() 则把切片从某个索引位置分开, 分成左右两部分切片.
其中 split_at() 返回的都是不可变更切片, 而 split_at_mut() 则返回的是可变更切片.
下面看一个示例程序:
fn main() {
    let mut nums = [1, 2, 3, 5, 3, 2, 1];
    let (left, right) = nums.split_at_mut(4);
    assert_eq!(left, [1, 2, 3, 5]);
    assert_eq!(right, [3, 2, 1]);
    for num in right.iter_mut() {
        *num *= 2;
    }
    assert_eq!(nums, [1, 2, 3, 5, 6, 4, 2]);
}
切片的分隔情况如下图所示:

sort(), sort_unstable()
对切片做排序, 其中:
sort()是稳定排序- 基于归并排序 (merge sort) 实现的
- 时间复杂度是
O(n * log(n)) - 空间复杂度是
O(n) - 如果切片中的元素比较少, 会使用插入排序代替
sort_unstable()是不稳定排序- 基于快速排序 (quick sort) 实现的
- 时间复杂度是
O(n * log(n)) - 空间复杂度是
O(1)
它们还有一些辅助函数, 可以指定排序函数, 比如 sort_by(), sort_by_key().
下面展示一个示例程序:
fn main() {
    let mut nums = vec!["3", "7", "6", "1", "9"];
    nums.sort_by_cached_key(|key| key.parse::<i32>().unwrap());
    assert_eq!(nums, ["1", "3", "6", "7", "9"]);
}
binary_search(), binary_search_by(), binary_search_by_key()
这一组方法, 使用二分法查找切片中是否包含某个值, 在调用该函数前要确保切片中的元素已经被排序了, 否则该操作没有意义.
上面介绍的 contains() 方法是从头到尾线性遍历切片, 比较慢, 但是不要求切片是排序的.
pub fn binary_search(&self, x: &T) -> Result<usize, usize> where T: Ord;
pub fn binary_search_by<'a, F>(&'a self, f: F) -> Result<usize, usize> where F: FnMut(&'a T) -> Ordering;
pub fn binary_search_by_key<'a, B, F>(&'a self, b: &B, f: F) -> Result<usize, usize> where F: FnMut(&'a T) -> B, B: Ord;
可以看到, binary_search() 是要求类型 T 实现 Ord trait 的, 但有时切片中的类型并不会实现它, 比如浮点类型的 f32, f64.
为此, 我们可以使用该组中的其它函数来绕过限制, 可以看看下面的示例代码:
fn main() {
    // 整数的排序和查找
    let nums = &mut [1_i32, 2, 0, 3, 9, 7, 16, 8, 9];
    nums.sort_unstable();
    assert_eq!(nums, &[0_i32, 1, 2, 3, 7, 8, 9, 9, 16]);
    assert_eq!(nums.binary_search(&8), Ok(5));

    // 浮点数的排序和查找
    let mut floats = vec![1.2_f32, 2.8, 3.6, 0.7, 4.5, 9.2];
    floats.sort_by(f32::total_cmp);
    assert_eq!(floats, &[0.7_f32, 1.2, 2.8, 3.6, 4.5, 9.2]);
    assert_eq!(floats.binary_search_by(|num| num.total_cmp(&2.8)), Ok(2));
}
to_vec(), repeat()
这一组函数将切片转换成动态数组 Vec<T>.
to_vec() 将切片转换成数组, 并拷贝切片中所有的元素, 类似于这样写: slice.iter().collect().
repeat(n) 将切片转换成数组, 并重复 n 次拷贝切片中的所有元素.
pub fn to_vec(&self) -> Vec<T> where T: Clone;
pub fn repeat(&self, n: usize) -> Vec<T> where  T: Copy;
看一个小例子:
fn main() {
    let nums = &mut [1, 2, 3, 5, 8];
    let single: Vec<i32> = nums.to_vec();
    assert_eq!(single, [1, 2, 3, 5, 8]);

    let duplex: Vec<i32> = nums.repeat(2);
    assert_eq!(duplex, [1, 2, 3, 5, 8, 1, 2, 3, 5, 8]);
}
操作过程如下图所示:

copy_from_slice(), clone_from_slice()
这一组函数用于批量替换切片中的元素, 它们的差别在于:
copy_from_slice()要求类型T实现Copytraitclone_from_slice()要求类型T实现Clonetrait
它们的函数声明如下:
pub fn copy_from_slice(&mut self, src: &[T]) where T: Copy;
pub fn clone_from_slice(&mut self, src: &[T]) where T: Clone;
要注意的是, 当前切片的长度应该等于源切片 src 的长度, 否则程序就会崩溃.
看一下示例程序:
#[derive(Debug, Default, Clone, PartialEq)]
pub struct Point {
    pub x: f64,
    pub y: f64,
}

pub fn encode_fixed32(dst: &mut [u8], value: u32) {
    debug_assert!(dst.len() >= 4);
    dst[..4].copy_from_slice(&value.to_le_bytes());
}

pub fn encode_fixed32_2(dst: &mut [u8], value: u32) {
    debug_assert!(dst.len() >= 4);
    dst[0] = (value & 0xff) as u8;
    dst[1] = ((value >> 8) & 0xff) as u8;
    dst[2] = ((value >> 16) & 0xff) as u8;
    dst[3] = ((value >> 24) & 0xff) as u8;
}

fn main() {
    let points = &[Point { x: 3.0, y: 4.0 }, Point { x: 4.0, y: 3.0 }];

    let mut points2 = vec![Point::default(); 2];
    points2.clone_from_slice(points);
    assert_eq!(points2, points);

    let number = 0x12345678;
    let mut bytes = [0_u8; 8];
    encode_fixed32(&mut bytes, number);
    encode_fixed32_2(&mut bytes[4..], number);
    assert_eq!(bytes[..4], bytes[4..]);
}
fill(), fill_with()
这一组函数用特定的值重新填充整个切片.
它们的函数声明如下:
pub fn fill(&mut self, value: T) where T: Clone;
pub fn fill_with<F>(&mut self, f: F) where F: FnMut() -> T;fill(value), 使用给定的值来填充fill_with(f), 调用指定的函数来填充
举一个例子:
struct Fibonacci {
    current: i32,
    previous: i32,
}

impl Default for Fibonacci {
    fn default() -> Self {
        Self::new()
    }
}

impl Fibonacci {
    fn new() -> Self {
        Self {
            current: 1,
            previous: 0,
        }
    }

    #[must_use]
    fn next(&mut self) -> i32 {
        (self.current, self.previous) = (self.current + self.previous, self.current);
        self.current
    }
}

fn main() {
    let nums = &mut [1, 2, 3, 4, 5];
    nums.fill(0);
    assert_eq!(nums, &[0, 0, 0, 0, 0]);

    let mut fib = Fibonacci::new();
    nums.fill_with(|| fib.next());
    assert_eq!(nums, &[1, 2, 3, 5, 8]);
}
concat(), join()
这一组函数用于将两个切片中的元素合并到一起, 并且生成新的对象.
它们的函数声明如下:
pub fn concat<Item>(&self) -> <[T] as Concat<Item>>::Output
    where [T]: Concat<Item>, Item: ?Sized;
pub fn join<Separator>(&self, sep: Separator) -> <[T] as Join<Separator>>::Output
    where [T]: Join<Separator>;
看下面一个例子:
use std::any::{Any, TypeId};

fn main() {
    // 使用字符串连接字符串
    let part1 = ["hello", "world"];
    let str1 = part1.join(", ");
    assert_eq!(TypeId::of::<String>(), (&str1 as &dyn Any).type_id());
    assert_eq!(&str1, "hello, world");

    // 直接拼接字符串
    let part2 = ["你好", "世界"];
    let str2 = part2.concat();
    assert_eq!(TypeId::of::<String>(), (&str2 as &dyn Any).type_id());
    assert_eq!(&str2, "你好世界");

    let part3 = &[[1, 2, 3], [3, 2, 1]];
    let nums = part3.join([5, 5].as_slice());
    assert_eq!(nums, [1, 2, 3, 5, 5, 3, 2, 1]);
}
操作过程参考下图:

字符串 str
字符串切片 &str
字符串切片的内存布局
首先看一个小例子:
use std::mem::size_of_val;

#[allow(unused_variables)]
#[allow(clippy::size_of_ref)]
fn main() {
    let s: &str = "Rust";
    let s2 = s;
    assert_eq!(s, s2);
    // 字符串切片的长度为4, 因为字符串字面量的值有 4 个字节
    assert_eq!(size_of_val(s), 4);
    // 字符串切片本身是一个切片类型, 其占用的内存是 16 个字节, | ptr: usize | len: usize |
    assert_eq!(size_of_val(&s), 16);
}
可以看下生成的汇编代码:
	.section	.text._ZN17string_mem_layout4main17hb4d59e5a01423cd2E,"ax",@progbits
	.p2align	4, 0x90
	.type	_ZN17string_mem_layout4main17hb4d59e5a01423cd2E,@function
_ZN17string_mem_layout4main17hb4d59e5a01423cd2E:
	.cfi_startproc
	subq	$120, %rsp
	.cfi_def_cfa_offset 128
	leaq	.L__unnamed_3(%rip), %rax
	movq	%rax, 16(%rsp)
	movq	$4, 24(%rsp)
	movq	16(%rsp), %rcx
	movq	24(%rsp), %rax
	movq	%rcx, 32(%rsp)
	movq	%rax, 40(%rsp)
	leaq	16(%rsp), %rax
	movq	%rax, 48(%rsp)
	leaq	32(%rsp), %rax
	movq	%rax, 56(%rsp)
	movq	48(%rsp), %rdi
	movq	%rdi, (%rsp)
	movq	56(%rsp), %rsi
	movq	%rsi, 8(%rsp)
	callq	_ZN4core3cmp5impls69_$LT$impl$u20$core..cmp..PartialEq$LT$$RF$B$GT$$u20$for$u20$$RF$A$GT$2eq17h01b3e2146858edabE
	testb	$1, %al
	jne	.LBB15_2
	movq	8(%rsp), %rdx
	movq	(%rsp), %rsi
	movb	$0, 71(%rsp)
	movq	$0, 72(%rsp)
	movzbl	71(%rsp), %edi
	leaq	.L__unnamed_4(%rip), %r8
	leaq	72(%rsp), %rcx
	callq	_ZN4core9panicking13assert_failed17h78d8de08a404e5a1E
.LBB15_2:
	addq	$120, %rsp
	.cfi_def_cfa_offset 8
	retq
.Lfunc_end15:
	.size	_ZN17string_mem_layout4main17hb4d59e5a01423cd2E, .Lfunc_end15-_ZN17string_mem_layout4main17hb4d59e5a01423cd2E
	.cfi_endproc

	.type	.L__unnamed_3,@object
	.section	.rodata.cst4,"aM",@progbits,4
.L__unnamed_3:
	.ascii	"Rust"
	.size	.L__unnamed_3, 4
上面的代码中, 先定义了一个字符串字面量, 并用它来初始化字符串切片 s,
字符串切片 s 的内存包含了两个部分:
- 指向字符串字面量内存的指针
- 以及字符串字面量的长度, 为4个字节
字符串字面量的值位于 rodata segment, 被嵌在了程序的二进制文件中, 在整个进程的运行期间它都是有效的.

字符串常量 String Literals
Unicode 字符串, 被存储在可执行文件的代码段 (text segment) 中.
多行字符串:
let speech = "Hello
world";
多行拼接:
let speech = "Hello \
world";
Raw Strings
Raw strings, 不需要使用转义字符:
let path = r"C:\Users\root\Documents\config.json";如果里面有双引号, 可以使用以下写法:
let path = r###"C:\Program Files\foo\bar.json"###;更复杂的多行示例:
println!(r###"
hello, world.
""""""Many double quotes here""""
"###);
Byte string literals
Byte strings 只能包含 ASCII 码以及 \xHH 这些字符,由一些 u8 值组成。
let method = b"GET";
assert_eq!(method, &[b'G', b'E', b'T']);
要注意的是, 它不是 string, 而是 u8 array, [u8].
C string literals
TODO(Shaohua):
C strings
C Strings 用于快速创建与 C 语言兼容的字符串, 字符串以 '\0' 结尾.
这个特性是1.77版本中引入的. 它代表了 &std::ffi::CStr.
use std::ffi::CStr;
assert_eq!(c"hello", CStr::from_bytes_with_nul(b"hello\0").unwrap());
参考
指针 point
引用
- 引用在退出作用域时并不会自动释放任何资源
- 引用可以是指向堆或者栈的任何数据类型
- 引用不能指向 null
- 引用默认是不可变的,
&T, 类似于C中的const T* - 可变引用要写成
&mut T, 类似于C中的T* - 会在编译期检查引用的所有权及生命周期
Box
使用Box::new() 在堆上创建值.
let b = Box::new(42);当 b 的作用域结束时, 会自动释放在堆上的内存.
原始指针 Raw Pointer
Raw 指针完全类似于C中的指针, 它是不安全的, 也可以是 null. 也会出现C语言中的指针的
问题, 比如指向已被释放了的内存. 所以操作 Raw 指针时需要在 unsafe 代码块中进行.
*mut T可变指针*const T不可变指针
相关问题
别名 Type Alias
使用 type 可用于定义一个类型别名, 类似于 C 中的 typedef 或者 C++ 中的 using TypeA = TypeB;.
使用 use 可将某模块中的内容或某枚举类型中的元素导入到当前作用域, 跟 C++ 中的 using 有些类似.
using GlyphId = int32_t;
同样的类型在 Rust 中可以这样写:
pub type GlyphId = i32;还可以使用不流行的写法:
pub use i32 as GlyphId;在导入外部的类型时, 可以使用 use Foo as Bar 的语法给它加上别名:
use color::Color as ArgbColor;

fn main() {
    let text_color = ArgbColor::new(255, 39, 88, 0x0a);
    println!("color: {text_color:?}");
}

pub mod color {
    #[derive(Debug, Default, Clone, Copy, Eq, PartialEq, Hash)]
    pub struct Color {
        pub alpha: u8,
        pub red: u8,
        pub green: u8,
        pub blue: u8,
    }

    impl Color {
        #[must_use]
        #[inline]
        pub const fn new(alpha: u8, red: u8, green: u8, blue: u8) -> Self {
            Self {
                alpha,
                red,
                green,
                blue,
            }
        }
    }
}
类型转换 Casting
基础数据类型, 可以使用 as 进行转换, 其中的数值精度问题与C语言保持一致.
C/C++默认是进行隐式类型转换的, 这种做法尽管比较方便灵活, 但也容易产生问题. 而 Rust 就要求使用显式的类型转换, 即不同类型之前做转换, 必须在代码上显式地描述出来, 否则编译器就报错. 比如:
let x = 42;
if x {
  // do something.
}
必需显式地写下:
let x = 42;
if x != 0 {
  // do something.
}
另一个例子, C 代码片段如下:
int sum = -42;
unsigned int pos_sum = sum;
assert(pos_sum == 4294967254);
用 Rust 来写同样的表达式:
let sum = -42i32;
let pos_sum = sum as u32;
assert_eq!(pos_sum, 4294967254);
其它转换方式
表达式 Expressions
Rust 是一个以表达式 (expression) 为主体的编程语言, 编写的大部分代码都是表达式.
每一种表达式类型都可以嵌入到其它表达式中.
表达式 (expression) 有值, 语句 (statement) 没有值.
这一章我们只介绍控制流表达式, 像基础数据类型, 结体体, 枚举, trait, 各种操作符, 函数调用及闭包等表达式, 在别的章节有全面的说明.
本章目标
- if let 与 match 的用法
- rust 特有的那几种循环语句的写法
- break/continue 如何返回值
变量 Variables
常见的声明变量的表达式, 使用 let 来声明, 格式如下:
let name: type = expr;这里, type 代表变量的类型, 大部分情况可以直接省去不写, 编译器会根据上下文自动推定.
expr 是一个表达式, 使用该表达式的值来初始化变量, 也可以省去, 在之后再初始化该变量.
#[allow(unused_variables)]
fn main() {
    let x: i32 = 42;
    let is_clicked = false;
    let scale_factor = 1.2;
    let range = (1, 4);
    let name = "Shawn";
    let c_path = c"PATH=/usr/bin:/usr/local/bin";
    let char_a = 'a';
}
变量默认不可更改
这个特性跟 C/C++ 有很大的不同, 在 C/C++ 中声明的变量, 默认都是可以修改它的值的, 除非显式地声明为只读:
int x = 42;
x += 1;
assert(x == 43);
而 Rust 中的变量默认是不可更改的, 除非加上 mut 修饰符, 显式地声明为可更改的:
let mut x = 42;
x += 1;
assert_eq!(x, 43);

let y = 42;
// 下面的表达式会编译失败.
// y += 1;
条件判断表达式 if 与 if let
条件判断表达式在代码里特别常见, 给定一个条件, 如果它的值是 true, 就执行 if 表达式内部的代码块.
if condition1 {
  block1
} else if condition2 {
  block2
} else {
  block_n
}
跟 C/C++ 等语言不同之处在于, condition1 表达式返回值的类型必须是 bool, 这里不进行
隐式类型转换. 另外, 这里不需要用小括号把 condition1 包括起来, 这个省去小括号的写法在其它语言中也不多见.
int x = 42;
if (x) {
  do_some();
}
像上面的代码片段, 如果用 rust 重写的话, 必须要先把隐藏的条件补充完成:
let x = 42;
if x != 0 {
  do_some();
}
if let
用于简化 match 表达式, 在分支条件比较单一的时候, 使用 if let 表达式可读性更高.
if let pattern = expr {
  block1
} else {
  block2
}
它等同于以下的 match 表达式:
match expr {
  pattern => { block1 }
  _ => { block2 }
}
看一下示例:
#![allow(dead_code)]

enum Foo {
    Bar,
    Baz,
    Qux(u32),
}

fn main() {
    let a = Foo::Bar;
    // destructing enumeration
    if let Foo::Bar = a {
        println!("a is bar!");
    }
}
以上代码片段, 我们不需要给 Foo 实现 std::cmp::PartialEq 这个 trait, 就可以对它的值进行比较.
类似于以下实现:
#![allow(dead_code)]

#[derive(PartialEq)]
enum Foo {
    Bar,
    Baz,
    Qux(u32),
}

fn main() {
    let a = Foo::Bar;
    if a == Foo::Bar {
        println!("a is bar!");
    }
}
这里之所以可以用 == 是因为 Foo 实现了 PartialEq trait.
匹配表达式 match
match 表达式与 C/C++ 中的 switch/case 语句类似, 用于匹配多个分支条件.
它的语法如下所示:
match value {
  pattern1 => expr1,
  pattern2 => expr2,
  ...
}
注意上面每个分支匹配表达式是以逗号 , 结尾的, 如果该表达式是块表达式 (block expression), 这个逗号就可以省略不写.
match 语句中的匹配优先级是根据分支顺序来确定的, 即优先检查第一条分支条件 pattern1 是否匹配, 如果匹配则执行 expr1
表达式, 并跳过剩下的所有分支. Rust 要求这些分支中必须有一条被匹配成功, 比如, 如果枚举中的条目没有被完全匹配到的话,
编译器就会报错:
#![allow(dead_code)]

#[derive(Debug, Clone, Copy, Eq, PartialEq)]
enum Weekday {
    Monday,
    Tuesday,
    Wednesday,
    Thursday,
    Friday,
    Saturday,
    Sunday,
}

fn main() {
    let date = Weekday::Friday;

    let to_weekend: i32 = match date {
        Weekday::Monday => 5,
        Weekday::Tuesday => 4,
        Weekday::Wednesday => 3,
        Weekday::Thursday => 2,
        Weekday::Friday => 1,
        Weekday::Saturday => 0,

        // 把下面这一行代码注释掉并重新编译, 查看编译器报错信息.
        // 它编译失败, 并提示:
        // ^^^^ pattern `Weekday::Sunday` not covered
        Weekday::Sunday => 0,
    };

    assert_eq!(to_weekend, 1);
}
上面的代码中, 最后两条可以合并在一起, 作为一个分支; 或者使用通配符匹配.
match 只能在最后一个分支使用通配符匹配 (wildcard pattern), 表示无条件匹配这个分支,
类似于 C 语言 switch/case 中的 default. 先看一个简单的用例:
use std::env;

fn main() {
use std::env;

fn main() {
    let num = env::args().len();
    let accum = match num {
        1 => 100,
        2 => 200,
        3 => 300,
        _ => 0,
    };
    assert_eq!(accum, 100);
}
用 C 语言来描述相同的功能, 大概如下:
#include <assert.h>

int main(int argc, char** argv) {
  int accum;
  switch (argc) {
    case 1: {
      accum = 100;
      break;
    }
    case 2: {
      accum = 200;
      break;
    }
    case 3: {
      accum = 300;
      break;
    }
    default: {
      accum = 0;
    }
  }

  assert(accum == 100);

  return 0;
}
后文有单独的章节介绍 模式匹配 更多功能和写法.
跳转表 Jump Table
跳转表 Jump Table, 又称作 分支表 Branch Table, 是对分支语句的一种优化手段.
下面的代码用于本次验证:
use std::env;

fn with_if_else() {
    let num = env::args().len();
    let accum = if num == 1 {
        100
    } else if num == 2 {
        200
    } else if num == 3 {
        300
    } else if num == 4 {
        400
    } else if num == 5 {
        500
    } else if num == 6 {
        600
    } else {
        0
    };
    assert_eq!(accum, 100);
}

fn with_match_short() {
    let num = env::args().len();
    let accum = match num {
        1 => 100,
        2 => 200,
        3 => 300,
        _ => 0,
    };
    assert_eq!(accum, 100);
}

// 在 x86_64 (AMD Ryzen 5) 上超过 4 个分支后, 才会构造 jump table.
// 在 aarch64 (Rock 3A) 上面也可以发现, 当超过 4 个分支后, 会构造 jump table.
fn with_match_long() {
    let num = env::args().len();
    let accum = match num {
        1 => 100,
        2 => 200,
        3 => 300,
        4 => 400,
        _ => 0,
    };
    assert_eq!(accum, 100);
}

fn main() {
    with_if_else();
    with_match_short();
    with_match_long();
}
是上面的是 with_if_else() 函数, 它里面的分支语句比较多,
使用 rustc --emit asm jump-table.rs 命令生成汇编代码, 生成的部分 x86_64 汇编代码如下:
// with_if_else()
	.section	.text._ZN10jump_table12with_if_else17hc2cb507cd4512507E,"ax",@progbits
	.p2align	4, 0x90
	.type	_ZN10jump_table12with_if_else17hc2cb507cd4512507E,@function
_ZN10jump_table12with_if_else17hc2cb507cd4512507E:
.Lfunc_begin4:
	.cfi_startproc
	.cfi_personality 155, DW.ref.rust_eh_personality
	.cfi_lsda 27, .Lexception4
	subq	$168, %rsp
	.cfi_def_cfa_offset 176
	movq	_ZN3std3env4args17h377a659c89f76567E@GOTPCREL(%rip), %rax
	leaq	40(%rsp), %rdi
	movq	%rdi, 24(%rsp)
	callq	*%rax
	movq	24(%rsp), %rdi
.Ltmp23:
	movq	_ZN84_$LT$std..env..Args$u20$as$u20$core..iter..traits..exact_size..ExactSizeIterator$GT$3len17hfc397728d7a27a41E@GOTPCREL(%rip), %rax
	callq	*%rax
.Ltmp24:
	movq	%rax, 32(%rsp)
	jmp	.LBB47_3
.LBB47_1:
.Ltmp26:
	leaq	40(%rsp), %rdi
	callq	_ZN4core3ptr35drop_in_place$LT$std..env..Args$GT$17h27567071cfad13afE
.Ltmp27:
	jmp	.LBB47_20
.LBB47_2:
.Ltmp25:
	movq	%rax, %rcx
	movl	%edx, %eax
	movq	%rcx, 152(%rsp)
	movl	%eax, 160(%rsp)
	jmp	.LBB47_1
.LBB47_3:
	leaq	40(%rsp), %rdi
	callq	_ZN4core3ptr35drop_in_place$LT$std..env..Args$GT$17h27567071cfad13afE
	movq	32(%rsp), %rax
	cmpq	$1, %rax
	jne	.LBB47_5
	movl	$100, 76(%rsp)
	jmp	.LBB47_6
.LBB47_5:
	movq	32(%rsp), %rax
	cmpq	$2, %rax
	je	.LBB47_7
	jmp	.LBB47_8
.LBB47_6:
	leaq	76(%rsp), %rax
	movq	%rax, 80(%rsp)
	leaq	.L__unnamed_10(%rip), %rax
	movq	%rax, 88(%rsp)
	movq	80(%rsp), %rax
	movq	%rax, 8(%rsp)
	movq	88(%rsp), %rcx
	movq	%rcx, 16(%rsp)
	movl	(%rax), %eax
	cmpl	(%rcx), %eax
	je	.LBB47_18
	jmp	.LBB47_17
.LBB47_7:
	movl	$200, 76(%rsp)
	jmp	.LBB47_6
.LBB47_8:
	movq	32(%rsp), %rax
	cmpq	$3, %rax
	jne	.LBB47_10
	movl	$300, 76(%rsp)
	jmp	.LBB47_6
.LBB47_10:
	movq	32(%rsp), %rax
	cmpq	$4, %rax
	jne	.LBB47_12
	movl	$400, 76(%rsp)
	jmp	.LBB47_6
.LBB47_12:
	movq	32(%rsp), %rax
	cmpq	$5, %rax
	jne	.LBB47_14
	movl	$500, 76(%rsp)
	jmp	.LBB47_6
.LBB47_14:
	movq	32(%rsp), %rax
	cmpq	$6, %rax
	jne	.LBB47_16
	movl	$600, 76(%rsp)
	jmp	.LBB47_6
.LBB47_16:
	movl	$0, 76(%rsp)
	jmp	.LBB47_6
.LBB47_17:
	movq	16(%rsp), %rdx
	movq	8(%rsp), %rsi
	movb	$0, 103(%rsp)
	movq	$0, 104(%rsp)
	movzbl	103(%rsp), %edi
	leaq	.L__unnamed_11(%rip), %r8
	leaq	104(%rsp), %rcx
	callq	_ZN4core9panicking13assert_failed17h884f0f31899bb549E
.LBB47_18:
	addq	$168, %rsp
	.cfi_def_cfa_offset 8
	retq
.LBB47_19:
	.cfi_def_cfa_offset 176
.Ltmp28:
	movq	_ZN4core9panicking16panic_in_cleanup17hc8e2b17e1b6d1381E@GOTPCREL(%rip), %rax
	callq	*%rax
.LBB47_20:
	movq	152(%rsp), %rdi
	callq	_Unwind_Resume@PLT
.Lfunc_end47:
	.size	_ZN10jump_table12with_if_else17hc2cb507cd4512507E, .Lfunc_end47-_ZN10jump_table12with_if_else17hc2cb507cd4512507E
	.cfi_endproc
	.section	.gcc_except_table._ZN10jump_table12with_if_else17hc2cb507cd4512507E,"a",@progbits
	.p2align	2, 0x0
可以看到, with_if_else() 函数, 使用 if/else 语句判断 num 变量时, 使用多次跳转才能匹配到
else 分支, 跳转次数越多, CPU 执行指令的效率越低.
接下来看 with_match_short() 函数, 它内部使用了 match 表达式来匹配 num 的值,
生成的汇编代码片段如下:
// with_match_short()
	.section	.text._ZN10jump_table16with_match_short17h5f66f4b7024a913fE,"ax",@progbits
	.p2align	4, 0x90
	.type	_ZN10jump_table16with_match_short17h5f66f4b7024a913fE,@function
_ZN10jump_table16with_match_short17h5f66f4b7024a913fE:
.Lfunc_begin5:
	.cfi_startproc
	.cfi_personality 155, DW.ref.rust_eh_personality
	.cfi_lsda 27, .Lexception5
	subq	$168, %rsp
	.cfi_def_cfa_offset 176
	movq	_ZN3std3env4args17h377a659c89f76567E@GOTPCREL(%rip), %rax
	leaq	40(%rsp), %rdi
	movq	%rdi, 24(%rsp)
	callq	*%rax
	movq	24(%rsp), %rdi
.Ltmp29:
	movq	_ZN84_$LT$std..env..Args$u20$as$u20$core..iter..traits..exact_size..ExactSizeIterator$GT$3len17hfc397728d7a27a41E@GOTPCREL(%rip), %rax
	callq	*%rax
.Ltmp30:
	movq	%rax, 32(%rsp)
	jmp	.LBB48_3
.LBB48_1:
.Ltmp32:
	leaq	40(%rsp), %rdi
	callq	_ZN4core3ptr35drop_in_place$LT$std..env..Args$GT$17h27567071cfad13afE
.Ltmp33:
	jmp	.LBB48_12
.LBB48_2:
.Ltmp31:
	movq	%rax, %rcx
	movl	%edx, %eax
	movq	%rcx, 152(%rsp)
	movl	%eax, 160(%rsp)
	jmp	.LBB48_1
.LBB48_3:
	leaq	40(%rsp), %rdi
	callq	_ZN4core3ptr35drop_in_place$LT$std..env..Args$GT$17h27567071cfad13afE
	movq	32(%rsp), %rax
	subq	$1, %rax
	je	.LBB48_5
	jmp	.LBB48_13
.LBB48_13:
	movq	32(%rsp), %rax
	subq	$2, %rax
	je	.LBB48_6
	jmp	.LBB48_14
.LBB48_14:
	movq	32(%rsp), %rax
	subq	$3, %rax
	je	.LBB48_7
	jmp	.LBB48_4
.LBB48_4:
	movl	$0, 76(%rsp)
	jmp	.LBB48_8
.LBB48_5:
	movl	$100, 76(%rsp)
	jmp	.LBB48_8
.LBB48_6:
	movl	$200, 76(%rsp)
	jmp	.LBB48_8
.LBB48_7:
	movl	$300, 76(%rsp)
.LBB48_8:
	leaq	76(%rsp), %rax
	movq	%rax, 80(%rsp)
	leaq	.L__unnamed_10(%rip), %rax
	movq	%rax, 88(%rsp)
	movq	80(%rsp), %rax
	movq	%rax, 8(%rsp)
	movq	88(%rsp), %rcx
	movq	%rcx, 16(%rsp)
	movl	(%rax), %eax
	cmpl	(%rcx), %eax
	je	.LBB48_10
	movq	16(%rsp), %rdx
	movq	8(%rsp), %rsi
	movb	$0, 103(%rsp)
	movq	$0, 104(%rsp)
	movzbl	103(%rsp), %edi
	leaq	.L__unnamed_12(%rip), %r8
	leaq	104(%rsp), %rcx
	callq	_ZN4core9panicking13assert_failed17h884f0f31899bb549E
.LBB48_10:
	addq	$168, %rsp
	.cfi_def_cfa_offset 8
	retq
.LBB48_11:
	.cfi_def_cfa_offset 176
.Ltmp34:
	movq	_ZN4core9panicking16panic_in_cleanup17hc8e2b17e1b6d1381E@GOTPCREL(%rip), %rax
	callq	*%rax
.LBB48_12:
	movq	152(%rsp), %rdi
	callq	_Unwind_Resume@PLT
.Lfunc_end48:
	.size	_ZN10jump_table16with_match_short17h5f66f4b7024a913fE, .Lfunc_end48-_ZN10jump_table16with_match_short17h5f66f4b7024a913fE
	.cfi_endproc
	.section	.gcc_except_table._ZN10jump_table16with_match_short17h5f66f4b7024a913fE,"a",@progbits
	.p2align	2, 0x0
从上面的汇编代码可以看到, 汇编器并没有生成跳转表, 也都只是一些条件判断语句,
需要多次判断用跳转才能到达最后一个分支.
但这部分代码要比 with_if_else() 的汇编代码更简洁, 执行效率也会更高.
只有分支语句达到某个限制时, 汇编器才会生成跳转表; 在 x86_64 上, 这个分支个数是4.
接下来看 with_match_long() 函数的汇编代码, 它就被构造出了跳转表:
// with_match_long()
	.section	.text._ZN10jump_table15with_match_long17hf93574d4242b2d97E,"ax",@progbits
	.p2align	4, 0x90
	.type	_ZN10jump_table15with_match_long17hf93574d4242b2d97E,@function
_ZN10jump_table15with_match_long17hf93574d4242b2d97E:
.Lfunc_begin6:
	.cfi_startproc
	.cfi_personality 155, DW.ref.rust_eh_personality
	.cfi_lsda 27, .Lexception6
	subq	$168, %rsp
	.cfi_def_cfa_offset 176
	movq	_ZN3std3env4args17h377a659c89f76567E@GOTPCREL(%rip), %rax
	leaq	40(%rsp), %rdi
	movq	%rdi, 24(%rsp)
	callq	*%rax
	movq	24(%rsp), %rdi
.Ltmp35:
	movq	_ZN84_$LT$std..env..Args$u20$as$u20$core..iter..traits..exact_size..ExactSizeIterator$GT$3len17hfc397728d7a27a41E@GOTPCREL(%rip), %rax
	callq	*%rax
.Ltmp36:
	movq	%rax, 32(%rsp)
	jmp	.LBB49_3
.LBB49_1:
.Ltmp38:
	leaq	40(%rsp), %rdi
	callq	_ZN4core3ptr35drop_in_place$LT$std..env..Args$GT$17h27567071cfad13afE
.Ltmp39:
	jmp	.LBB49_13
.LBB49_2:
.Ltmp37:
	movq	%rax, %rcx
	movl	%edx, %eax
	movq	%rcx, 152(%rsp)
	movl	%eax, 160(%rsp)
	jmp	.LBB49_1
.LBB49_3:
	leaq	40(%rsp), %rdi
	callq	_ZN4core3ptr35drop_in_place$LT$std..env..Args$GT$17h27567071cfad13afE
	movq	32(%rsp), %rax
	decq	%rax
	movq	%rax, 16(%rsp)
	subq	$3, %rax
	ja	.LBB49_4
	movq	16(%rsp), %rax
	leaq	.LJTI49_0(%rip), %rcx
	movslq	(%rcx,%rax,4), %rax
	addq	%rcx, %rax
	jmpq	*%rax
.LBB49_4:
	movl	$0, 76(%rsp)
	jmp	.LBB49_9
.LBB49_5:
	movl	$100, 76(%rsp)
	jmp	.LBB49_9
.LBB49_6:
	movl	$200, 76(%rsp)
	jmp	.LBB49_9
.LBB49_7:
	movl	$300, 76(%rsp)
	jmp	.LBB49_9
.LBB49_8:
	movl	$400, 76(%rsp)
.LBB49_9:
	leaq	76(%rsp), %rax
	movq	%rax, 80(%rsp)
	leaq	.L__unnamed_10(%rip), %rax
	movq	%rax, 88(%rsp)
	movq	80(%rsp), %rax
	movq	%rax, (%rsp)
	movq	88(%rsp), %rcx
	movq	%rcx, 8(%rsp)
	movl	(%rax), %eax
	cmpl	(%rcx), %eax
	je	.LBB49_11
	movq	8(%rsp), %rdx
	movq	(%rsp), %rsi
	movb	$0, 103(%rsp)
	movq	$0, 104(%rsp)
	movzbl	103(%rsp), %edi
	leaq	.L__unnamed_13(%rip), %r8
	leaq	104(%rsp), %rcx
	callq	_ZN4core9panicking13assert_failed17h884f0f31899bb549E
.LBB49_11:
	addq	$168, %rsp
	.cfi_def_cfa_offset 8
	retq
.LBB49_12:
	.cfi_def_cfa_offset 176
.Ltmp40:
	movq	_ZN4core9panicking16panic_in_cleanup17hc8e2b17e1b6d1381E@GOTPCREL(%rip), %rax
	callq	*%rax
.LBB49_13:
	movq	152(%rsp), %rdi
	callq	_Unwind_Resume@PLT
.Lfunc_end49:
	.size	_ZN10jump_table15with_match_long17hf93574d4242b2d97E, .Lfunc_end49-_ZN10jump_table15with_match_long17hf93574d4242b2d97E
	.cfi_endproc

// 定义的跳转表
	.section	.rodata._ZN10jump_table15with_match_long17hf93574d4242b2d97E,"a",@progbits
	.p2align	2, 0x0
.LJTI49_0:
	.long	.LBB49_5-.LJTI49_0
	.long	.LBB49_6-.LJTI49_0
	.long	.LBB49_7-.LJTI49_0
	.long	.LBB49_8-.LJTI49_0
	.section	.gcc_except_table._ZN10jump_table15with_match_long17hf93574d4242b2d97E,"a",@progbits
	.p2align	2, 0x0
下图展示了跳转表的基本结构, 与 if/else 语句相比, 分支越多, match 表达式的执行效率相对越高.

另外, 在 aarch64 平台编译器也有类似的行为, 下面的汇编代码片段展示了 with_match_long() 函数:
	.section	.text._ZN10jump_table15with_match_long17h4ee0bf410c273a3cE,"ax",@progbits
	.p2align	2
	.type	_ZN10jump_table15with_match_long17h4ee0bf410c273a3cE,@function
_ZN10jump_table15with_match_long17h4ee0bf410c273a3cE:
.Lfunc_begin7:
	.cfi_startproc
	.cfi_personality 156, DW.ref.rust_eh_personality
	.cfi_lsda 28, .Lexception7
	sub	sp, sp, #192
	.cfi_def_cfa_offset 192
	str	x30, [sp, #176]
	.cfi_offset w30, -16
	.cfi_remember_state
	add	x8, sp, #48
	str	x8, [sp, #32]
	bl	_ZN3std3env4args17hf417fc576c685b45E
	ldr	x0, [sp, #32]
.Ltmp41:
	bl	_ZN84_$LT$std..env..Args$u20$as$u20$core..iter..traits..exact_size..ExactSizeIterator$GT$3len17ha56aa4d3a3bd219eE
	str	x0, [sp, #40]
.Ltmp42:
	b	.LBB43_3
.LBB43_1:
.Ltmp44:
	add	x0, sp, #48
	bl	_ZN4core3ptr35drop_in_place$LT$std..env..Args$GT$17hdc3a512020133b55E
.Ltmp45:
	b	.LBB43_14
.LBB43_2:
.Ltmp43:
	str	x0, [sp, #160]
	mov	w8, w1
	str	w8, [sp, #168]
	b	.LBB43_1
.LBB43_3:
	add	x0, sp, #48
	bl	_ZN4core3ptr35drop_in_place$LT$std..env..Args$GT$17hdc3a512020133b55E
	ldr	x8, [sp, #40]
	subs	x8, x8, #1
	str	x8, [sp, #24]
	subs	x8, x8, #3
	cset	w8, hi
	tbnz	w8, #0, .LBB43_5
	ldr	x11, [sp, #24]
	adrp	x10, .LJTI43_0
	add	x10, x10, :lo12:.LJTI43_0
.Ltmp47:
	adr	x8, .Ltmp47
	ldrsw	x9, [x10, x11, lsl #2]
	add	x8, x8, x9
	br	x8
.LBB43_5:
	str	wzr, [sp, #84]
	b	.LBB43_10
.LBB43_6:
	mov	w8, #100
	str	w8, [sp, #84]
	b	.LBB43_10
.LBB43_7:
	mov	w8, #200
	str	w8, [sp, #84]
	b	.LBB43_10
.LBB43_8:
	mov	w8, #300
	str	w8, [sp, #84]
	b	.LBB43_10
.LBB43_9:
	mov	w8, #400
	str	w8, [sp, #84]
	b	.LBB43_10
.LBB43_10:
	add	x8, sp, #84
	str	x8, [sp, #88]
	adrp	x8, .L__unnamed_10
	add	x8, x8, :lo12:.L__unnamed_10
	str	x8, [sp, #96]
	ldr	x8, [sp, #88]
	str	x8, [sp, #8]
	ldr	x9, [sp, #96]
	str	x9, [sp, #16]
	ldr	w8, [x8]
	ldr	w9, [x9]
	subs	w8, w8, w9
	cset	w8, ne
	tbnz	w8, #0, .LBB43_12
	b	.LBB43_11
.LBB43_11:
	ldr	x30, [sp, #176]
	add	sp, sp, #192
	.cfi_def_cfa_offset 0
	.cfi_restore w30
	ret
.LBB43_12:
	.cfi_restore_state
	ldr	x2, [sp, #16]
	ldr	x1, [sp, #8]
	strb	wzr, [sp, #111]
	add	x3, sp, #112
	str	xzr, [sp, #112]
	ldrb	w0, [sp, #111]
	adrp	x4, .L__unnamed_13
	add	x4, x4, :lo12:.L__unnamed_13
	bl	_ZN4core9panicking13assert_failed17h10918a4a4d6d5d6fE
	brk	#0x1
.LBB43_13:
.Ltmp46:
	bl	_ZN4core9panicking19panic_cannot_unwind17hf82fd8d1e9cc4d07E
	brk	#0x1
.LBB43_14:
	ldr	x0, [sp, #160]
	bl	_Unwind_Resume
	brk	#0x1
.Lfunc_end43:
	.size	_ZN10jump_table15with_match_long17h4ee0bf410c273a3cE, .Lfunc_end43-_ZN10jump_table15with_match_long17h4ee0bf410c273a3cE
	.cfi_endproc

// 定义的跳转表
	.section	.rodata._ZN10jump_table15with_match_long17h4ee0bf410c273a3cE,"a",@progbits
	.p2align	2, 0x0
.LJTI43_0:
	.word	.LBB43_6-.Ltmp47
	.word	.LBB43_7-.Ltmp47
	.word	.LBB43_8-.Ltmp47
	.word	.LBB43_9-.Ltmp47
	.section	.gcc_except_table._ZN10jump_table15with_match_long17h4ee0bf410c273a3cE,"a",@progbits
	.p2align	2, 0x0
参考
返回表达式 return
return 表达式用于函数或者闭包 (closure)中, 从当前函数上下文退出, 返回到函数调用处.
如果函数的返回值为空, 它返回的是 (), 即所谓的 unit struct, 类似于 C 语言中的 void. 比如:
fn do_some() -> () {
  ...
  return;
}
类似于:
void do_some() {
  ...
  return;
}
如果 return obj; 表达式是函数中最后一个表达式, 那么 return 表达式中可以简写为 foo, 看个例子:
fn max_num(a: i32, b: i32) -> i32 {
  if a > b {
    return a;
  } else {
    return b;
  }
}
通常会被简写成以下形式:
fn max_num(a: i32, b: i32) -> i32 {
  if a > b {
    a
  } else {
    b
  }
}
return 表达式的优先级
先看一个基于 RustQuiz#20 修改的示例程序, 考虑考虑程序运行的结果是什么样的:
#![allow(unreachable_code)]
#![allow(unused_braces)]

#[rustfmt::skip]
fn return1() {
    if (return { println!("1") } ) {
    }
}

#[rustfmt::skip]
fn return1_expanded() {
    if (return println!("1")) {
    }
}

fn return1_simplified() {
    println!("1")
}

#[rustfmt::skip]
fn return2() {
    if return { println!("2") } {
    }
}

#[rustfmt::skip]
fn return2_expanded() {
    if return println!("2") {
    }
}

fn return3() {
    if (return {
        println!("3");
    }) {}
}

fn main() {
    return1();
    return1_expanded();
    return1_simplified();
    return2();
    return2_expanded();
    return3();
}
其中, return1() 函数的 MIR 代码如下:
fn return1() -> () {
    let mut _0: ();
    let _1: ();
    let mut _2: std::fmt::Arguments<'_>;
    let mut _3: &[&str];
    let mut _4: &[&str; 1];

    bb0: {
        _4 = const return1::promoted[0];
        _3 = _4 as &[&str] (PointerCoercion(Unsize));
        _2 = Arguments::<'_>::new_const(move _3) -> [return: bb1, unwind continue];
    }

    bb1: {
        _1 = _print(move _2) -> [return: bb2, unwind continue];
    }

    bb2: {
        return;
    }
}

const return1::promoted[0]: &[&str; 1] = {
    let mut _0: &[&str; 1];
    let mut _1: [&str; 1];

    bb0: {
        _1 = [const "1\n"];
        _0 = &_1;
        return;
    }
}
再看一下 return2() 函数的 MIR 代码:
fn return2() -> () {
    let mut _0: ();
    let _1: ();
    let mut _2: std::fmt::Arguments<'_>;
    let mut _3: &[&str];
    let mut _4: &[&str; 1];

    bb0: {
        _4 = const return2::promoted[0];
        _3 = _4 as &[&str] (PointerCoercion(Unsize));
        _2 = Arguments::<'_>::new_const(move _3) -> [return: bb1, unwind continue];
    }

    bb1: {
        _1 = _print(move _2) -> [return: bb2, unwind continue];
    }

    bb2: {
        return;
    }
}

const return2::promoted[0]: &[&str; 1] = {
    let mut _0: &[&str; 1];
    let mut _1: [&str; 1];

    bb0: {
        _1 = [const "2\n"];
        _0 = &_1;
        return;
    }
}
对比 return2() 的 MIR 代码可以发现, 它与 return1() 的代码是相同的.
从这里我们可以学习到, return 表达式比 if 表达式有更高的优先级, 它优先与后面的表达式结合, 组合成 return 表达式,
并作为 if 表达式的条件 (condition).
如何理解呢? return 有更高的优先级, 它优先与大括号中的语句结合, 所以那个大括号是多余的,
cargo clippy 会给出相应的提示, 就像下图所示:

循环表达式 Loop
Rust 支持四种循环表达式的写法, 下面列出它们的基本语法:
loop {
  block
}

for pattern in iterator {
  block
}

while condition {
  block
}

while let pattern = expr {
  block
}
每种写法都应各自的使用场景, 本节会依次介绍它们.
loop 循环
最简单的循环语句就是 loop { block }, 它相当于 C 语言中的:
while (true) {
  block
}
但是, Rust 单独引入了一个 loop 关键字来表示一个无限循环语句.
终止无限循环的方法也有几种:
break表达式, 立即终止循环return表达式, 立即终止循环并退出当前函数- 抛出错误, 立即终止循环. 退出当前函数并将错误向上继续抛出
- 抛出 panic, 当前线程直接终止
- 调用
std::process::exit()退出程序
使用 return 表达式终止循环的例子:
fn fibonacci(mut n: i32) -> i32 {
    debug_assert!(n >= 0);
    let mut x: i32 = 0;
    let mut y: i32 = 1;
    loop {
        (x, y) = (x + y, x);
        n -= 1;
        if n == 0 {
            return x;
        }
    }
}

fn main() {
    assert_eq!(fibonacci(1), 1);
    assert_eq!(fibonacci(2), 1);
    assert_eq!(fibonacci(10), 55);
}
如果 loop 循环的内部代码块执行时产生了错误 (Result<T, E>), 该错误又没有在代码块内部捕获,
而是将错误向函数调用处抛出了, 那么就会立即终止当前的循环.
下面的示例程序会尝试读取 shadow 文件, 但因为没有读取权限, 就会产生 io::Error, 进而终止整个循环:
use std::fs;
use std::io;
use std::thread;
use std::time::Duration;

fn read_files() -> io::Result<()> {
    let mut is_shadow = false;
    loop {
        let filepath = if is_shadow {
            "/etc/shadow"
        } else {
            "/etc/passwd"
        };
        // 当尝试读取 shadow 文件 (当前用户无权读取) 时, 会终止无限循环.
        let content = fs::read_to_string(filepath)?;
        assert!(!content.is_empty());
        thread::sleep(Duration::from_secs(1));
        is_shadow = !is_shadow;
    }
}

fn main() {
    let ret = read_files();
    assert!(ret.is_err());
    assert_eq!(ret.err().unwrap().kind(), io::ErrorKind::PermissionDenied);
}
使用 break 终止循环
break 表达式的语法如下:
break [LifeTime | Label] [Expression]
可以发现 break 表达式比在其它语言中要更为复杂, 它后面通常都留空, 只立即终止当前循环; 但也可以跟随标签(label) 或者表达式
fn main() {
    let mut count = 0;
    loop {
        count += 1;

        if count == 3 {
            println!("three");
        }

        if count == 5 {
            println!("five");
            break;
        }
    }
}
break 跳转到最外层循环
多层嵌套的循环语句, 可以使用 break Label 跳出来.
fn main() {
    let mut sum = 0;

    'outer:
    for i in 0..100 {
        for j in 0..i {
            sum += j;
            if i * j > 200 {
                break 'outer;
            }
        }
    }
    assert_eq!(sum, 560);

    #[allow(clippy::never_loop)]
    #[allow(unused_labels)]
    'outer_loop: loop {
        println!("Enter the outer loop");

        'inner_loop: loop {
            println!("Enter the inner loop");

            break 'outer_loop;
        }
    }
    println!("Leave the outer loop");
}
循环中使用 break 来返回值
loop 表达式也可以有返回值:
fn main() {
    let mut x: i32 = 0;
    let mut y: i32 = 1;
    let accum: i32 = loop {
        (x, y) = (x + y, x);
        if x > 30 {
            break x + y;
        }
    };
    assert_eq!(accum, 55);
}
代码块使用 break 来返回值
use std::env;

fn main() {
    let args: Vec<String> = env::args().collect();

    let result: i32 = 'block: {
        if args.len().is_multiple_of(3) && !args.len().is_multiple_of(5) {
            break 'block 1;
        }
        if !args.len().is_multiple_of(3) && args.len().is_multiple_of(5) {
            break 'block 2;
        }
        3
    };

    assert_eq!(result, 3);
}
深入理解 break 表达式
先看一个基于 RustQuiz#20 修改的示例程序, 考虑考虑程序运行的结果是什么样的:
#![allow(clippy::never_loop)]
#![allow(unreachable_code)]
#![allow(clippy::unused_unit)]

fn break1() {
    loop {
        if (break println!("1")) {
            let _ = 1;
        }
    }
}

fn break1_expanded() {
    loop {
        if (break {
            println!("1");
        }) {
            let _ = 1;
        }
    }
}

#[rustfmt::skip]
fn break2() {
    loop {
        if break { println!("2") }
        {
            let _ = 2;
        }
    }
}

fn break2_expanded() {
    loop {
        if break () {
            println!("2")
        }

        // Another unused block
        {
            let _ = 2;
        }
    }
}

fn break3() {
    loop {
        if break println!("3") {
            let _ = 3;
        }
    }
}

fn noop() {}

fn main() {
    break1();
    break1_expanded();
    break2();
    break2_expanded();
    noop();
    break3();
}
上面的代码中, break1_expand() 函数是对 break1() 的重新格式化, 这样更容易阅读:
break { println!("1"); }这个表达式作为if表达式的条件, 会优先被执行, 会打印出1- 它执行的结果是
(), 所以if表达式中的条件不成立, if 表达式内的代码块不会被执行 - 然后立即终止本循环
可以看一下它的 MIR 代码:
fn break1() -> () {
    let mut _0: ();
    let _1: ();
    let mut _2: std::fmt::Arguments<'_>;
    let mut _3: &[&str];
    let mut _4: &[&str; 1];
    scope 1 {
    }

    bb0: {
        _4 = const break1::promoted[0];
        _3 = _4 as &[&str] (PointerCoercion(Unsize));
        _2 = Arguments::<'_>::new_const(move _3) -> [return: bb1, unwind continue];
    }

    bb1: {
        _1 = _print(move _2) -> [return: bb2, unwind continue];
    }

    bb2: {
        return;
    }
}

const break1::promoted[0]: &[&str; 1] = {
    let mut _0: &[&str; 1];
    let mut _1: [&str; 1];

    bb0: {
        _1 = [const "1\n"];
        _0 = &_1;
        return;
    }
}
而 break2() 就更奇怪了, 它与 break() 相比, 只是少了一对小括号. break2_expanded() 是它的展开样式,
可以发现 if break () { xxx } 表达式是核心, break () 表达式返回值为空, 所以 if 表达式条件判断不成立,
if 语句内的代码块不会被执行.
break2() 和 break2_expanded() 的 MIR 代码如下:
fn break2() -> () {
    let mut _0: ();
    scope 1 {
    }

    bb0: {
        return;
    }
}

fn break2_expanded() -> () {
    let mut _0: ();
    scope 1 {
    }

    bb0: {
        return;
    }
}
可以看出来, 这两个函数其实什么都不会做的, 类似于 noop() 函数:
fn break3() -> () {
    let mut _0: ();
    let _1: ();
    let mut _2: std::fmt::Arguments<'_>;
    let mut _3: &[&str];
    let mut _4: &[&str; 1];
    scope 1 {
跳过当前循环 continue
在循环语句中使用 continue 来跳过当前循环中的后续代码, 继续执行下个循环.
continue 表达式的语法如下:
continue [Lifetime | Label ]可以看到, continue 表达式也是支持标签的, 用于快速跳出多层循环嵌套.
先看一个例子, 展示 continue 的一般用法:
fn main() {
    for i in 1..20 {
        if i % 15 == 0 {
            println!("factor of 15");
            continue;
        }

        if i % 5 == 0 {
            println!("factor of 5");
            continue;
        }

        if i % 3 == 0 {
            println!("factor of 3");
        }
    }
}
下面的例子, 展示了如何使用 continue Label 跳出多层循环:
fn main() {
    let mut sum = 0;

    'outer:
    for i in 0..100 {
        for j in 0..i {
            sum += j;
            if i * j > 200 {
                continue 'outer;
            }
        }
    }
    assert_eq!(sum, 2087);
}
for 循环
for .. in 表达式用于遍历一个迭代器.
fn main() {
    for i in 1..10 {
        println!("{i}^2 = {}", i * i);
    }
}
默认情况下, for 在遍历一个集合时会使用 Iterator trait 的 into_iter() 方法.
除了这个方法之外, 还有另外两个方法:
iter()以引用的方法遍历集合, 不改变集合中的值, 该容器接下来还可以被使用into_iter()从集合中解析出里面的数据, 一旦遍历完它, 该集合接下来不可再被使用, 相当于把这个集合move到了这个循环中iter_mut()以可变引用的方法遍历集合, 可以改变集合中的值, 该集合在接下来还可被使用
while 循环
while 的一般写法跟在 C/C++ 语言中没有多少差别, 当条件成立时, 就执行内部的代码块; 当条件不成立时, 就终止循环. 看一个小示例:
fn main() {
    let mut num = 1;
    while !(num % 3 == 0 && num % 5 == 0) {
        num += 1;
    }
    assert_eq!(num, 15);
}
另一个小示例, 猜数字:
use std::io;

fn read_number() -> i32 {
    let mut line = String::new();
    if io::stdin().read_line(&mut line).is_err() {
        0
    } else {
        line.trim().parse::<i32>().unwrap_or_default()
    }
}

fn main() {
    println!("Guess number!");
    while read_number() != 42 {
        println!("Try again");
    }
    println!("You have got it!");
}
while let 循环
while let 表达式用于支持模式匹配, 当匹配成功时, 会执行 while 语句内的代码; 如果匹配失败了, 就终止循环.
下面的示例程序展示了单链表的一种写法, 注意里面的 len() 函数和 debug_print() 函数, 它们展示了 while let 的用法:
#[derive(Debug, Clone)]
pub struct ListNode {
    pub val: i32,
    pub next: Option<Box<ListNode>>,
}

impl ListNode {
    #[must_use]
    pub fn len(head: &Option<Box<Self>>) -> usize {
        let mut node_ref = head;
        let mut count = 0;
        while let Some(node_box) = node_ref {
            node_ref = &node_box.as_ref().next;
            count += 1;
        }
        count
    }

    #[must_use]
    #[inline]
    pub const fn is_empty(head: &Option<Box<Self>>) -> bool {
        head.is_none()
    }

    #[must_use]
    pub fn from_slice(slice: &[i32]) -> Option<Box<Self>> {
        let mut head = None;
        for &val in slice.iter().rev() {
            head = Some(Box::new(Self {
                val,
                next: head,
            }))
        }
        head
    }

    fn debug_print(head: &Option<Box<Self>>) {
        print!("head: [ ");
        let mut node_ref = head;
        while let Some(node_box) = node_ref {
            let val: i32 = node_box.as_ref().val;
            print!("{val}, ");
            node_ref = &node_box.as_ref().next;
        }
        println!("]");
    }
}

fn main() {
    let list = ListNode::from_slice(&[1, 2, 3, 5, 8]);
    ListNode::debug_print(&list);
    assert_eq!(ListNode::len(&list), 5);
}
为什么引入 loop 表达式
上文已经介绍了 loop 和 while 表达式, 那么问题来了, 既然 loop { block } 就相当于 while true { block },
那为什么 Rust 还要单独引入一个新的关键字呢? 像 C/C++ 这样的语言并不需要这样.
先看一个示例代码:
fn fibonacci(mut n: i32) -> i32 {
    debug_assert!(n >= 1);
    let mut x = 1;
    let mut y = 0;
    // 换成 while true 后就会编译失败.
    // while true {
    loop {
        (x, y) = (x + y, x);
        n -= 1;
        if n == 1 {
            return x;
        }
    }
}

fn main() {
    assert_eq!(fibonacci(10), 55);
}
上面的 fibonacci() 函数中, 如果把 loop 换成 while true, 就会编译失败.
这个是 rustc 编译器比较特殊的地方, 因为它支持 flow-sensitive analysis. 在 if/while 等支持条件判断的语句中,
它不会直接判断 condition 表达式的值是 true 还是 false; 它会假设条件的值既可以是 true, 也可以是 false,
然后继续分析 if/while 语句内部的代码块. 很显然, 上面的代码中, 如果把 loop 换成 while true,
当 rustc 编译器检查代码时, 它就会发现 fibonacci() 函数在不同的分支判断情况下可能返回不同类型的值,
而这是不被允许的.
遇到这样的情况, 就直接用 loop 表达式.
同样的, 看另一个示例, 它来自某个服务器端模块代码, 初始化好之后, 服务就开始一直运行下去了, 直到整个进程退出,
run_loop() 函数的返回值类型很不常见, ! 表示 never type.
impl Server {
    pub async fn run_loop(&mut self) -> ! {
        loop {
            tokio::select! {
                Some(cmd) = self.dispatcher_receiver.recv() => {
                    if let Err(err) = self.handle_dispatcher_cmd(cmd).await {
                        log::error!("Failed to handle dispatcher cmd: {:?}", err);
                    }
                }
                Some(cmd) = self.server_ctx_receiver.recv() => {
                    self.handle_server_ctx_cmd(cmd).await;
                }
            }
        }
    }
}
下划线表达式 Underscore
下划线表达式 _ 用于占位, 它只能用于赋值语句的左边.
let pos = (1, 2);
let y: i32;
(_, y) = pos;
assert_eq!(y, 2);
跟它很相近的写法是通配符模式 (wildcard pattern), 使用通配符重写上面的代码:
let pos = (1, 2);
let (_, y) = pos;
assert_eq!(y, 2);
代码块表达式 Block
一个代码块 (block expression) 就是一个表达式, 所以它可以为一个变量赋值. 看下面的例子:
fn main() {
    let x: i32 = if cfg!(target_os = "linux") {
        42
    } else {
        43
    };
    assert_eq!(x, 42);
}
要注意分号的位置 ;, 在 if 语句的最后一个表达式是不包含分号的. 另一个类似的例子:
fn main() {
    let x = {
        let mut sum = 0;
        for i in 1..10 {
            sum += i;
        }
        sum
    };
    assert_eq!(x, 45);
}
有时, 会在代码块表过式中自动声明本地的临时变量, 该变量的作用域只限于代码块内部 ( 即 { ... }).
如果在代码块之外有同名的变量, 那么该变量会在代码块内部被遮盖掉 (shadow). 看下面的例子:
fn main() {
    let num: i32 = 42;
    for num in 0_i32..10 {
        println!("{num}");
    }
    assert_eq!(num, 42);
}
为块表达式设置属性
const 块表达式
unsafe 块表达式
参考 unsafe 块表达式
async 块表达式
操作符表达式 Operators
算术与比特位操作符
参考 算术与比特位操作符
比较操作符
参考
其它表达式
还有更多类型的表达式, 它们被分散在其它章节, 下面我们列出了对应的索引位置.
字面量表达式 Literal expression
参考以下链接:
数组及其索引 Array
参考 数组
元组及其索引 Tuple
参考 元组
结构体 Struct 以及访问成员变量 Field-access
参考 调用结构体的方法
闭包 Closure 及方法调用表达式 Method-call
参考 closure
范围表达式 Range Expression
参考 Range
await 表达式
模块 Modules
Crate 的组成部分
模块 Modules
外部库 Extern crates
使用声明 use
函数 Functions
类型别名 Type alias
结构体 Structs
枚举 Enumerations
联合体 Unions
常量 Constant items
静态对象 Static items
Traits
方法实现 Implementations
外部代码块 External blocks
泛型参数 Generic parameters
关联类型 Associated items
模块 Modules
文件系统结构 Filesystem Hierarchy
默认的路径
- src/main.rs
- src/bin/xxx.rs
- build.rs
- examples/
- benches/
路径 Path
可见性 Visibility
参考
预先导入 Preludes
参考
所有权 Ownership
根据之前 对谷歌开发者的统计, Rust 语言中有三大难点:
- 宏 Macros
- 所有权与借用 Ownership and borrowing
- 异步编程 Async programming
接下来的三个章节将尝试着从多个方面介绍 Rust 的所有权及生命周期相关的知识.
-2022.html
本章的学习目标:
- 理解所有权的概念
- 温习 C++ 中的移动语义
- 掌握 Rust 中的移动语义
- 了解 Clone 和 Copy
- 了解共享所有权, Rc 和 Arc
- 了解引用
所有权
什么是所有权 ownership? 这个概念在之前的 C/C++ 以及 Python 等编程语言中, 并没有被太多的强调,
在 Rust 中, 所有权相关的有三个部分:
- 变量的值指的是它所占用的内存区域, 有一个对应的变量名指代该内存区域, 该变量是该内存区域的所有者
- 每个值有且只有一个属主/所有者, 一个资源只能一个所有者
- 当所有者超出作用域时, 这个值被释放 (drop)
所有权的问题会出现在哪里
在函数间传递对象
在函数调用时, 传递参数的方法有:
- 值传递
- 复制旧的对象
- 转移旧的对象
- 指针/引用, 传递一个内存地址
在结构体中保存对象
- 存储值的引用或指针
- 引用的有效性
- 值本身已经被释放了, 但是还保留有引用指向它
- 存储值本身
- 多个对象如何共享同一个值
缓解所有权的限制
上面提到了所有权的概念, 可以发现它的规则很严格, 如果只使用这样的方式来编程, 将极为受限, 为此, Rust 引入了另外的规则来缓限这样的限制, 给编写代码提供便利:
- 可以将值从一个变量移到另一个变量上, 用于重新安排
- 对于基本的值, 比如整数, 布尔值, char 等, 可以直接完整地拷贝它的值, 因为这样的值结构简单高效, Copy trait
- 可以完整地拷贝一个值, 包括它内部管理的堆内存等, 这是深拷贝, Clone trait
- 标准库提供了引用计数容器, Rc及 Arc, 这样多个变量可以拥有一个值; 当最后一个变量被释放后, 它们拥有的值也会被释放
- 可以使用 borrow reference (借用), 引用并不会改变值的拥有者
我们接下来依次介绍以上几个方面的内容.
C++ 中的移动语义 Move Semantics
有时候拷贝对象的成本太高, 会显著影响 C++ 代码的性能.
C++11 之前的世界
之前的 C++ 版本中, 鼓励以复制的方式来构造对象, 比如:
std::string s1 = "C++";
std::string s2 = s1;
上面的代码中, 字符串 s2 会复制一份与 s1 相同的堆内存, 这之后它们两个不再有任何关联.
就像下图展示的那样:

下面是一个更复杂的例子:
#include <cstdio>
#include <cassert>

#include <string>

class Person {
public:
  explicit Person(const std::string& name) noexcept : name_(name) {
    printf("Person(const string&) %s\n", name_.c_str());
  }

  Person(const Person& other) : name_(other.name_) {
    printf("Person(const Person&)\n");
  }

  Person(Person&& other) noexcept = delete;

  ~Person() = default;

  Person& operator=(const Person& other) {
    if (this == &other) {
      return *this;
    }
    this->name_ = other.name_;
    return *this;
  }

  Person& operator=(Person&& other) noexcept = delete;

  const std::string& name() const { return name_; }

private:
  std::string name_;
};


int main(int argc, char** argv) {
  (void)argc;
  (void)argv;

  std::string name = "Julia";
  Person p2(name);
  assert(!name.empty());
  name.clear();

  printf("creating p3\n");
  Person p3("Julia");

  // 使用 copy constructor
  printf("creating p4:\n");
  Person p4(p3);

  return 0;
}
为了简化图例, 本文忽略了 std::string 相关的 SSO (short string optimization), 但这对本文的核心没有影响.
更多关于 SSO 的信息可以参考本文结尾的链接.
C++11 引入 移动语义 Move semantics
移动语义依赖三个基础:
- move constructor
- move assignment operator
std::move()
这是对 C++ 过渡封装的补救.
- 一个右值引用参数
- 转移所有权
- 原有的对象仍然保持有效状态
- 它是浅拷贝
C++ 中的右值引用 Rvalue Reference
std::move() 将左值 (lvalue) 对象转换成对应的右值引用(rvalue reference).
什么是左值 lvalue?
- 可以出现在赋值表达式的左侧
- 有名字
- 有内存地址
什么是右值 rvalue?
- 除了不是 lvalue 的, 都是 rvalue
- 临时对象
- 字面量常量 literal constants, 比如
"Hello, C++" - 函数返回值 (不是左值引用 lvalue reference)
std::string s1 = "C++";
std::string s2 = std::move(s1);
上面的代码片段中, 字符串 s2 是 s1 原有内存的浅拷贝; 而 s1 里面的堆内存被重新设置了,
并且其字符串长度 size == 0.

下面是一个更复杂的例子, Person 类额外实现了
- move constructor
- move assignment operator
在创建对象时可以使用它们进行浅拷贝, 以提高程序的速度.
#include <cstdio>
#include <cassert>

#include <string>

class Person {
public:
  explicit Person(std::string&& name) noexcept : name_(std::move(name)) {
    printf("Person(string&&) %s\n", name_.c_str());
  }

  Person(const Person& other) : name_(other.name_) {
    printf("Person(const Person&)\n");
  }

  Person(Person&& other) noexcept : name_(std::move(other.name_)) {
    printf("Person(Person&&)\n");
  }

  ~Person() = default;

  Person& operator=(const Person& other) {
    if (this == &other) {
      return *this;
    }
    this->name_ = other.name_;
    return *this;
  }

  Person& operator=(Person&& other) noexcept {
    if (this == &other) {
      return *this;
    }
    this->name_ = std::move(other.name_);
    return *this;
  }

  const std::string& name() const { return name_; }

private:
  std::string name_;
};

int main(int argc, char** argv) {
  (void)argc;
  (void)argv;

  std::string name = "Julia";
  Person p2(std::move(name));
  assert(name.empty());

  printf("creating p3\n");
  Person p3("Julia");

  // 使用 copy constructor
  printf("creating p4:\n");
  Person p4(p3);

  // 使用 move constructor
  printf("creating p5:\n");
  Person p5(std::move(p4));

  return 0;
}
参考
- C++ Move Semantics - The Complete Guide
- C++ Core Guidelines
- SSO-23
- Understanding Small String Optimization (SSO) in std::string
所有权转移 Move ownership
大多数类型, 在赋值, 函数参数及函数返回值时, 都是 move 的方式, 而不是拷贝的方式. 原变量的值的所有权转移给目标变量, 同时原变量成为未初始化, 也不再能被使用.
let x = y; foo(x) 当进行赋值及作为函数参数时, 变量的所有权就进行了传递.
传递所有权时, 可以更改值的可变性:
let x = Box::new(42i32);
let mut x2 = x;
转移所有权的实现
作为与上文中转移字符串的 C++ 代码的对应, 我们实现了相应的 Rust 代码, 看它是如何转移所有权的:
#[allow(unused_variables)]
fn main() {
    let s1 = "Rust".to_owned();
    let s2 = s1;
}
使用命令 rustc --emit asm move-string.rs 可以生成相应的汇编文件,
我们摘取 main() 函数的代码并加上了一些注释, 可以对比上面的 rust 代码片段:
	.section	.text._ZN11move_string4main17h2b54fa27eb759b1dE,"ax",@progbits
	.p2align	4, 0x90
	.type	_ZN11move_string4main17h2b54fa27eb759b1dE,@function
_ZN11move_string4main17h2b54fa27eb759b1dE:
	.cfi_startproc
	subq	$56, %rsp
	.cfi_def_cfa_offset 64
;let s1 = "Hello, Rust".to_owned();
	leaq	8(%rsp), %rdi
	leaq	.L__unnamed_10(%rip), %rsi
	movl	$4, %edx
	callq	_ZN5alloc3str56_$LT$impl$u20$alloc..borrow..ToOwned$u20$for$u20$str$GT$8to_owned17hd870369ca9fdf413E
; s2.ptr = s1.ptr;
	movq	8(%rsp), %rax
	movq	%rax, 32(%rsp)
; s2.cap = s1.cap;
	movq	16(%rsp), %rax
	movq	%rax, 40(%rsp)
; s2.len = s1.len;
	movq	24(%rsp), %rax
	movq	%rax, 48(%rsp)
; drop(s2);
	leaq	32(%rsp), %rdi
	callq	_ZN4core3ptr42drop_in_place$LT$alloc..string..String$GT$17hcecf74a2a26a41e6E
	addq	$56, %rsp
	.cfi_def_cfa_offset 8
	retq
.Lfunc_end31:
	.size	_ZN11move_string4main17h2b54fa27eb759b1dE, .Lfunc_end31-_ZN11move_string4main17h2b54fa27eb759b1dE
	.cfi_endproc
根据上面的汇编代码指令, 我们画一下对应的图:

可以看到, s2 的栈内存数据都是从 s1 拷贝的, 但并没有拷贝它的堆内存, 这个属于浅拷贝 (shallow copy).
是函数结束前, 只调用了 drop(s2) 来释放 s2 的堆内存, 并没有调用 drop(s1) 来释放 s1 的堆内存, 为什么呢?
因为在哪里调用 drop() 函数, 以及是否调用 drop() 函数, 都是编译器在编译期间确定的.
例如上面的汇编代码就是编译器自动填充的:
; drop(s2);
	leaq	32(%rsp), %rdi
	callq	_ZN4core3ptr42drop_in_place$LT$alloc..string..String$GT$17hcecf74a2a26a41e6E
因为 s1 已经被编译器标记为 未初始化 uninit, 所以它不再能被使用, 也不必要调用 drop(s1) 释放它的内存.
与 drop 动作相关的更多细节, 我们在后面的 Drop 一节中有更全面和深入的介绍.
与 C++ 比较
可以看到, 在 Rust 中实现所有权的转移, 非常自然, 相对应的, 在C++中就需要:
- move constructor
- move assignment operator
std::move()
与C++中的转移语言的不同点是:
- 在 C++ 中,
s1和s2字符串变量都是可以访问的, 在超出作用域后, 它们的析构函数都会被调用 - 在 Rust 中, 只有
s2字符串可以被访问; 而s1已经被编译器标记为未初始化, 所以它不能再被使用, 并且它也不会被 drop - 在 C++ 中, 默认是深拷贝 (deep copy) 为主, 如果想要实现移动语义实现浅拷贝, 就需要用前文提到的方法修改代码
- 在 Rust 中, 默认实现的是移动语义, 如果想深拷贝, 就要显式地调用
clone()方法
另外, 作为对比, 我们也实现一个 Person 类, 可以参看一下前文的 C++ 代码:
#[derive(Debug, Clone)]
pub struct Person {
    name: String,
}

impl Person {
    #[must_use]
    #[inline]
    pub const fn new(name: String) -> Self {
        Self { name }
    }

    #[must_use]
    #[inline]
    pub fn name(&self) -> &str {
        &self.name
    }
}

#[allow(unused_variables)]
fn main() {
    let name = "Julia".to_owned();
    let p2 = Person::new(name);

    println!("creating p3");
    let p3 = Person::new("Julia".to_owned());

    // 使用 clone
    println!("creating p4:");
    let p4 = p3.clone();

    // 使用 move
    println!("creating p5:");
    let p5 = p4;
}
参考
不需要转移所有权
基础数据类型的值可以直接被拷贝, 因为它们的结构通常都很简单, 拷贝的效率很高.
而且有时候需要深拷贝一个值, 这样的话新的值与原先的值可以共存, 而且双方没有任何关联.
上面的情竞, 都不需要再转移值的所有权.
Copy trait
当一个类型实现了 Copy trait 后, 该类型的变量在赋值时, 进行的是复制的操作, 而不是转移(move)操作.
#[allow(unused_variables)]
fn main() {
    // bool
    let enabled = true;
    let enabled2 = enabled;
    assert_eq!(enabled, enabled2);

    // i32
    let x = 42_i32;
    let x2 = x;
    assert_eq!(x, x2);

    // f64
    let radius = 2.78_f64;
    let radius2 = radius;
    assert_eq!(radius, radius2);

    // array
    let fib = [1, 1, 2, 3, 5, 8];
    let fib2 = fib;
    assert_eq!(fib, fib2);

    // tuple
    let point = (3, 2);
    let point2 = point;
    assert_eq!(point, point2);

    // string slice
    let s = "Rust";
    let s2 = s;
    assert_eq!(s, s2);

    // slice
    let b = &[1, 2, 3];
    let b2 = b;
    assert_eq!(b, b2);

    // char
    let c = '中';
    let c2 = c;
    assert_eq!(c, c2);
}
上面的代码很好地演示了基础类型字面量的拷贝, 在标准库中都为它们实现了 Copy trait.
这里的拷贝是将它们
这里类型包括:
- 整数类型
- 浮点类型
- bool
- 元组 tuple, 要求元组中的元素也都是基础数据类型
- 数组 array, 要求数组中的元素也都是基础数据类型
- 字符 char
- 切片 slice
- 字符串字面量 string literal
下面来解释一下数组的拷贝过程, 首先看看上面代码对应的汇编代码:
.LBB54_6:
; fib[0] = 1;
	movl	$1, 376(%rsp)
; fib[1] = 1;
	movl	$1, 380(%rsp)
; fib[2] = 2;
	movl	$2, 384(%rsp)
; fib[3] = 3;
	movl	$3, 388(%rsp)
; fib[4] = 5;
	movl	$5, 392(%rsp)
; fib[5] = 8;
	movl	$8, 396(%rsp)
; fib2[0] = fib1[0];
; fib2[1] = fib1[1];
	movq	376(%rsp), %rax
	movq	%rax, 400(%rsp)
; fib2[2] = fib1[2];
; fib2[3] = fib1[3];
	movq	384(%rsp), %rax
	movq	%rax, 408(%rsp)
; fib2[4] = fib1[4];
; fib2[5] = fib1[5];
	movq	392(%rsp), %rax
	movq	%rax, 416(%rsp)
; assert_eq!(fib, fib2);
	leaq	376(%rsp), %rax
	movq	%rax, 424(%rsp)
	leaq	400(%rsp), %rax
	movq	%rax, 432(%rsp)
	movq	424(%rsp), %rdi
	movq	%rdi, 64(%rsp)
	movq	432(%rsp), %rsi
	movq	%rsi, 72(%rsp)
	callq	_ZN4core5array8equality103_$LT$impl$u20$core..cmp..PartialEq$LT$$u5b$U$u3b$$u20$N$u5d$$GT$$u20$for$u20$$u5b$T$u3b$$u20$N$u5d$$GT$2eq17h6d520c7c19838dbfE
整个过程如下图所示:

如何"深拷贝" 字符串 - Clone trait
前文演示了 C++ 中如何深拷贝一个字符串对象, 在 Rust 中实现同样的操作也很容易.
fn main() {
    let s = "Rust".to_owned();
    let s2 = s.clone();
    assert_eq!(s, s2);
}
生成的汇编代码如下:
	.type	.L__unnamed_14,@object
	.section	.rodata.cst4,"aM",@progbits,4
.L__unnamed_14:
	.ascii	"Rust"
	.size	.L__unnamed_14, 4

	.section	.text._ZN12clone_string4main17hb10a0993d22ed25dE,"ax",@progbits
	.p2align	4, 0x90
	.type	_ZN12clone_string4main17hb10a0993d22ed25dE,@function
_ZN12clone_string4main17hb10a0993d22ed25dE:
.Lfunc_begin6:
	.cfi_startproc
	.cfi_personality 155, DW.ref.rust_eh_personality
	.cfi_lsda 27, .Lexception6
	subq	$168, %rsp
	.cfi_def_cfa_offset 176
; let s = "Rust".to_owned();
	leaq	.L__unnamed_14(%rip), %rsi
	leaq	32(%rsp), %rdi
	movq	%rdi, 24(%rsp)
	movl	$4, %edx
	callq	_ZN5alloc3str56_$LT$impl$u20$alloc..borrow..ToOwned$u20$for$u20$str$GT$8to_owned17ha8562f57be6c6ad8E
	movq	24(%rsp), %rsi
.Ltmp33:
; let s2 = s.clone();
	movq	_ZN60_$LT$alloc..string..String$u20$as$u20$core..clone..Clone$GT$5clone17hdbaa59186bb9a20dE@GOTPCREL(%rip), %rax
	leaq	56(%rsp), %rdi
	callq	*%rax
.Ltmp34:
	jmp	.LBB40_3
.LBB40_1:
.Ltmp45:
; drop(s);
	leaq	32(%rsp), %rdi
	callq	_ZN4core3ptr42drop_in_place$LT$alloc..string..String$GT$17hb4f79947c261455cE
.Ltmp46:
	jmp	.LBB40_12
.LBB40_2:
.Ltmp44:
	movq	%rax, %rcx
	movl	%edx, %eax
	movq	%rcx, 152(%rsp)
	movl	%eax, 160(%rsp)
	jmp	.LBB40_1
.LBB40_3:
; assert_eq!(s, s2);
	leaq	32(%rsp), %rax
	movq	%rax, 80(%rsp)
	leaq	56(%rsp), %rax
	movq	%rax, 88(%rsp)
	movq	80(%rsp), %rdi
	movq	%rdi, (%rsp)
	movq	88(%rsp), %rsi
	movq	%rsi, 8(%rsp)
.Ltmp35:
	callq	_ZN62_$LT$alloc..string..String$u20$as$u20$core..cmp..PartialEq$GT$2eq17hc2b51f3ddbfca1c2E
.Ltmp36:
	movb	%al, 23(%rsp)
	jmp	.LBB40_6
.LBB40_4:
.Ltmp40:
; drop(s2);
	leaq	56(%rsp), %rdi
	callq	_ZN4core3ptr42drop_in_place$LT$alloc..string..String$GT$17hb4f79947c261455cE
.Ltmp41:
	jmp	.LBB40_1
.LBB40_5:
.Ltmp39:
	movq	%rax, %rcx
	movl	%edx, %eax
	movq	%rcx, 152(%rsp)
	movl	%eax, 160(%rsp)
	jmp	.LBB40_4
.LBB40_6:
	movb	23(%rsp), %al
	testb	$1, %al
	jne	.LBB40_8
	jmp	.LBB40_7
.LBB40_7:
	movq	8(%rsp), %rdx
	movq	(%rsp), %rsi
	movb	$0, 103(%rsp)
	movq	$0, 104(%rsp)
	movzbl	103(%rsp), %edi
.Ltmp37:
	leaq	.L__unnamed_15(%rip), %r8
	leaq	104(%rsp), %rcx
	callq	_ZN4core9panicking13assert_failed17h6e6ea08a2257a330E
.Ltmp38:
	jmp	.LBB40_9
.LBB40_8:
.Ltmp42:
	leaq	56(%rsp), %rdi
	callq	_ZN4core3ptr42drop_in_place$LT$alloc..string..String$GT$17hb4f79947c261455cE
.Ltmp43:
	jmp	.LBB40_10
.LBB40_9:
	ud2
.LBB40_10:
	leaq	32(%rsp), %rdi
	callq	_ZN4core3ptr42drop_in_place$LT$alloc..string..String$GT$17hb4f79947c261455cE
	addq	$168, %rsp
	.cfi_def_cfa_offset 8
	retq
.LBB40_11:
	.cfi_def_cfa_offset 176
.Ltmp47:
	movq	_ZN4core9panicking16panic_in_cleanup17hd62aa59d1fda1c9fE@GOTPCREL(%rip), %rax
	callq	*%rax
.LBB40_12:
	movq	152(%rsp), %rdi
	callq	_Unwind_Resume@PLT
.Lfunc_end40:
	.size	_ZN12clone_string4main17hb10a0993d22ed25dE, .Lfunc_end40-_ZN12clone_string4main17hb10a0993d22ed25dE
	.cfi_endproc
	.section	.gcc_except_table._ZN12clone_string4main17hb10a0993d22ed25dE,"a",@progbits
	.p2align	2, 0x0
以上操作完成之后, 内存的结构如下图所示:

上图中的 copy() 函数, 实际上是调用的 slice::to_vec() 函数实现的, 最终会调用
copy_nonoverlapping, 它等价于 libc 中的 memcpy(),
它的核心代码如下所示:
    pub trait ConvertVec {
        fn to_vec<A: Allocator>(s: &[Self], alloc: A) -> Vec<Self, A>
        where
            Self: Sized;
    }

    impl<T: Copy> ConvertVec for T {
        #[inline]
        fn to_vec<A: Allocator>(s: &[Self], alloc: A) -> Vec<Self, A> {
            let mut v = Vec::with_capacity_in(s.len(), alloc);
            // SAFETY:
            // allocated above with the capacity of `s`, and initialize to `s.len()` in
            // ptr::copy_to_non_overlapping below.
            unsafe {
                s.as_ptr().copy_to_nonoverlapping(v.as_mut_ptr(), s.len());
                v.set_len(s.len());
            }
            v
        }
    }
一个更复杂的深拷贝示例
#![allow(dead_code)]
#![allow(clippy::inconsistent_digit_grouping)]

use std::mem::size_of;

#[derive(Debug, Clone)]
pub struct Book {
    title: String,
    isbn: u64,
    price: f64,
}

fn main() {
    assert_eq!(size_of::<Book>(), 40);

    let books = vec![
        Book {
            title: "Programming Rust".to_owned(),
            isbn: 978_1_492_05259_3,
            price: 69.99,
        },
        Book {
            title: "Rust Atomics and Locks".to_owned(),
            isbn: 978_1_098_11944_7,
            price: 59.99,
        },
    ];

    let mut books_sorted = books.clone();
    books_sorted.sort_by(|a, b| a.price.total_cmp(&b.price));

    println!("books sorted: {books_sorted:?}");
}
先创建 books 数组, 里面包含了两本书:

然后再创建 books 数组的副本, 并且基于价格对书进行排序, 最后其内存结构如下图所示:

使用 Rc 与 Arc 共享所有权
引用计数指针, 其包含的值都被分配在了堆内存上, 类似于 Box 指针这样的. 除此之外, 在堆内存的头部, 还存放着被引用的次数(reference counting), 这个是 Box 没有的.
参考
引用 References
一个资源只能一个所有者, 但可以有多个引用(reference)指向它.
为什么使用引用而不使用指针?
引用是如何实现的?
指针
C++ 中的示例
引用 References
我们之前用过的 Box<T> 或者 Vec<T> 等, 内部包含了指向堆内存的指针, 这些指针是拥有堆内存的所有权,
被称为 owning pointers. 当 box 或者 vec 对象被丢弃 (drop) 时, 这些堆内存也会被释放掉,
它们是通过 owning pointers 管理这些堆内存的.
Rust 还有一种不拥有所有权的指针, 叫做引用 (references), 引用不会影响被引用对象的生命周期. 关于生命周期的更多内容放在了下一个章节.
本章主要的学习目标是:
- 引用的常规操作方法
- 共享引用与可变更引用
- 理解引用的内存布局
- 对抗借用检查器
引用的操作
引用的赋值
在 C++ 中, 引用在初始化之后, 其指向的内存地址便不再能被修改. 在 Rust 中, 却不是这样的, 引用可以再被指向别的地址:
let x = 42;
let y = 3;
let mut r = &x;
if y > 0 {
  r = &y;
}
这里, 我们使用 let mut r = &x; 因为要修改 r 指向的地址, 所以要给它加 mut
来修饰.
比较两个内存是否是同一个地址, 可以使用 std::ptr::eq().
创建引用的引用
解引用 Dereference
尽管引用是一种指针, 但因为它使用很频繁, Rust 在 . 操作符被使用时, 若有必要会
自动直接访问指针所指向的内存 deref 而不需要像 C 语言那样使用 *ref. 这个
功能被称为 implicit dereference`.
同时, 如有必要, .操作符还会隐式地借用其左操作值的引用:
let mut v = vec![1, 3, 2];
v.sort();
(&mut v).sort();
其中 v.sort() 被隐式去转换成了 (&mut v).sort().
let ref value = 42;等同于以下写法:
let value = &42;在 match 进行模式匹配时, 可以使用 ref 及 ref mut 来从 struct/tuple 中
解析出需要的元素:
#[derive(Debug)]
struct Point {
    x: i32,
    y: i32,
}

fn main() {
    let mut p = Point { x: 0, y: 5 };
    match p {
        Point { x: 0, ref mut y } => *y = 3,
        _ => println!("Do nothing!"),
    }
    println!("p: {:?}", p);
}
引用之间的比较
以下示例中, assert!(ref_x == ref_y); 进行的是值的比较;
而 assert!(!std::ptr::cmp(ref_x, ref_y)); 则比较了两个引用本身的内存地址,
所以它们是不相等的.
fn main() {
    let x = 42;
    let y = 42;
    let ref_x = &x;
    let ref_y = &y;

    assert!(ref_x == ref_y);
    assert!(!std::ptr::eq(ref_x, ref_y));
}
引用永远是有效的
引用不能是空指针或者别的无效值, 它们在编译期就已经确认了一直是有效的.
Option<&T> 表示可以是无效引用, 其值为 None, 类似于 C++ 中的 nullptr. 要么其值
是一个有效的引用. 这个写法不会占用额外的内存.
引用的内存结构 Memory layout
Rust 中的引用, 跟 C++ 中的引用一样, 在底层都是指针.
先看一段代码 C++ 代码片段:
#include <cassert>

int addr1() {
  int x = 42;
  int& x_ptr = x;
  x_ptr += 1;
  return x;
}

int main(void) {
  assert(addr1() == 43);
  return 0;
}
这段 C++ 代码对应的汇编代码如下:
	.file	"reference-address.cpp"
	.text
	.globl	_Z5addr1v
	.type	_Z5addr1v, @function
_Z5addr1v:
.LFB3:
	.cfi_startproc
	pushq	%rbp
	.cfi_def_cfa_offset 16
	.cfi_offset 6, -16
	movq	%rsp, %rbp
	.cfi_def_cfa_register 6
	movl	$42, -12(%rbp)
	leaq	-12(%rbp), %rax
	movq	%rax, -8(%rbp)
	movq	-8(%rbp), %rax
	movl	(%rax), %eax
	leal	1(%rax), %edx
	movq	-8(%rbp), %rax
	movl	%edx, (%rax)
	movl	-12(%rbp), %eax
	popq	%rbp
	.cfi_def_cfa 7, 8
	ret
	.cfi_endproc
.
然后我们用 C 语言重新写一遍相同的功能, 如下:
#include <stdlib.h>
#include <assert.h>

int addr1() {
  int x = 42;
  int* x_ptr = &x;
  *x_ptr += 1;
  return x;
}

int main(void) {
  assert(addr1() == 43);
  return 0;
}
这段 C 代码对应的汇编代码如下:
	.file	"reference-address.c"
	.text
	.globl	addr1
	.type	addr1, @function
addr1:
.LFB6:
	.cfi_startproc
	pushq	%rbp
	.cfi_def_cfa_offset 16
	.cfi_offset 6, -16
	movq	%rsp, %rbp
	.cfi_def_cfa_register 6
	movl	$42, -12(%rbp)
	leaq	-12(%rbp), %rax
	movq	%rax, -8(%rbp)
	movq	-8(%rbp), %rax
	movl	(%rax), %eax
	leal	1(%rax), %edx
	movq	-8(%rbp), %rax
	movl	%edx, (%rax)
	movl	-12(%rbp), %eax
	popq	%rbp
	.cfi_def_cfa 7, 8
	ret
	.cfi_endproc
可以发现, 两段汇编代码是完全一样的. 简单地说, C++中的引用, 在底层就是通过指针实现的.
最后, 我们看一下对应的 Rust 代码如何写:
fn add1() -> i32 {
    let mut x: i32 = 42;
    let x_ref: &mut i32 = &mut x;
    *x_ref += 1;
    x
}

fn main() {
    assert_eq!(add1(), 43);
}
当然, 也要把它生成汇编代码:
	.section	.text._ZN17reference_address4add117h385aa07c715333f2E,"ax",@progbits
	.p2align	4, 0x90
	.type	_ZN17reference_address4add117h385aa07c715333f2E,@function
_ZN17reference_address4add117h385aa07c715333f2E:
	.cfi_startproc
	pushq	%rax
	.cfi_def_cfa_offset 16
	movl	$42, 4(%rsp)
	movl	4(%rsp), %eax
	incl	%eax
	movl	%eax, (%rsp)
	seto	%al
	jo	.LBB12_2
	movl	(%rsp), %eax
	movl	%eax, 4(%rsp)
	movl	4(%rsp), %eax
	popq	%rcx
	.cfi_def_cfa_offset 8
	retq
.LBB12_2:
	.cfi_def_cfa_offset 16
	leaq	.L__unnamed_3(%rip), %rdi
	movq	_ZN4core9panicking11panic_const24panic_const_add_overflow17h343c6c3f46bad3f5E@GOTPCREL(%rip), %rax
	callq	*%rax
.Lfunc_end12:
	.size	_ZN17reference_address4add117h385aa07c715333f2E, .Lfunc_end12-_ZN17reference_address4add117h385aa07c715333f2E
	.cfi_endproc
可以看到, 生成的汇编代码里压根就没有用到 x_ref 这个引用. 这是因为表达式太简单, 被优化掉了,
我们使用 rustc --emit asm -g reference-address.rs 重新生成汇编, 得到以下内容:
	.section	.text._ZN17reference_address4add117h385aa07c715333f2E,"ax",@progbits
	.p2align	4, 0x90
	.type	_ZN17reference_address4add117h385aa07c715333f2E,@function
_ZN17reference_address4add117h385aa07c715333f2E:
.Lfunc_begin12:
	.file	11 "/home/shaohua/dev/rust/intro-to-rust/src/references/assets" "reference-address.rs"
	.loc	11 5 0
	.cfi_startproc
	subq	$24, %rsp
	.cfi_def_cfa_offset 32
; let x = 42;
	movl	$42, 12(%rsp)
; let x_ref = &mut x;
	leaq	12(%rsp), %rax
	movq	%rax, 16(%rsp)
	movl	12(%rsp), %eax
	incl	%eax
	movl	%eax, 8(%rsp)
	seto	%al
	jo	.LBB12_2
	movl	8(%rsp), %eax
	movl	%eax, 12(%rsp)
	movl	12(%rsp), %eax
	addq	$24, %rsp
	.cfi_def_cfa_offset 8
	retq
.LBB12_2:
	.cfi_def_cfa_offset 32
.Ltmp40:
	.loc	11 8 5
	leaq	.L__unnamed_3(%rip), %rdi
	movq	_ZN4core9panicking11panic_const24panic_const_add_overflow17h343c6c3f46bad3f5E@GOTPCREL(%rip), %rax
	callq	*%rax
.Ltmp41:
.Lfunc_end12:
	.size	_ZN17reference_address4add117h385aa07c715333f2E, .Lfunc_end12-_ZN17reference_address4add117h385aa07c715333f2E
	.cfi_endproc
上面几行重要的汇编代码都加了注释, 可以看到:
x_ref存储的也是x的内存地址
这个跟上面 C/C++ 代码里的行为是一致的.
简单地说, Rust 中的引用, 在底层也是通过指针实现的.
但是, 除了我们用过的这些引用类型之外, Rust 还有一些更复杂的引用类型, 它们的内存结构也更复杂.
切片 slice 的引用
上段介绍过了引用本身占用的内存大小只是一个指针大小, 即 usize. 这个类似于 C/C++ 中的
指针.
但切片以及 trait object 的引用, 这两类都是胖指针(fat pointer), 即除了指向内存地址之外, 还有别的属性.
指向 slice 的指针包含两个成员, 第一个是指向 slice 某个元素的内存地址; 第二个 是定义了该引用可访问的元素个数.
指向 trait object 的引用包含了两个 field, 第一个是指向该值的内存地址, 第二个指向 该值对该 trait 的实现的地址, 以方便调用该 trait 定义了的方法.
但还有两个特殊类型的引用, 它们都占两个指针大小, 即 usize * 2:
切片 slice 的引用是一个胖指针, 该指针包含两个字段:
- slice 起始地址
- slice 长度
先看一段代码示例:
use std::mem::size_of_val;

fn main() {
    // 整数数组
    let numbers: [i32; 5] = [1, 2, 3, 4, 5];
    assert_eq!(size_of_val(&numbers), 20);

    // 数组的引用
    let numbers_ref: &[i32; 5] = &numbers;
    assert_eq!(size_of_val(numbers_ref), 20);

    // 切片引用, 该切片指向数组中的第 3 个元素, 切片长度为 3
    let slice_ref: &[i32] = &numbers[2..];
    assert_eq!(size_of_val(slice_ref), 12);
    assert_eq!(slice_ref.len(), 3);
}
这里面创建了两个引用:
numbers_ref只是一般的引用, 它指向数组numbers第 1 个元素的地址slice_ref是一个切片引用, 它里面的指针指向numbers的第 3 个元素的地址; 而且切片的长度为 3
其内存结构如下图如示:

如果还不相信的话, 我们可以用调试器直接查看它们的内存, 首先是 numbers 数组, 注意它的第 3 个元素的内存地址:
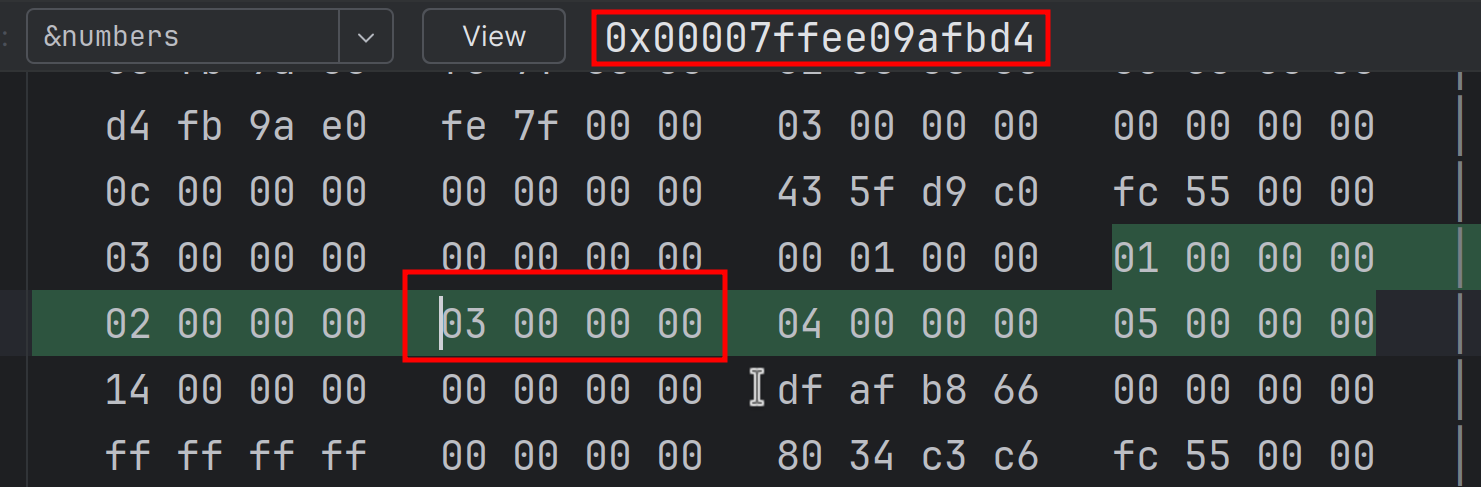
可以看到, 这个整数数组的内存都是连续存放的, 每个元素占用 4 个字节.
然后是 slice_ref 的内存结构:
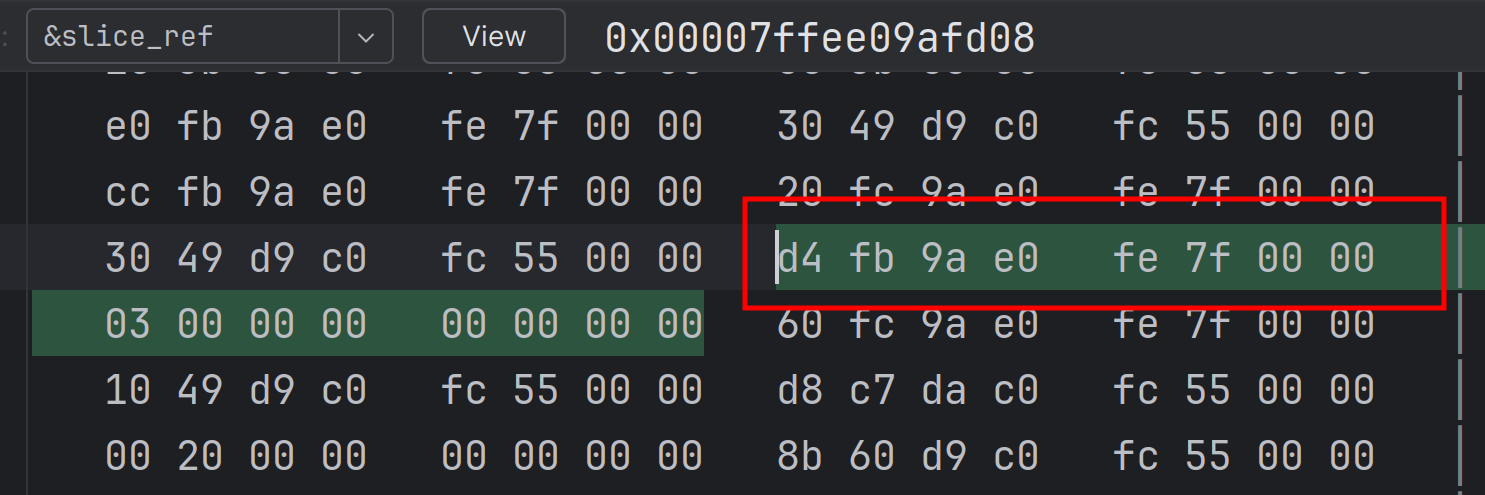
可以看到, slice_ref 确实包含两个成员:
- 指针, 指向数组
numbers的第 3 个元素 - 切片长度, 是 3
trait object 的引用
trait object 的引用也是一个胖指针, 包含两部分:
- object 数据地址
- object virtual table 地址, 即该值对该 trait 的具体实现
引用的安全性 Reference Safety
- 引用不可能指向空对象/空指针/空地址, 即它一定指向一个有效的对象
- 引用的生命周期必须是在它指向的对向的生命周期内, 即可以保证引用指向的内存区域绝对有效
- 一个对象只能有一个可写引用 (
&mut T), 避免出现数据竞争
与C++中的引用进行比较
共享引用 Shared References
共享引用又称为只读引用 (Read-only References).
可以使用引用来访问值,同时不影响其生命周期。
- shared reference,
&T, 同时期内可以有多个这种引用指向同一个值,都是只读的。 shared references 实现了Copytrait - mutable reference,
&mut T,对其引用的值可读可写,同时期内只能有一个可写引用 指向一个值,Mutable references 没有实现Copytrait
上面的情况是互斥的, 即, 一个对象不能同时有共享引用 (shared references), 也有可变更引用 (mutable reference), 这个 Rust 语言的重要特点. 因为它禁止对 "对象的共享可变更访问" (shared mutable accesses, SMA).
可变更引用 Mutable References
可写引用又称排它型引用(Exclusive Reference).
Reborrow
参考
借用检查器 Borrow Checker
参考
生命周期 Lifetimes
生命周期 Lifetime 只有在编译期间被编译器使用, 在运行期间不存在.
参考
标注生命周期
参考
函数中的生命周期
当函数只接受一个引用作为参数, 而且也返回一个引用时, rust 会假设这两个引用有 相同的生命周期. 这样做主要是为了简化函数声明. 比如:
fn smallest(v: &[i32]) -> &i32 {
let mut s = &v[0];
for r in &v[1..] {
if *r < *s {
s = r;
}
}
s
}
fn main() {
let parabola = [9, 4, 3, 1, 1, 4, 9];
let s = smallest(¶bola);
println!("s: {}", s);
}结构体生命周期
要么使用静态生命周期, 要么显式地标出其生命周期:
struct S {
  r: &'static i32,
}

struct T<'a> {
  r: &'a i32,
}
如果结构体里嵌了别的结构体, 可以这样:
struct S<'a> {
  r: &'a i32,
}

struct T<'a> {
  s: S<'a>,
}
泛型生命周期
省去标注生命周期 Lifetime Elision
常量 const
const 作为变量修饰符即可用于本地作用域, 也可用于全局作用域. const 用于定义常量, 编译期即被展开并替换 (inline). 它只代表值, 不代表内存地址.
const 函数
参考
静态变量 static
static 变量修饰符即可用于本地作用域, 也可用于全局作用域.
static 用于定义静态变量.
如果静态变量是可修改的(mutable), 则对它的读写都是 unsafe 的.
参考
static 生命周期
区分 static 生命周期与全局变量 static 装饰符
全局变量, 要用 static 修饰, 有两个特点:
- 每个静态变量都要被初始化
- 可变静态变量不是线程安全的, 如果要直接访问它, 需要放在
unsafe {}内部
static mut STASH: &i32 = &10;
static WORTH_POINTING_AT: i32 = 42;
Non-lexical lifetimes NLL
参考
结构体 Structs
除了 基础数据类型 之外, Rust 主要还支持四种用户自定义类型:
本章先介绍结构体相关的知识, 后面章节陆续介绍其它的几种类型.
定义结构体 Definition
结构体有三种写法:
- struct struct
- tuple struct
- union struct
Struct Structs
Struct structs 又称为 named-field struct.
C 语言中类似的结构体, 经典写法, 除了各元素本身占用的内存之外, struct 内还可能有 一个额外的 padding, 用于对齐内存, 即是 4 的倍数.
struct PointF {
    x: f32,
    y: f32,
}
Tuple Structs
命名元组, Tuple-like structs, named tuple, 其实就是一个元素的别名, 比如 struct Matrix(f64, f64, f64, f64).
也可能包含一个 padding 用于对齐内存.
pub struct Bounds(pub usize, pub usize);

impl Bounds {
    fn new(elem0: usize, elem1: usize) -> Bounds {
        Bounds(elem0, elem1)
    }
}

fn main() {
    let image_bounds = Bounds(1024, 768);
}
这种写法对于重命名一个新的类型很有效, 还可以为它实现新的方法:
struct Ascii(Vec<u8>);这种写法比以下写法更为严格, 下面的写法只是声明了一个别名, 并不能给 Ascii 添加新的方法:
type Ascii = Vec<u8>;Unit-Like Structs
Unit struct, 即定义一个空白的不包含任何具体元素的, 比如 struct Nil;, 其占用的
内存大小为0.
struct Nil ();

fn main() {
    let nil = Nil;
    assert_eq!(std::mem::size_of_val(&nil), 0);
}
定义方法 Implementation
访问成员变量
调用结构体的方法
自动解引用
New Type
Ref
- https://www.howtocodeit.com/articles/ultimate-guide-rust-newtypes
内存布局 Memory Layout
repr(packed)
枚举 Enums
经典写法
经典枚举, 类似于 C 中的写法:
enum Weekday {
    Monday,
    Tuesday,
    Wednesday,
    Thursday,
    Friday,
    Saturday,
    Sunday,
}
对于像 Option<Box<i32>> 这种的, Option<> 内部是一个指针类型的, 这里只在栈上
占一个 machine word, 通常是 8 个字节. 值为 0 则表示 None, 非 0 表示
Some<T>.
内存布局 Memory Layout
与其它数据类型相比, 枚举类型的内存布局比较复杂, 接下来我们分别说明.
只有枚举项标签
pub enum Weekday {
    Monday,
    Tuesday,
    Wednesday,
    Thursday,
    Friday,
    Saturday,
    Sunday,
}
这里, Weekday 类型占用1个字节的内存.

随着元素个数的增加, 可以占用2个字节或者更多. 比如下面的例子, 编译器会给它分配2个字节, 因为有太多枚举项了:
use std::mem::size_of;

pub enum TooManyTags {
    Tag0,
    Tag1,
    Tag2,
    Tag3,
    ...
    Tag257,
    Tag258,
    Tag259,
}

fn main() {
    assert_eq!(size_of::<TooManyTags>(), 2);
}
显式地指定字节数
C++ 中, 可以显式地指定其数据类型, 以便确定占用的字节数. 下面的代码片段, Weekday 中的枚举项就会占用4个字节:
enum class Weekday : uint32_t {
  Monday,
  Tuesday,
  Wednesday,
  Thursday,
  Friday,
  Saturday,
  Sunday,
};
Rust 中可以这样写:
use std::mem::size_of;

#[repr(u32)]
#[derive(Debug, Default, Clone, Copy, Eq, PartialEq)]
pub enum Weekday {
    #[default]
    Monday,
    Tuesday,
    Wednesday,
    Thursday,
    Friday,
    Saturday,
    Sunday,
}

impl Weekday {
    pub const fn is_weekend(self) -> bool {
        matches!(self, Self::Saturday | Self::Sunday)
    }
}

fn main() {
    assert_eq!(size_of::<Weekday>(), 4);

    let monday = Weekday::Monday;
    let _tuesday = Weekday::Tuesday;
    assert!(!monday.is_weekend());
}
它们这些枚举项都占用4个字节, 尽管一个字节足够存储它们的值.

混合类型
枚举项标签内, 还包含了其它类型的数据.
enum 也可以使用不同的类型作为其元素. 比如:
#![allow(unused_variables, dead_code)]

use std::mem::size_of;

pub enum WebEvent {
    PageLoad,
    PageUnload,
    KeyPress(char),
    Click { x: i32, y: i32 },
}

impl WebEvent {
    fn tag(&self) -> u8 {
        unsafe { *(self as *const Self as *const u8) }
    }
}

fn main() {
    assert_eq!(size_of::<char>(), 4);
    assert_eq!(size_of::<WebEvent>(), 12);
    assert_eq!(size_of::<String>(), 24);

    let page_load = WebEvent::PageLoad;
    let keypress = WebEvent::KeyPress('a');
    let click = WebEvent::Click { x: 42, y: 43 };
    assert_eq!(click.tag(), 3);
}
这里, WebEvent 类型占用的内存, 基于其子元素所占内存的最大值, 这里就是 Click. 同时要考虑到内存对齐 (alignment) 的问题.
它里面的枚举ID只占用了一个字节, 但是还有3个字节作为填充(padding).

包含一个指针类型 - 空指针优化
enum
#![allow(unused_variables, dead_code)]

use std::mem::size_of;

pub enum WebEventWithString {
    PageLoad,
    PageUnload,
    KeyPress(char),
    Paste(String),
    Click { x: i32, y: i32 },
}

impl WebEventWithString {
    fn tag(&self) -> u8 {
        unsafe { *(self as *const Self as *const u8) }
    }
}

fn main() {
    assert_eq!(size_of::<char>(), 4);
    assert_eq!(size_of::<WebEventWithString>(), 24);
    let mut s = "Hello, world".to_owned();
    s.reserve(3);
    println!("len: {}, cap: {}", s.len(), s.capacity());

    let paste = WebEventWithString::Paste(s.clone());
    let paste2 = WebEventWithString::Paste(s.clone());
    let click = WebEventWithString::Click { x: 42, y: 43 };
    let keypress = WebEventWithString::KeyPress('a');
    // assert_eq!(paste.tag(), 3);
    assert_eq!(click.tag(), 4);
    assert_eq!(size_of::<Option<String>>(), 24);
}
这里, Paste(String), 内部包含了一个 String 对象, 而 String 对象里有一个指针, 指向了堆内存, 用于存放字符串的内容.
下图就是这个枚举类的内存分布情况:

可以看到, paste 对象第一个值包含的就是 String 对象里的那个指向堆内存的指针:

同时, 除了 Paste(String) 之外的其它枚举项, 里面的枚举ID只占了一个字节, 还有7个字节用于填充(padding), 填充项的第7个字节,
被强制设置成了 0x80, 这个就是用于标记一个无效指针地址的, 即所谓的空指针优化.
比如 click 对象的枚举ID以及填充字节加在一起是8个字节. 它的值是:
0x80000000 00000004, 这不是一个有效的内存地址! 因为内存地址不高于 0x00007fff ffffffff.
表示这仅仅是一个枚举项的ID, 而不是一个内存地址. 除了 Paste(String) 外的其它几个枚举项, 都是这样的布局!
编译器就是利用这种手段, 在枚举中对有一个指针的对象做了优化.
像上面的例子中: assert_eq!(size_of::<String>(), size_of::<WebEventWithString>());
包含多个指针类型
如果一个枚举项中, 有多于一个枚举项里含有指针, 那个上面介绍的对指针的优化方法就不再适用了. 因为加 0x80 前缀的方法不能区别多个内存地址.
看下面的代码示例:
#![allow(unused_variables, dead_code)]

use std::mem::size_of;

pub enum WebEventWithMoreStrings {
    PageLoad,
    PageUnload,
    KeyPress(char),
    Paste(String),
    Copy(String),
    Click { x: i32, y: i32 },
}

impl WebEventWithMoreStrings {
    fn tag(&self) -> u8 {
        unsafe { *(self as *const Self as *const u8) }
    }
}

fn main() {
    assert_eq!(size_of::<char>(), 4);
    assert_eq!(size_of::<String>(), 24);
    let mut s = "Hello, world".to_owned();
    s.reserve(3);
    println!("len: {}, cap: {}", s.len(), s.capacity());

    assert_eq!(size_of::<Option<String>>(), 24);
    assert_eq!(size_of::<WebEventWithMoreStrings>(), 32);
    let paste = WebEventWithMoreStrings::Paste(s.clone());
    let copy = WebEventWithMoreStrings::Copy(s);
    let keypress = WebEventWithMoreStrings::KeyPress('a');
    let click = WebEventWithMoreStrings::Click { x: 42, y: 43 };
    assert_eq!(keypress.tag(), 2);
    assert_eq!(paste.tag(), 3);
    assert_eq!(copy.tag(), 4);
    assert_eq!(click.tag(), 5);
}
这个枚举类的内存反而简单了一些:

因为不存在对指针的优化, Paste(String) 和 Copy(String) 的枚举ID也被设置了, 它占用一个字节, 同时有7个字节的填充(
padding).
这里, 使用 WebEventWithMoreStrings::tag() 方法就可以从各个枚举项里解析出枚举ID:
assert_eq!(keypress.tag(), 2);
assert_eq!(paste.tag(), 3);
assert_eq!(copy.tag(), 4);
assert_eq!(click.tag(), 5);
为枚举定义方法 Impl
与C/C++不同, Rust 可以为枚举定义方法. 这个也得益于 Rust 将数据与函数做了彻底的分离.
#[derive(Debug, Default, Clone, Copy, Eq, PartialEq)]
pub enum Weekday {
    #[default]
    Monday,
    Tuesday,
    Wednesday,
    Thursday,
    Friday,
    Saturday,
    Sunday,
}

impl Weekday {
    pub const fn is_weekend(self) -> bool {
        matches!(self, Self::Saturday | Self::Sunday)
    }
}

fn main() {
    let monday = Weekday::Monday;
    assert!(!monday.is_weekend());
}
Option
内存布局
空指针优化
Result
联合体 Unions
跟 structs/enums 不同, 联合体 unions 是在较新的版本中才引入的类型, 引入这种类型主要还是考虑 与 C/C++ 语言兼容. 联合体在现代化的语言中使用并不多.
所谓的联合体, 就是对于一块内存, 使用不同的结构去解析它, 读取或者修改它. 比如, 把它的内部作为
int64 或者作为一个函数指针.
本文先展示一些联合体的使用示例, 之后重点介绍它的内存布局.
联合体主要用于 FFI, 这方面在后面的章节会有更多介绍, 在这里我们要清楚, 对于联合体的操作都是不安全的,
需要 unsafe 来释放编译器的限制. 联合体的出现, 主要是为了节省内存, 但是对它的操作, 可能会
触发未定义行为.
定义联合体
先看一个联合体的例子:
#![allow(non_camel_case_types)]
#![allow(clippy::module_name_repetitions)]
#![allow(dead_code)]

use std::ffi::c_void;

pub type poll_t = u32;

#[repr(C)]
#[derive(Default, Clone, Copy)]
pub struct epoll_event_t {
    pub events: poll_t,
    pub data: epoll_data_t,
}

#[repr(C)]
#[derive(Clone, Copy)]
pub union epoll_data_t {
    pub ptr: *const c_void,
    pub fd: i32,
    pub v_u32: u32,
    pub v_u64: u64,
}

impl Default for epoll_data_t {
    fn default() -> Self {
        Self {
            v_u64: 0,
        }
    }
}

fn main() {
    assert_eq!(size_of::<epoll_data_t>(), size_of::<u64>());
}
这个结构体是在 linux 的 epoll API 里使用. 它里面有 4 个元素, 但是这 4 个元素共享同一块内存.
比如, fd 只占用 4 个字节, 而 ptr 在 64 位的机器上会占用 8 个字节. 这个结构体占用的内存,
会按照占用内存最多的那个元素, 以保证能存下它, 比如上面的 v_u64 永远占用 8 个字节.
另外, 要注意它的内存成局方式是 repr(C), 这是因为联合体常用于与C/C++一起使用, 为了保证与C ABI
的兼容, 通常都要使用 repr(C) 的布局方式.
联合体的特点
- 联合体中各个成员共享同一块内存, 其内存大小是占用内存最大的那个元素
- 当向一个成员写入值时, 可能就会把别的成员的内容给覆盖
联合体的成员类型
不单联合体的使用很受限, 它里面包含的成员类型也受限, 只能是:
- 实现了
Copytrait - 共享引用
&T或者可变更引用&mut T ManuallyDrop<T>, 这个需要用户手动管理对象的生命周期, 对类型T不作限制- 数组
[T; N]或者元组(T, T), 这里的类型T要满足上面的几个条件
以上的限定条件, 就是为了让联合体的对象不再需要自动被 drop. 但用户仍然可以手动实现 Drop trait.
联合体的初始化
联合体的初始化比较特殊, 只需要初始化其中的一个成员即可.
比如, 初始化一个上面介绍的 epoll_data_t 对象.
let data = epoll_data_t { fd: 1 };但是, 上面的代码只初始化了其中的 4 个节字, 还有高位的 4 个字节是未初始化的, 所以也不应该直接 访问高 4 位的内存, 否则就产生未定义行为.
读写联合体中的成员
向联合体中的成员写入数据, 只是写内存而已, 所以是安全的, 不需要 unsafe;
但是从联合体的成员读数据, 编译器不能保证里面的内存都被初始化了, 所以是不安全的, 需要 unsafe 将它包括起来,
这里是提醒开发者可能会产生未定义行为.
比如这个例子:
#![allow(non_camel_case_types)]

use std::ffi::c_void;

#[repr(C)]
pub union literals_t {
    pub v_u8: u8,
    pub v_u16: u16,
    pub v_u32: u32,
    pub v_u64: u64,
    pub v_char: char,
    pub v_ptr: *const c_void,
}

impl literals_t {
    pub const NULL_PTR: Self = Self { v_u64: 0 };

    /// 将所有字节都重置为 0
    #[inline]
    pub fn reset(&mut self) {
        self.v_u64 = 0;
    }
}

fn main() {
    assert_eq!(size_of::<literals_t>(), 8);

    // 初始化时, 不是 unsafe的, 这里只写入其中 1 个字节, 其它 7 个字节位未初始化.
    let value = literals_t { v_u8: 42 };

    // 访问成员的值是, 是 unsafe
    unsafe {
        assert_eq!(value.v_u8, 0x2a);
    }

    let v_u64 = unsafe { value.v_u64 };
    let least_byte = (v_u64 & 0xff) as u8;
    assert_eq!(least_byte, 42);

    // 访问其它字节, 是未定义行为, 因为它们都没有被初始化.
    let _most_byte = (v_u64 >> 24) as u8;
}
定义方法
这个是跟 C/C++ 有很大不同的地方, Rust 可以给联合体定义方法.
还看上面用到的例子:
impl literals_t {
    pub const NULL_PTR: Self = Self { v_u64: 0 };

    /// 将所有字节都重置为 0
    #[inline]
    pub fn reset(&mut self) {
        self.v_u64 = 0;
与结构体和枚举一样, 使用 impl Union 语法可以给联合体定义方法.
甚至还可以给它定义常量值, 就像在结构体中一样.
与结构体的两个不同点:
- 联合体中的成员共享同一块内存, 彼此之间可能会相互覆盖
- 联合体中的成员类型比较受限, 通常需要实现
Copytrait
其它方面, 和结构体相比就相差不多了, 比如:
- 可以定义常量
- 可以通过
impl Union语法实现方法 - 可以给它们实现 trait
impl Trait for Union - 可以给成员设置
pub,pub(crate), 修改其可见性 visibility - 支持泛型
- 支持模式匹配
联合体的模式匹配
联合体的模式匹配比较受限, 每次只能匹配其中的一个成员, 先看一个示例:
#![allow(non_camel_case_types)]
#![allow(clippy::module_name_repetitions)]
#![allow(dead_code)]

use std::ffi::c_void;

#[repr(C)]
#[derive(Clone, Copy)]
pub union epoll_data_t {
    pub ptr: *const c_void,
    pub fd: i32,
    pub v_u32: u32,
    pub v_u64: u64,
}

fn main() {
    let data = epoll_data_t { fd: 2 };
    unsafe {
        match data {
            epoll_data_t { fd: 2 } => println!("stdout fd"),
            epoll_data_t { v_u32: 42 } => println!("u32 is 42"),
            epoll_data_t { v_u64: 28 } => println!("u64 is 28"),
            epoll_data_t { ptr } => if ptr.is_null() {
                eprintln!("NULL ptr")
            } else {
                println!("ptr: {ptr:?}")
            },
        }
    }
}
有时, 需要配合支持 C 语言中常用的 tagged-union 写法, 比如下面的例子是对 X11 的 XEvent 的封装:
use std::ffi::c_void;
use std::ptr;

#[repr(u8)]
#[derive(Debug, Default, Clone, Copy)]
pub enum EventType {
    #[default]
    Any,
    Keyboard,
    Button,
    Map,
}

pub type WindowId = i32;

#[repr(C)]
#[derive(Debug, Clone, Copy)]
pub struct XAnyEvent {
    pub event_type: EventType,
    pub serial: usize,
    pub send_event: bool,
    pub display: *const c_void,
    pub window: WindowId,
}

#[repr(C)]
#[derive(Debug, Clone, Copy)]
pub struct XKeyEvent {
    pub event_type: EventType,
    pub serial: usize,
    pub send_event: bool,
    pub display: *const c_void,
    pub window: WindowId,
    pub root: WindowId,
    pub x: i32,
    pub y: i32,
    pub x_root: i32,
    pub y_root: i32,
    pub keycode: u32,
}


impl XKeyEvent {
    #[must_use]
    #[inline]
    pub fn new(window: WindowId, x: i32, y: i32, keycode: u32) -> Self {
        Self {
            event_type: EventType::Keyboard,
            serial: 0,
            send_event: false,
            display: ptr::null(),
            window,
            root: window,
            x,
            y,
            x_root: x,
            y_root: y,
            keycode,
        }
    }
}

#[repr(C)]
#[derive(Debug, Clone, Copy)]
pub struct XButtonEvent {
    pub event_type: EventType,
    pub serial: usize,
    pub send_event: bool,
    pub display: *const c_void,
    pub window: WindowId,
    pub root: WindowId,
    pub sub_window: WindowId,
    pub x: i32,
    pub y: i32,
    pub state: u32,
    pub button: u32,
}

#[repr(C)]
pub union XEvent {
    pub event_type: EventType,
    pub xany: XAnyEvent,
    pub xkey: XKeyEvent,
    pub xbutton: XButtonEvent,
}

fn main() {
    assert_eq!(size_of::<XEvent>(), 64);

    let event = XEvent {
        xkey: XKeyEvent::new(0x128a8, 40, 80, 95)
    };

    unsafe {
        match event.event_type {
            EventType::Any => println!("generic event"),
            EventType::Keyboard => {
                let x = event.xkey.x;
                let y = event.xkey.y;
                let keycode = event.xkey.keycode;
                println!("keyboard event at ({x}, {y}), keycode: 0x{keycode:0X}");
            }
            _ => eprintln!("Unhandled events"),
        }
    }
}
或者, 使用另一种风格的 tagged-union 写法, 这种的要更清晰一些. 下面这个例子支持单精度和双精度的方式来存储一个坐标点:
#![allow(dead_code)]

#[repr(u32)]
pub enum PointPrecision {
    F32,
    F64,
}

#[repr(C)]
union PointValue {
    v_f32: f32,
    v_f64: f64,
}

#[repr(C)]
struct Point {
    tag: PointPrecision,
    v: PointValue,
}

impl Point {
    pub const fn new_f32(value: f32) -> Self {
        Self {
            tag: PointPrecision::F32,
            v: PointValue { v_f32: value },
        }
    }

    pub const fn new_f64(value: f64) -> Self {
        Self {
            tag: PointPrecision::F64,
            v: PointValue { v_f64: value },
        }
    }

    #[allow(clippy::match_like_matches_macro)]
    pub fn is_zero(&self) -> bool {
        unsafe {
            match self {
                Self { tag: PointPrecision::F32, v: PointValue { v_f32: 0.0 } } => true,
                Self { tag: PointPrecision::F64, v: PointValue { v_f64: 0.0 } } => true,
                _ => false,
            }
        }
    }
}

fn main() {
    assert_eq!(size_of::<Point>(), 16);

    let point = Point::new_f32(3.12);
    assert!(!point.is_zero());
}
内存布局 Memory Layout
与结构体和枚举相比, 联合体的内存布局是最特殊的.
前面的章节提到了, 联合体的特点:
- 联合体中各个成员共享同一块内存, 其内存大小是占用内存最大的那个元素
- 当向一个成员写入值时, 可能就会把别的成员的内容给覆盖
具体是怎么共享内存的, 我们先看个例子:
#![allow(non_camel_case_types)]

use std::ffi::c_void;

#[repr(C)]
pub union literals_t {
    pub v_u8: u8,
    pub v_u16: u16,
    pub v_u32: u32,
    pub v_u64: u64,
    pub v_char: char,
    pub v_ptr: *const c_void,
}

impl literals_t {
    pub const NULL_PTR: Self = Self { v_u64: 0 };

    /// 将所有字节都重置为 0
    #[inline]
    pub fn reset(&mut self) {
        self.v_u64 = 0;
    }
}

fn main() {
    assert_eq!(size_of::<literals_t>(), 8);

    // 初始化时, 不是 unsafe的, 这里只写入其中 1 个字节, 其它 7 个字节位未初始化.
    let value = literals_t { v_u8: 42 };

    // 访问成员的值是, 是 unsafe
    unsafe {
        assert_eq!(value.v_u8, 0x2a);
    }

    let v_u64 = unsafe { value.v_u64 };
    let least_byte = (v_u64 & 0xff) as u8;
    assert_eq!(least_byte, 42);

    // 访问其它字节, 是未定义行为, 因为它们都没有被初始化.
    let _most_byte = (v_u64 >> 24) as u8;
}
上面的代码中, 因为只初始化了最低位的字节, 其它 7 个字节仍然是未初始化的.
因为 literals_t 中的所有成员共享了8个字节的内存.
调试代码也可以发现,
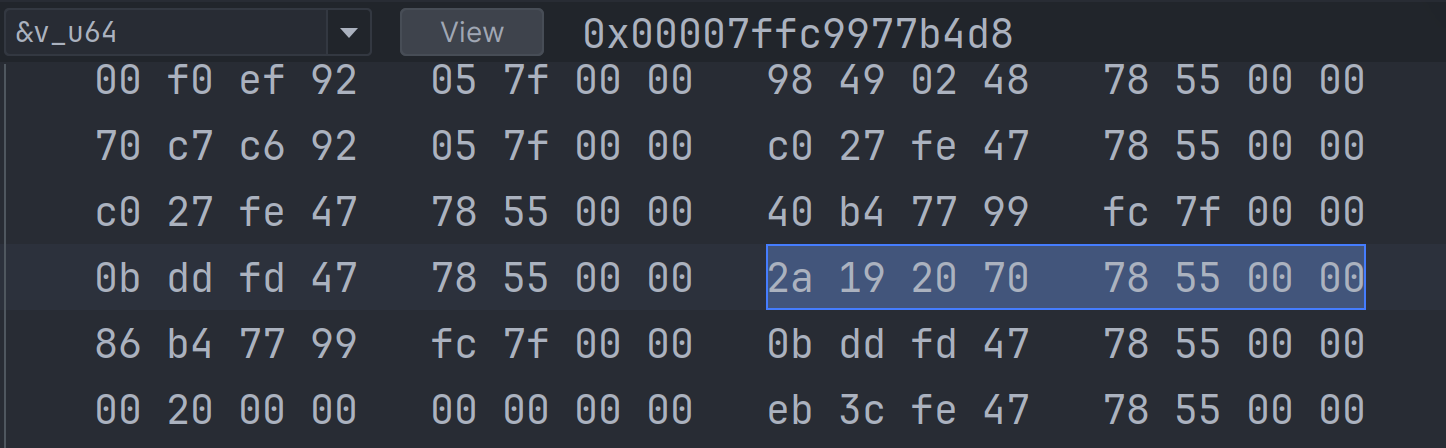
注意, 当前系统是小端系统, 所以最低有效位在左侧, 最高有效位在右侧.
所以: v_u64 的值是 0x0000_5578_7020_192a, 可以发现它的最低位确实是我们事先设置的 0x2a,
但是其余 7 个字节都是不确定的, 因为它们没有被初始化!

总结一下:
- 初始化联合体时, 应该先将它所有字节重置为0, 再初始化某个联合体成员, 以减少未定义行为发生
泛型联合体
接口 Traits
trait 在 Rust 语言中是一个很重要的概念. 它用于为不同的类型约定一组必须实现的函数接口. 包括基础数据类型, 结构体, 枚举等, 甚至还没有实现的结构体. 它与之前介绍的结构体/枚举等相比:
- 结构体/枚举/联合体, 用于定义对象在内存中的内容
- 而 trait 则用于定义对这些内存数据的操作, 或者称作对象的行为
trait 是 Rust 实现多态 polymorphism 的手段之一, 另一种方法是泛型 generics, 我们会在后面的章节进行介绍.
它看起来类似于 Java 里面的接口 interface, 或者 C++ 里面的抽像基类 abstract base class.
比如常用的 Write trait, 里面要求的 write() 函数, 不管是向 File 或者 TcpStream 或者
String Buffer, 都可以调用一致的接口进行数据写入.
使用 Trait
std::io::Write
std::iter::Iterator
定义和实现 Trait
定义 trait 比较简单, 其语法如下:
pub trait TraitName {
  fn method1(&self, ...) -> Retrun1;
  fn function2(...) -> Return2;
  ...
}
先看一下标准库中 fmt::Debug trait:
pub trait Debug {
    // Required method
    fn fmt(&self, f: &mut Formatter<'_>) -> fmt::Result;
}
该 trait 只声明了一个方法 fmt(), 要为自己定义的类型实现这个方法, 也很简单:
use std::fmt;

pub struct Point {
    x: f32,
    y: f32,
}

impl fmt::Debug for Point {
    fn fmt(&self, f: &mut fmt::Formatter<'_>) -> fmt::Result {
        f.debug_struct("Point")
            .field("x", &self.x)
            .field("y", &self.y)
            .finish()
    }
}
另一个常用的 trait 是 Default trait, 用于实现类型的默认值, 其定义如下:
pub trait Default: Sized {
    // Required method
    fn default() -> Self;
}
接下来给上面的 Point 结构体实现这个 trait:
impl Default for Point {
    fn default() -> Self {
        Self {
            x: 0.0,
            y: 0.0,
        }
    }
}
实现方法
在 trait 中, 可以只声明方法 (method declaration), 也可以同时定义方法 (method default definition), 即编写该方法的默认实现, 但可以被外部类型所覆盖.
看一下标准库中的例子:
继承 trait
#![allow(dead_code)]

trait Person {
    fn name(&self) -> String;
}

trait Student: Person {
    fn university(&self) -> String;
}

trait Programmer {
    fn favorite_language(&self) -> String;
}

trait ComputerScienceStudent: Programmer + Student {
    fn git_username(&self) -> String;
}

fn comp_sci_student_greeting(student: &dyn ComputerScienceStudent) -> String {
    format!(
        "My name is {} and I attend {}. My git username is {}",
        student.name(),
        student.university(),
        student.git_username()
    )
}

fn main() {}
空的 trait
标准库中定义了好几个空的 trait, 这些 trait 只有名称, 没有约束任何的方法或者别的类型, 比如:
- Sized
- Copy
- Send
- Sync
声明它们的代码很简单:
pub trait Copy: Clone { }
pub trait Sized { }
pub unsafe auto trait Send { }
pub unsafe auto trait Sync { }
通常这些类型都被编译器使用:
- Copy trait 可以让类型通过拷贝比特位来复制其值
- Send/Sync, 用于实现跨线程访问共享的状态
- Sized, 要求类型在编译期有确定的内存大小占用, 否则就是 dynamic sized type
为外部类型实现外部的 trait
Rust 语言中的规则是, 要么类型是自己定义的, 要么 trait 是自己声明的, 这样的话才能给类型实现指定的 trait.
但有时候要给标准库或者第三方库里的类型实现外部的 trait, 怎么处理? 此时可以先定义一个新的结构体,
然后给这个结构体实现已存在的 trait, 这个方法被称为 New Type Idiom.
标准库并没有为 f32 和 f64 实现 Eq, Ord, Hash 等 traits, 但有时又确实需要实现这些
trait, 看下面的一个简陋的例子:
use std::cmp::Ordering;
use std::hash::{Hash, Hasher};

#[derive(Debug, Default, Clone, Copy, PartialEq, PartialOrd)]
pub struct F32(f32);

impl Eq for F32 {}

#[allow(clippy::derive_ord_xor_partial_ord)]
impl Ord for F32 {
    fn cmp(&self, other: &Self) -> Ordering {
        self.0.to_be_bytes().cmp(&other.0.to_be_bytes())
    }
}

impl Hash for F32 {
    fn hash<H: Hasher>(&self, state: &mut H) {
        self.0.to_bits().hash(state);
    }
}

#[cfg(test)]
mod tests {
    use super::F32;

    #[test]
    fn test_f32_equal() {
        let f1 = F32(std::f32::consts::PI);
        let f2 = F32(std::f32::consts::PI);
        assert_eq!(f1, f2);
    }
}
参考
Derive: 自动继承常见的 trait
上文介绍了如何定义和实现 trait, 但对于一些常用的 traits, 比如 Debug, Default, Clone 等,
这些 traits 的行为都很单一, 手动编写的代码几乎一样, 如果每个新的类型都要手动实现一次, 比较烦琐,
Rust 提供了 #[derive(Trait)] 属性标记, 由编译器自动帮我们实现这些常用的 traits.
比如下面的 Point 结构体:
/// `Vector2D` provides an alternative name for `Point`.
///
/// `Vector2D` and `Point` can be used interchangeably for all purposes.
pub type Vector2D = Point;

#[derive(Debug, Default, Clone, Copy, PartialEq)]
pub struct Point {
    x: f32,
    y: f32,
}
或者 Side 枚举类:
#[derive(Debug, Default, Clone, Copy, PartialEq, Eq)]
pub enum Side {
    #[default]
    Top,
    Right,
    Bottom,
    Left,
}
继承宏 Derive macro
除了标准库中预定义好的可直接继承的 traits 之外, 我们也可以对其进行扩展, 这部分涉及到了过程宏, 我们在继承宏 这一节有详细的介绍.
参考
关联的项目 Associated Items
前文提到了, trait 主要用于在类型之间建立联系. 除了之前介绍过的, 可以在 trait 内定义 相关联的函数方法之外, 还可以为它绑定其它类型的资源.
本节主要介绍三种:
- 关联函数 associated functions
- 关联类型 associated types
- 关联常量 associated consts
关联函数 Associated Functions
关联类型 Associated Types
关联类型, 定义即与当前的 trait 相关的类型, 最常用的就是迭代器:
pub trait Iterator {
    // 关联类型
    type Item;

    // Required method
    fn next(&mut self) -> Option<Self::Item>;

    // Provided methods
    fn size_hint(&self) -> (usize, Option<usize>) {
        (0, None)
    }

    ...
}
上面的代码来自标准库中的 Iterator trait, 里面的 type Item 就是声明的一个关联类型,
它用于表示该迭代器在每次迭代时输出的数据类型, 也就是 next() 方法的返回值.
关联常量 Associated Consts
关联常量, 可以预定义一些与当前类型或者 trait 相关联的常量值, 比如下面的例子:
pub trait Float: PartialEq {
    const ZERO: Self;
    const ONE: Self;
    const NEARLY_ZERO: Self;

    fn nearly_equal(self, other: Self) -> bool;

    fn nearly_zero(self) -> bool;
}

impl Float for f32 {
    const ZERO: Self = 0.0;
    const ONE: Self = 1.0;
    #[allow(clippy::cast_precision_loss)]
    const NEARLY_ZERO: Self = 1.0 / (1 << 12) as Self;

    fn nearly_equal(self, other: Self) -> bool {
        (self - other).abs() <= Self::NEARLY_ZERO
    }

    fn nearly_zero(self) -> bool {
        self.nearly_equal(Self::ZERO)
    }
}

impl Float for f64 {
    const ZERO: Self = 0.0;
    const ONE: Self = 1.0;
    const NEARLY_ZERO: Self = 1.0 / (1 << 19) as Self;

    fn nearly_equal(self, other: Self) -> bool {
        (self - other).abs() <= Self::NEARLY_ZERO
    }

    fn nearly_zero(self) -> bool {
        self.nearly_equal(Self::ZERO)
    }
}
参考
特征对象 Trait Objects
特征对象 trait objects 是实现一组特征 trait 的一种类型的不透明值 opaque value,
其没有固定内存大小的值.
这种数值类型类似于数组, 因为其大小不确定, 并不能直接作为参数使用, 需要使用 &dyn Trait 或者 Box<dyn Trait> 的形式.
use std::io::Write;

fn main() {
    let mut buf: Vec<u8> = Vec::new();
    let writer: &mut dyn Write = &mut buf;
}
这里, writer 就是一个 trait object. 作为对比, 我们看看之前学过的 slice 用.
fn main() {
    let vec = vec![1, 2, 3, 4];
    let vec_ref: &[i32] = &vec;
}
dyn trait
类似于使用切片引用来存储数组 array 或者 动态数组 vec 一样, 使用 dyn trait 语法来存储 trait object.
先看一个示例程序:
struct Sheep {
    naked: bool,
    name: &'static str,
}

trait Animal {
    fn new(name: &'static str) -> Self;

    fn name(&self) -> &'static str;
    fn noise(&self) -> &'static str;

    fn talk(&self) {
        println!("{} says {}", self.name(), self.noise());
    }
}

impl Sheep {
    fn is_naked(&self) -> bool {
        self.naked
    }

    fn shear(&mut self) {
        if self.naked {
            println!("{} is already naked...", self.name());
        } else {
            println!("{} gets a haircut!", self.name);
            self.naked = true;
        }
    }
}

impl Animal for Sheep {
    fn new(name: &'static str) -> Sheep {
        Sheep { name, naked: false }
    }

    fn name(&self) -> &'static str {
        self.name
    }

    fn noise(&self) -> &'static str {
        if self.is_naked() {
            "baaaaaa?"
        } else {
            "baaaaaah!"
        }
    }

    fn talk(&self) {
        println!("{} pauses briefly... {}", self.name, self.noise());
    }
}

fn main() {
    let mut dolly: Sheep = Animal::new("Dolly");

    dolly.talk();
    dolly.shear();
    dolly.talk();
}
它使用 dyn trait 作为返回值, 因为trait object 对象本身占用的内存大小是不确定的, 我们需要把它用 Box<dyn Trait> 包装起来,
放在堆内存上, 否则编译器就会提示内存大小的错误.
Trait Object 的内存布局
trait object 的引用是一种胖指针(fat pointer), 有两个指针组成; 在 64 位的机器上, 占用 16 个字节:
data ptr指针指向实际对象的内存地址vtable ptr指针指向该对象的vtable, 里面记录了该对象提供的方法; 这个表是相同类型的所有值所共享.
trait object 详细的布局结构会在下一节动态派发部分有更全面的介绍.
参考
静态派发与动态派发 Static Dispatch and Dynamic Dispatch
一句话概括它们的特点:
- 静态派发 (static dispatch), 是在编译期间确定函数调用关系, 是所谓的编译期多态 compiling time polymorphism
- 动态派发 (dynamic dispatch), 是在程序运行期间, 通过对象的虚表 (vtable), 找到要调用的目标函数, 并调用它, 是所谓的运行时多态 runtime polymorphism
可以看到, 动态派发多了查找虚表的操作, 要比静态派发慢一点点, 但是动态派发使用起来更加灵活.
举例来说:
pub struct Point {
    x: f32,
    y: f32,
}

pub trait Print {
    fn print(&self);

    fn default_method(&self) {
        println!("Print::default_method()");
    }
}

impl dyn Print + 'static {
    fn print_trait_object(&self) {
        println!("Print::print_trait_object()");
    }
}

impl Print for Point {
    fn print(&self) {
        println!("Point({}, {})", self.x, self.y);
    }
}

fn static_dispatch<T: Print>(point: &T) {
    print!("static_dispatch: ");
    point.print();
    point.default_method();
}

fn dynamic_dispatch(point: &(dyn Print + 'static)) {
    print!("dynamic_dispatch: ");
    point.print();
    point.default_method();
    point.print_trait_object();
}

fn main() {
    let p = Point { x: 3.0, y: 4.0 };
    static_dispatch(&p);
    println!("==============");
    dynamic_dispatch(&p);
}
impl trait
有时候使用 trait 作为函数返回值的类型:
#![allow(dead_code)]

mod static_dispatch_input;

fn double_positive(numbers: &[i32]) -> impl Iterator<Item=i32> + '_ {
    numbers.iter().filter(|x| x > &&0).map(|x| x + 2)
}

fn combine_vecs(u: Vec<i32>, v: Vec<i32>) -> impl Iterator<Item=i32> {
    v.into_iter().chain(u).cycle()
}

fn make_adder_function(y: i32) -> impl Fn(i32) -> i32 {
    move |x: i32| x + y
}

fn main() {}
只要 trait 或者相应的类型在本 crate 中有声明, 就可以给这个类型实现这个 trait.
作为传入参数
先看一个例子, 用静态派发的方式将 trait 作为函数的传入参数:
接下来我将把这个例子改造成动态派发的形式:
作为函数返回值
先看一个例子, 用静态派发的方式将 trait 作为函数的返回值:
接下来我将把这个例子改造成动态派发的形式:
# 参考

- [trait object](https://stackoverflow.com/questions/27567849/what-makes-something-a-trait-object)
隐藏名称 Name Hiding
或者称作 Method hiding, 或者 method shadowing, 如果一个对象定义了两个或者多个同名的函数(通过实现不同的 traits),
rustc 编译器不能推导出你想使用哪一个, 而只会使用 impl Struct {...} 里面声明的那个, 其它的同名函数就会被隐去了.
先看一下示例程序:
struct Child {
    name: String,
}

impl Child {
    fn title(&self) {
        println!("Child: {}", self.name);
    }
}

trait Student {
    fn title(&self);
}

/// 班长
trait ClassPresident {
    fn title(&self);
}

/// 数学课代表
trait MathRepresentative {
    fn title(&self);
}

impl Student for Child {
    fn title(&self) {
        println!("Student: {}", self.name);
    }
}

impl ClassPresident for Child {
    fn title(&self) {
        println!("Class president: {}", self.name);
    }
}

impl MathRepresentative for Child {
    fn title(&self) {
        println!("Math representative: {}", self.name);
    }
}

fn main() {
    let child = Child {
        name: "Joey".to_owned(),
    };
    // 调用 Child::title() 方法
    child.title();
}
完全限定语法 Fully Qualified Syntax
这种写法就是为了消除歧义, 让编译器很清晰地找到要使用的函数, 这种写法又称为 Turbofish.
上面的代码, 如果要访问这几个 traits 中定义的 title() 方法, 需要这样写:
struct Child {
    name: String,
}

impl Child {
    fn title(&self) {
        println!("Child: {}", self.name);
    }
}

trait Student {
    fn title(&self);
}

/// 班长
trait ClassPresident {
    fn title(&self);
}

/// 数学课代表
trait MathRepresentative {
    fn title(&self);
}

impl Student for Child {
    fn title(&self) {
        println!("Student: {}", self.name);
    }
}

impl ClassPresident for Child {
    fn title(&self) {
        println!("Class president: {}", self.name);
    }
}

impl MathRepresentative for Child {
    fn title(&self) {
        println!("Math representative: {}", self.name);
    }
}

fn main() {
    let child = Child {
        name: "Joey".to_owned(),
    };
    // 调用 Child::title() 方法
    child.title();
    // 使用完全限定语法
    Student::title(&child);
    // 第二种风格
    <Child as ClassPresident>::title(&child);
    // 另一种风格的写法
    (&child as &dyn MathRepresentative).title();
}
另外的一个示例:
use std::rc::Rc;

fn main() {
    let rc = Rc::new(5);
    // 直接调用 trait 的方法
    let rc2 = rc.clone();
    // 使用完全限定语法
    let rc3 = Rc::clone(&rc);
}
参考
函数与闭包 Functions and Closures
Functions
Diverging functions
就是一个函数不返回任何值, 比如一个 loop 无限循环, 或者线程会到止退出的.
目前, 只能通过调用 panic!() 或者 unreachable!() 来实现:
impl Server {
pub fn run(self) -> ! {
loop {
...
}
}
}作为返回值
fn create_fnmut() -> impl FnMut() {
return move || println!("Hello FnMut()!");
}
let mut f = create_fnmut();
f();函数属性
常量函数 const
内联函数 inline
设置函数为废弃 deprecated
为函数参数设置属性
可以为不同的平台指定不同类型的函数参数
不安全的函数 unsafe
这个在 后面的章节 有详细介绍.
异步函数 async
这个在 async/await 章节 有详细介绍.
外部函数 extern
这个在 后面的章节 有详细介绍.
函数重载 Function Overloading
函数重载的概念对于 C++ 程序员来说是很熟悉的, 举个例子, STL标准库里的 std::sort() 函数是这样声明的:
template< class RandomIt >
void sort( RandomIt first, RandomIt last );
template< class RandomIt >
constexpr void sort( RandomIt first, RandomIt last );
template< class ExecutionPolicy, class RandomIt >
void sort( ExecutionPolicy&& policy,
RandomIt first, RandomIt last );
template< class RandomIt, class Compare >
void sort( RandomIt first, RandomIt last, Compare comp );
template< class RandomIt, class Compare >
constexpr void sort( RandomIt first, RandomIt last, Compare comp );
template< class ExecutionPolicy, class RandomIt, class Compare >
void sort( ExecutionPolicy&& policy,
RandomIt first, RandomIt last, Compare comp );
函数名相同, 参数类型及个数不相同, 进而兼容更多的调用方式.
从某种角度来说 Rust 也是支持函数重载的, 我们先来看一下例子:
use std::path::Path;
pub struct File {
fd: i32,
}
impl File {
pub fn open<P: AsRef<Path>>(p: P) -> Result<Self, std::io::Error> {
todo!()
}
}在使用时, 也可以传入很多种不同类型的参数, 只要它们都实现了 AsRef<Path> trait, 例如:
File::open("/etc/passwd");
File::open(PathBuf::from("/etc/passwd"));
File::open(OsStr::new("/etc/passwd"));函数传递参数的几种方法
- 值传递
- 引用传递
- 指针传递 (不常用)
闭包 Closure
闭包访问上下文变量
可以捕获外部变量, 变量有三种方法被捕获:
- 只读引用 (read only)
- 可变引用 (mutable, modified)
- 值 (consumed), 如果该值实现了
Copytrait, 那就复制一份; 如果未实现, 就将该值move到 closure中.
当然, 也可以显式地加一个 move 标记, 将一个变量移到closure内.
自加1:
let accum = |s: i32| -> i32 { s + 1 };返回一个常数1:
let one = || 1;也可以获取被捕获变量的所有权:
struct Point {
x: i32,
y: i32,
}
let square = move |point: Point| -> i32 { point.x + point.y };Rust中的闭包性能跟一般的函数一样, 而且要比函数指针还要快.
作为输出参数
一个高阶函数也可以返回一个函数, 但需要加入 impl 前缀.
闭包的内存布局
Fn, FnMut and FnOnce
作为输入参数. 比如, 作为一个高阶函数的输入参数时, 闭包 closure 可以有三种声明:
- Fn, 对应于 "引用" (reference)
- FnMut, 对应于 "可变引用" (mutable reference)
- FnOnce, 对应于 "值" (consumed value)
Generic
Function Trait:
fn apply_to_3<F>(f: F) -> i32
where F: Fn(i32) -> i32,
{
return f(3);
}区别:
fn(...) -> ..., 函数类型,只能是一般的函数Fn(...) -> ..., 泛型函数,可以是一般的函数, 也可以是闭包
FnOnce
FnOnce() 这种声明的函数, 只能被调用一次, 通常是因为有值移到了函数内部, 转移了所有权.
回调函数
libgit2-sys 里面定义了一些比较典型的回调函数:
pub type git_checkout_progress_cb =
Option<extern "C" fn(*const c_char, size_t, size_t, *mut c_void)>;这里的回调函数可以为空指针.
Function Declaration
Hook
f: Box<dyn Fn() + Send + 'static>
标准库里的 panic hook 有这样的定义:
enum Hook {
Default,
Custom(Box<dyn Fn(&PanicInfo<'_>) + 'static + Sync + Send>),
}
impl Hook {
#[inline]
fn into_box(self) -> Box<dyn Fn(&PanicInfo<'_>) + 'static + Sync + Send> {
match self {
Hook::Default => Box::new(default_hook),
Hook::Custom(hook) => hook,
}
}
}泛型 Generics
参考
泛型函数 Generic Functions
对于泛型这种形式, rust 在编译期会生成不同版本的函数. 也就是说, 跟 Trait Objects 不同的是,
泛型函数不需要在运行期查找 vtable, 即所谓的动态派发 (dynamic dispatch), 所以其性能要更好些,
但是因为生成了不同版本的函数, 就导致可执行文件的大小有所增加. 此外, 还可以在编译期对这些生成的函数做特定的优化,
比如 inline, 或者在直接计算常量的值.
fn say_hello<W: std::io::Write>(out: &mut W) -> std::io::Result<()> {
todo!()
}AsRef
参考
泛型结构体 Generic Structs
与 C++ 类似, 泛型 (Generics) 这种特性在 Rust 中也被广为使用, 比如标准库中的容器类, 都离开泛型这个特性.
泛型在 Rust 里有广泛的应用, 除了本节介绍的结构体的泛型, 还有 函数泛型 以及 trait 泛型等等, 后面章节陆续会有介绍.
一般的泛型写法:
pub struct Queue<T> {
older: Vec<T>,
younger: Vec<T>,
}
impl<T> Queue<T> {
pub fn new() -> Queue<T> {
Queue { older: Vec::new(), younger: Vec::new() }
}
pub fn push(&mut self, t: T) {
self.younger.push(t);
}
pub fn is_empty(&self) -> bool {
self.older.is_empty() && self.younger.is_empty()
}
}使用 Where
可以使用 where 来指定复杂的泛型:
use std::fmt::{Debug, Display};
fn print_info<T>(t: T)
where
T: Debug + Display + Clone,
{
println!("debug: {:?}, display: {}", t, t.clone());
}
fn main() {
let s = "Hello, world".to_string();
print_info(s);
}偏特化 partial specialization
除了一般的泛型写法之外, 还可以使用偏特化为某个类型单独实现一种特殊形式.
比如, 标准库里的 Box<T> 就有这样的代码:
impl<T: Default> Default for Box<T> {
/// Creates a `Box<T>`, with the `Default` value for T.
#[inline]
fn default() -> Self {
Box::new(T::default())
}
}
impl<T> Default for Box<[T]> {
#[inline]
fn default() -> Self {
let ptr: Unique<[T]> = Unique::<[T; 0]>::dangling();
Box(ptr, Global)
}
}
impl Default for Box<str> {
#[inline]
fn default() -> Self {
// SAFETY: This is the same as `Unique::cast<U>` but with an unsized `U = str`.
let ptr: Unique<str> = unsafe {
let bytes: Unique<[u8]> = Unique::<[u8; 0]>::dangling();
Unique::new_unchecked(bytes.as_ptr() as *mut str)
};
Box(ptr, Global)
}
}接下来再看另一个示例程序, 甚至可以为不同特化的类型添加特定的方法, 来扩展它:
struct GeneralVal<T>(T);
impl GeneralVal<i32> {
pub fn int_value(&self) -> i32 {
return self.0;
}
}
impl GeneralVal<f64> {
pub fn double(&self) -> f64 {
return self.0 * 2.0;
}
}
impl<T> GeneralVal<T> {
pub fn value(&self) -> &T {
return &self.0;
}
}
fn main() {
let v = GeneralVal(42);
println!("val: {}", v.int_value());
let f = GeneralVal(3.14);
println!("double: {}", f.double());
}参考
泛型 Traits Generic Traits
在 trait 里的方法, 也可以指定生命周期:
#[derive(Debug)]
struct Borrowed<'a> {
x: &'a i32,
}
impl<'a> Default for Borrowed<'a> {
fn default() -> Self {
Self { x: &42 }
}
}
fn main() {
let b: Borrowed = Default::default();
println!("b is {:?}", b);
}Const generics
TODO
参考
常量泛型参数 Const Generics
参考
模式匹配 Pattern Matching
模式 Patterns
| 模式类别 | 例子 | 备注 |
|---|---|---|
| Literal | 100, "name" | Matches an exact value; the name of a const is also allowed |
| Range | 0...100, 'a'...'k' | Matches any value in range, including the end value |
| Wildcard | _ | Matches any value and ignores it |
| Variable | name, mut count | Like _ but moves or copies the value into a new local variable |
| ref variable | ref field, ref mut field | Borrows a reference to the matched value instead of moving or coping it |
| Reference | &value, &(k, v) | Matches only reference values |
| Binding with subpattern | val @ 0...99, ref circle @Shape::Circle {...} | Matches the pattern to the right of @, using the variable name to the left |
| Enum pattern | Some(val), None | |
| Tuple pattern | (key, value), (r, g, b) | |
| Struct pattern | Color(r, g, b), Point{x, y} | |
| Multiple patterns | `'a' | 'k'` |
| Guard expression | x if x * x <= r2 | In match only (not valid in let, etc.) |
匹配值 Matching Values
match 可以匹配一个值, 几个值, 一个范围, 或者任意值.
fn main() {
let number = 13;
match number {
1 => println!("One!"),
2 | 3 | 5 | 7 | 11 => println!("A prime number"),
13..=19 => println!("A teen!"),
_ => println!("Ain't special"),
}
}匹配引用
fn main() {
let val = 42;
let ref ref_value = val;
match *ref_value {
v => assert_eq!(v, val),
}
match ref_value {
&v => assert_eq!(v, val),
}
match val {
ref v => assert_eq!(v, ref_value),
}
}使用条件匹配 Match Guards
指定值的范围并绑定变量 Binding
fn main() {
let value = 42;
match value {
0 => println!("0"),
n @ 1..=12 => println!("child: {n}"),
n @ 13..=18 => println!("teen: {n}"),
_ => println!("other"),
}
}解构 Destructing
解构结构体 structs
#[derive(Debug, Default)]
struct Point {
x: i32,
y: i32,
}
fn main() {
let point = Point::default();
match point {
Point { x, y: 0 } => println!("on x axes: {x}"),
Point { x: 0, y } => println!("on y axes: {y}"),
Point { x: 0, y: 0 } => println!("original pos: (0, 0)"),
Point { x, .. } => println!("Other position: {x}, ignoring y value!"),
}
}解构元组 tuple
fn main() {
let pair = (0, -2);
match pair {
(x, 0) => println!("On X axes: {}", x),
(0, y) => println!("On Y axes: {}", y),
_ => println!("any other point"),
}
let point = (3, 1);
match point {
(x, 0) => println!("on x axes: {}", x),
(0, y) => println!("on y axes: {}", y),
(0, 0) => println!("original pos: (0, 0)"),
_ => println!("Other positions!"),
}
}解构枚举 enums
enum Weekday {
Monday,
Tuesday,
Wednesday,
Thursday,
Friday,
Saturday,
Sunday,
}
fn main() {
let weekday = Weekday::Friday;
match weekday {
Weekday::Monday => println!("On Monday!"),
Weekday::Tuesday => println!("On Tuesday!"),
Weekday::Wednesday => println!("On Wednesday!"),
_ => println!("Other days!"),
}
}解构引用
let ref v = 42;与下面的表达式是一样的:
let v = & 42;let 控制流
matches 宏
操作符重载 Operator Overloading
为某个类型实现加减乘除等自定义操作, 就是所谓的操作符重载.
本章使用 Vector2D 作为示例, 它的定义如下:
#[derive(Debug, Default, Clone, PartialEq)]
pub struct Vector2D {
x: f32,
y: f32,
}在 std::ops模块 里, 定义了这些要被重载的 traits.
算术与比特位操作符 Arithmetic and bitwise operators
标准库里提供的算术与比特位操作符 trait, 都列在了下面表格里:
| 分类 | trait | 表达式 | 描述 |
|---|---|---|---|
| 一元操作符 | std::ops::Neg | -x | 取负值 |
| std::ops::Not | !x | 取逻辑否 | |
| 二元算术操作符 | std::ops::Add | x + y | 算术相加操作 |
| std::ops::Sub | x - y | 算术相减操作 | |
| std::ops::Mul | x * y | 算术相乘操作 | |
| std::ops::Div | x / y | 算术相除操作 | |
| std::ops::Rem | x % y | 算术求余操作 | |
| 二元比特位操作符 | std::ops::BitAnd | x & y | 按位与操作 |
| std::ops::BitOr | `x | y` | |
| std::ops::BitXor | x ^ y | 按位与或操作 | |
| std::ops::Shl | x << y | 左移 | |
| std::ops::Shr | x >> y | 右移 | |
| 二元赋值算术操作符 | std::ops::AddAssign | x += y | 算术相加 |
| std::ops::SubAssign | x -= y | 算术相减 | |
| std::ops::MulAssign | x *= y | 算术相乘 | |
| std::ops::DivAssign | x /= y | 算术相除 | |
| std::ops::RemAssign | x %= y | 算术求余 | |
| 二元赋值比特位操作符 | std::ops::BitAndAssign | x &= y | 按位与赋值 |
| std::Ops::BitOrAssign | `x | = y` | |
| std::ops::BitXorAssign | x ^ y | 按位与或赋值 | |
| std::ops::ShlAssign | x <<= y | 左移赋值 | |
| std::ops::ShrAssign | x >>= y | 右移赋值 |
接下来以复数类型为例, 其定义如下:
#[derive(Debug, Default, Clone, Copy, PartialEq, Eq, Hash)]
pub struct Complex<T> {
/// 实数部分
pub re: T,
/// 虚数部分
pub im: T,
}
pub type Complex32 = Complex<f32>;
pub type Complex64 = Complex<f64>;
impl<T> Complex<T> {
#[must_use]
#[inline]
pub const fn new(re: T, im: T) -> Self {
Self { re, im }
}
}一元操作符
| trait | 表达式 | 等价的表达式 |
|---|---|---|
| std::ops::Neg | -x | x.neg() |
| std::ops::Not | !x | x.not() |
一元操作符 -, 对应于Neg trait, 它的接口定义如下:
pub trait Neg {
type Output;
fn neg(self) -> Self::Output;
}只需要定义 neg() 方法即可, 我们来复数结构实现这个trait:
#![allow(clippy::module_name_repetitions)]
use std::ops::{Add, Div, Mul, Neg, Sub};
/// A complex number in Cartesian form.
#[derive(Debug, Default, Clone, Copy, PartialEq, Eq, Hash)]
pub struct Complex<T> {
/// Real part of the complex number.
pub re: T,
/// Imaginary part of the complex number.
pub im: T,
}
pub type Complex32 = Complex<f32>;
pub type Complex64 = Complex<f64>;
impl<T> Complex<T> {
#[must_use]
#[inline]
pub const fn new(re: T, im: T) -> Self {
Self { re, im }
}
}
impl<T: Neg<Output = T>> Neg for Complex<T> {
type Output = Self;
fn neg(self) -> Self::Output {
Self {
re: -self.re,
im: -self.im,
}
}
}逻辑否操作!, 对应于 Not trait, 它的接口定义如下:
pub trait Not {
type Output;
fn not(self) -> Self::Output;
}复数并不需要实现这个操作, 我们用别的例子来展示一下:
use std::ops::Not;
#[derive(Debug, PartialEq)]
enum Answer {
Yes,
No,
}
impl Not for Answer {
type Output = Self;
fn not(self) -> Self::Output {
match self {
Answer::Yes => Answer::No,
Answer::No => Answer::Yes
}
}
}
assert_eq!(!Answer::Yes, Answer::No);
assert_eq!(!Answer::No, Answer::Yes);二元算术操作符
先来介绍 Add trait, 它定义了加法操作, 其接口如下:
pub trait Add<Rhs = Self> {
type Output;
fn add(self, rhs: Rhs) -> Self::Output;
}下面的例子代码就是为复数实现 Add trait:
impl<T: Add<T, Output=T>> Add for Complex<T> {
type Output = Self;
fn add(self, rhs: Self) -> Self::Output {
Self {
re: self.re + rhs.re,
im: self.im + rhs.im,
}
}
}其它几个二元算术操作符的定义与上面的类似, 我们一并列出来:
pub trait Sub<Rhs = Self> {
type Output;
fn sub(self, rhs: Rhs) -> Self::Output;
}
pub trait Mul<Rhs = Self> {
type Output;
fn mul(self, rhs: Rhs) -> Self::Output;
}
pub trait Div<Rhs = Self> {
type Output;
fn div(self, rhs: Rhs) -> Self::Output;
}
pub trait Rem<Rhs = Self> {
type Output;
fn rem(self, rhs: Rhs) -> Self::Output;
}为复数实现这些接口:
impl<T: Sub<T, Output=T>> Sub for Complex<T> {
type Output = Self;
fn sub(self, rhs: Self) -> Self::Output {
Self {
re: self.re - rhs.re,
im: self.im - rhs.im,
}
}
}
impl<T> Mul for Complex<T>
where
T: Copy + Add<T, Output=T> + Sub<T, Output=T> + Mul<T, Output=T>,
{
type Output = Self;
fn mul(self, rhs: Self) -> Self::Output {
let re = self.re * rhs.re - self.im * rhs.im;
let im = self.re * rhs.im + self.im * rhs.re;
Self { re, im }
}
}
impl<T> Div for Complex<T>
where
T: Copy + Add<T, Output=T> + Sub<T, Output=T> + Mul<T, Output=T>,
{
type Output = Self;
fn div(self, rhs: Self) -> Self::Output {
let re = self.re * rhs.re + self.im * rhs.im;
let im = self.im * rhs.re - self.re * rhs.im;
Self { re, im }
}
}二元比特位操作符
二元赋值算术操作符
二元赋值比特位操作符
区间选择 Range
ops 模块定义了几种区间选择的结构体, 以及 RangeBounds trait.
Range 迭代器
用于定义一个左闭右开的区间, [start..end), 即 start <= x < end, 如果 start >= end,
就为空, 啥都不选.
其结构体定义如下:
pub struct Range<Idx> {
pub start: Idx,
pub end: Idx,
}它用来支持 start..end 这种语法糖:
use std::ops::Range;
assert_eq!((3..6), Range{ start: 3, end: 6 });RangeFrom 迭代器
它的定义如下:
pub struct RangeFrom<Idx> {
pub start: Idx,
}它用来支持 start.. 这种语法糖:
use std::ops::RangeFrom;
assert_eq!((3..), RangeFrom { start: 3 });要注意的是, 因为这个迭代器没有指定结束的值, 它可能会出现整数溢出的问题.
RangeFull 结构体
用于定义无边界区间, 然而它并不是一个迭代器, 它没有起始值.
它用来支持 .. 这种语法糖, 它用来选择一个 slice 里的所有元素.
let slice = [0, 1, 1, 2, 3];
assert_eq!(slice[..], [0, 1, 1, 2, 3]);RangeInclusive 迭代器
它用来支持 start..=end 这种语法糖:
use std::ops::RangeInclusive;
assert_eq!((3..=6), RangeInclusive::new(3, 6));RangeTo 结构体
它不是一个迭代码, 因为没有起始值, 用于 slice 里的部分元素.
它用来支持 ..end 这种语法糖:
use std::ops::RangeTo;
assert_eq!((..6), RangeTo{ end: 6 });RangeToInclusive 结构体
它不是一个迭代码, 因为没有起始值, 用于 slice 里的部分元素.
它用来支持 ..=end 这种语法糖:
use std::ops::RangeToInclusive;
assert_eq!((..=6), RangeToInclusive{ end: 6 });索引 Index 与 IndexMut
用于实现 container[index] 这样的索引操作, 通过 *container.index(index) 以及
*container.index_mut(index) 方法.
它们常用于容器类中, 用于访问容器中的某个或者某些元素.
它们的定义如下:
pub trait Index<Idx>where
Idx: ?Sized,{
type Output: ?Sized;
// Required method
fn index(&self, index: Idx) -> &Self::Output;
}
pub trait IndexMut<Idx>: Index<Idx>where
Idx: ?Sized,{
// Required method
fn index_mut(&mut self, index: Idx) -> &mut Self::Output;
}可以看到, IndexMut<T> 是对 Index<T> 的扩展, 它返回一个可变更引用 (mutable reference).
比如:
use std::ops::{Index, Range};
let slice = vec![1, 1, 2, 3, 5];
assert_eq!(slice[1..4], *slice.index(Range{start:1, end: 4}));可以看到, container[index] 这种写法只是个语法糖.
与 C++ 的区别
在 C++ 中, index 操作符是可以直接向容器中插入新的值, 但根据上面的定义可以看出, IndexMut 只是
返回一个可变引用, 只能用于修改已有值, 不能用于插入新值.
以下代码就会报出 index out of bounds 的错误:
let mut slice = vec![];
slice[0] = 1;
slice[1] = 4;
assert_eq!(slice.len(), 2);下面的 C++ 代码可以正常编译和运行, 也比较符合常见编程语言的预期操作(例如Python也类似):
#include <cassert>
#include <map>
int main() {
std::map<std::string, double> persons = {};
persons["Joe"] = 1.74;
persons["Allen"] = 1.71;
assert(persons.size() == 2);
return 0;
}
但当把它用 Rust 重写之后, 并不能被编译:
use std::collections::BTreeMap;
let mut persons = BTreeMap::<String, f64>::new();
persons["Joe"] = 1.74;
persons["Allen"] = 1.71;
assert_eq!(persons.len(), 2);需要显式地插入元素:
use std::collections::BTreeMap;
let mut persons = BTreeMap::<String, f64>::new();
persons.insert("Joe".to_owned(), 1.74);
persons.insert("Allen".to_owned(), 1.71);
assert_eq!(persons.len(), 2);一个完整的示例
use std::ops::{Index, IndexMut};
#[derive(Debug, Default, Clone, Copy, PartialEq, Eq)]
pub enum Side {
#[default]
Top,
Right,
Bottom,
Left,
}
#[derive(Debug, Default, Clone, PartialEq)]
pub struct Margins {
pub top: f32,
pub right: f32,
pub bottom: f32,
pub left: f32,
}
impl Index<Side> for Margins {
type Output = f32;
fn index(&self, index: Side) -> &Self::Output {
match index {
Side::Top => &self.top,
Side::Right => &self.right,
Side::Bottom => &self.bottom,
Side::Left => &self.left,
}
}
}
impl IndexMut<Side> for Margins {
fn index_mut(&mut self, index: Side) -> &mut Self::Output {
match index {
Side::Top => &mut self.top,
Side::Right => &mut self.right,
Side::Bottom => &mut self.bottom,
Side::Left => &mut self.left,
}
}
}相等与比较 Eq and Ord
std::cmp模块提供了四个 traits:
PartialEqEqPartialOrdOrd用于实现比较操作, 这四个 trait 之间有这样一个关系:Eq基于于PartialEq, 即pub trait Eq: PartialEq
PartialOrd基于PartialEq, 即pub trait PartialOrd: PartialEqOrd基于Eq和PartialOrd,pub trait PartialOrd: Eq + PartialOrd<Self>
相等比较操作, 对应于 == 以及 != 操作符,
顺序比较操作, 对应于 >, <, >=以及 <= 等操作符.
cmp 模块还定义了比较结果 Ordering 这样一个枚举类型:
pub enum Ordering {
Less = -1,
Equal = 0,
Greater = 1,
}部分等价关系 PartialEq
先说最基础的 PartialEq, 这个 trait 定义了两个方法:
eq(), 两个值相等的话就返回true, 需要使用者自行定义该方法.ne(), 两个值不相等的话就返回true
PartialEq trait
实现了部分等价关系 Partial_equivalence_relation,
这种数值关系有以下特性:
- 对称性 (symmetric): 如果
a == b, 那么b == a - 可传递性 (transitive): 如果
a == b且b == c, 那么a == c
所有的基本数据类型都实现了 PartialEq trait. 平时使用时只需要用 #[derive] 的方法实现即可, 就像这样:
#[derive(PartialEq)]
pub struct Person {
pub id: u32,
pub name: String,
pub height: f64,
}编译器默认实现类似以下代码:
impl PartialEq for Person {
fn eq(&self, other: &Self) -> bool {
self.id == other.id &&
self.name == other.name &&
self.height == other.height
}
}但如果我们在比较两个 Person 时, 只想通过 id 属性来确定是不是同一个人, 可以
手动定义 PartialEq trait 的实现:
impl PartialEq for Person {
fn eq(&self, other: &Self) -> bool {
self.id == other.id
}
}等价关系 Eq
Eq trait 实现了 等价关系 Equivalence_relation,
该数值关系具有以下特性:
- 对称性 (symmetric): 如果
a == b, 那么b == a - 可传递性 (transitive): 如果
a == b且b == c, 那么a == c - 自反性 (reflexive):
a == a
Eq trait 基于 PartialEq trait, 但在此之上并没有添加新的方法定义, 这个 trait
只是用于给编译器提示说, 这是个 等份关系 而不是个 部分等价关系. 因为编译器
并不能检测 自反性 (reflexive).
在标准库中, 只有 f32 和 f64 没有实现 Eq trait, 因为浮点值有两个特殊的值:
- NAN
- INFINITY, 它们本身是不可比较的,
NAN != NAN.
我们可以来测试一下:
println!("NAN == NAN ? {}", std::f64::NAN == std::f64::NAN);打印的结果是:
NAN == NAN ? false
所以, 上面的示例中定义的 struct Person 是无法用 #[derive(Eq)] 的方法定义的:
#[derive(Eq, PartialEq)]
struct Person {
pub id: u32,
pub name: String,
pub height: f64,
}编译器会报出以下错误:
188 | height: f64,
| ^^^^^^^^^^^ the trait `std::cmp::Eq` is not implemented for `f64`
|
= note: required by `std::cmp::AssertParamIsEq`
但我们可以手动实现该 trait:
#[derive(PartialEq)]
struct Person {
pub id: u32,
pub name: String,
pub height: f64,
}
impl Eq for Person {}偏序关系 PartialOrd
PartialOrd 基于 PartialEq 实现, 它新定义了几个方法:
partial_cmp() -> Ordering, 需要使用者实现本方法, 返回两值的比较结果lt(),le(),gt(),ge()已经定义好
偏序关系有以下特性:
- 不对称性 antisymmetry: 如果
a < b那么!(a > b) - 可传递性 transitive: 如果
a < b且b < c那么a < c
标准库里的所有基本类型都已实现该 trait. 可直接使用 #[derive] 的方法实现该 trait,
也可像下面这样手动实现, 这里是以身高来排序的:
impl PartialOrd for Person {
fn partial_cmp(&self, other: &Self) -> Option<std::cmp::Ordering> {
self.height.partial_cmp(&other.height)
}
}全序关系 Ord
Ord 基于 PartialOrd 和 Eq 实现, 它新定义了几个方法:
cmp(), 需要使用者实现本方法, 返回两值的比较结果- max, min, clamp 已经定义好
全序关系有以下特性:
- 完整的不对称性 total antisymmetry:
a < b,a == b,a > b这三种结果只有一个是真 - 可传递性 transitive: 如果
a < b且b < c那么a < c
在标准库中, f32 和 f64 没有实现 Ord trait, 同样是因为 NAN 和 INFINITY 的
不确定性, NAN 和 INFINITY 无法跟其它浮点值比较大小.
参考
迭代器 Iterators
迭代器模式, 作为一种常用的设计模式, 在 Rust 里也有广泛的应用.
根据维基百科里的定义, 在面向对象的编程中, 迭代器模式是一种用于遍历容器并访问容器的元素的设计模式. 迭代器模式将算法与容器分离; 在某些情况下, 算法必然是特定于容器的, 因此不能解耦.
像 Vec, String, HashMap 等标准库里提供的容器, 对迭代器有很完整的支持.
本章我们将介绍与迭代器相关的几个 traits, 以及如何为自定义的类型实现迭代器模式.
遍历的三种形式
从一个集合创建迭代器, 有三种形式:
iter(), 通过&T遍历, 只读的形式iter_mut(), 通过&mut T遍历, 可以改变它的值into_iter(), 通过T遍历, 发生了所有权的转移
只读引用的形式:
let v = vec![1, 2, 3, 4];
for x in v.iter() {
println!("{x}");
}可变更引用的形式:
let mut v = vec![1, 2, 3, 4];
for x in v.iter_mut() {
*x += 1;
}
// 或者使用语法糖
for x in &mut v {
*x += 1;
}发生所有权转移的形式:
let v = vec![1, 2, 3, 4];
for x in v {
println!("{x}");
}
// v 已经变成未初始化的了, 接下来无法再使用它.相关知识
Iterator 与 IntoIterator
Iterator trait 与 IntoIterator trait 是 Rust 实现迭代器的基础.
Iterator trait 的定义比较复杂, 有70多个方法, 但通常只需要实现 next() 方法即可.
该方法会返回 Option<Self::Item>, 返回下一个元素 Some(Self::Item); 如果没有下个元素的话, 就返回 None.
pub trait Iterator {
type Item;
// Required method
fn next(&mut self) -> Option<Self::Item>;
// Provided methods
fn next_chunk<const N: usize>(
&mut self
) -> Result<[Self::Item; N], IntoIter<Self::Item, N>>
where Self: Sized { ... }
fn size_hint(&self) -> (usize, Option<usize>) { ... }
fn count(self) -> usize
where Self: Sized { ... }
fn last(self) -> Option<Self::Item>
where Self: Sized { ... }
...ExactSizeIterator
如果迭代器里的元素个数是已知的, 就可以实现这个 trait. 比如 slice, Vec, String以及其它容器类等.
pub trait ExactSizeIterator: Iterator {
fn len(&self) -> usize { ... }
fn is_empty(&self) -> bool { ... }
}用法也很简单:
let mut range = 0..5;
assert_eq!(5, range.len());
let _ = range.next();
assert_eq!(4, range.len());DoubleEndedIterator
这个 trait 提供了方法, 可以从前后两端访问迭代器.
ub trait DoubleEndedIterator: Iterator {
fn next_back(&mut self) -> Option<Self::Item>;
fn advance_back_by(&mut self, n: usize) -> Result<(), NonZeroUsize> { ... }
fn nth_back(&mut self, n: usize) -> Option<Self::Item> { ... }
...
}比如 VecDeque 双端队列以及 LinkedList 双向链表的迭代器就实现了这个 trait.
这个方法平时并不会直接被调用, 而是使用 Iterator::rev() 方法, 调转迭代器的执行方向.
let a = [1, 2, 3];
let mut iter = a.iter().rev();
assert_eq!(iter.next(), Some(&3));
assert_eq!(iter.next(), Some(&2));
assert_eq!(iter.next(), Some(&1));
assert_eq!(iter.next(), None);FromIterator
从一个迭代器构造容器对象.
pub trait FromIterator<A>: Sized {
fn from_iter<T>(iter: T) -> Self where T: IntoIterator<Item = A>;
}先看一个简单的示例:
let five_fives = std::iter::repeat(5).take(5);
let v = Vec::from_iter(five_fives);
assert_eq!(v, vec![5, 5, 5, 5, 5]);当然, Iterator::collect() 方法也会使用这个 trait, 上面的代码也可以这样写:
let five_fives = std::iter::repeat(5).take(5);
let v = five_fives.collect::<Vec<_>>();
assert_eq!(v, vec![5, 5, 5, 5, 5]);要为一个容器实现这个 trait 也比较容易, 我们以标准库里的 LinkedList 双链表为例:
impl<T> Extend<T> for LinkedList<T> {
fn extend<I: IntoIterator<Item = T>>(&mut self, iter: I) {
<Self as SpecExtend<I>>::spec_extend(self, iter);
}
#[inline]
fn extend_one(&mut self, elem: T) {
self.push_back(elem);
}
}
impl<T> FromIterator<T> for LinkedList<T> {
fn from_iter<I: IntoIterator<Item = T>>(iter: I) -> Self {
let mut list = Self::new();
list.extend(iter);
list
}
}Extend
这个 trait 主要是给容器类使用, 将迭代器里的值依次存储到容器类中.
pub trait Extend<A> {
fn extend<T>(&mut self, iter: T) where T: IntoIterator<Item = A>;
fn extend_one(&mut self, item: A) { ... }
fn extend_reserve(&mut self, additional: usize) { ... }
}举个例子:
let mut message = String::from("The first three letters are: ");
message.extend(&['a', 'b', 'c']);
assert_eq!("abc", &message[29..32]);求和 Sum
这个 trait 表示将一个 iterator 里的所有元素求和, 得到结果. 它的定义如下:
pub trait Sum<A = Self>: Sized {
fn sum<I>(iter: I) -> Self where I: Iterator<Item = A>;
}这个 trait 只会被目标类型实现, 而不会直接被调用; 相反地, 通常直接调用 Iterator::sum() 方法:
let a = [1, 2, 3];
let sum: i32 = a.iter().sum();
assert_eq!(sum, 6);乘积 Product
这个 trait 表示将一个 iterator 里的所有元素求乘积, 并得到结果. 它的定义如下:
pub trait Product<A = Self>: Sized {
fn product<I>(iter: I) -> Self where I: Iterator<Item = A>;
}这个 trait 只会被目标类型实现, 而不会直接被调用; 相反地, 通常直接调用 Iterator::product() 方法:
fn factorial(n: u32) -> u32 {
(1..=n).product()
}
assert_eq!(factorial(0), 1);
assert_eq!(factorial(1), 1);
assert_eq!(factorial(5), 120);Iterator Adapters
迭代器可以被串连在一起, 实现更复杂的操作.
Laziness
使用 Iterator
常用的 traits
本章介绍一些日常使用的 traits, 熟悉它们的用法可以更加快捷的编写统一风格的 Rust 代码.
Drop trait
类似于 C++ 类里的析构函数(destructor), 用于实现 RAII 模式, 当一个值的所有者生命周期结束时, 通过实现
Drop trait 来释放内部的资源, 比如在堆上分配的内存, 操作系统的文件句柄, socket 等.
如果一个类型实现了 Drop trait, 那它就不能再实现 Copy trait.
该trait的定义如下:
pub trait Drop {
fn drop(&mut self);
}Drop trait 被调用的几种情况有:
- 对象越过其了作用域, 该被销毁
- 手动调用
drop(xx)函数 - 清除容器里的元素, 比如
Vector::clear()或者Deque::pop() - 到达了表达式结尾
大部分情况下, Rust 会自动处理 drop 行为, 但有时要自定义.
标准库中定义了可独立调用的方法:
fn drop<T>(_x: T) {}这里, drop() 会获取变量的所有权, 然后什么都不做, 当该函数结束时, 就会自动调用
Drop trait 中定义的 drop() 方法.
递归调用 drop
有时, 编译器默认实现的 Drop trait, 会以递归的形式被调用, 而 Rust 语言默认的调用栈比较有限,
为此我们可以重新以迭代的方法手动释放资源. 以单链表为例来说明:
pub struct LinkedList {
val: i32,
next: Option<Box<LinkedList>>,
}相关内容
Default trait
Default trait 用于返回一个类型的默认值, 其定义如下:
pub trait Default: Sized {
// Required method
fn default() -> Self;
}Rust 里的基础数据类型都实现了这个 trait, 比如布尔类型的默认值是 false:
default_impl! { bool, false, "Returns the default value of `false`" }其它常用类型的默认值列举如下表如示:
| 类型 | 默认值 |
|---|---|
bool | false |
i8 | 0 |
i16 | 0 |
i32 | 0 |
i64 | 0 |
i128 | 0 |
isize | 0 |
u8 | 0 |
u16 | 0 |
u32 | 0 |
u64 | 0 |
u128 | 0 |
usize | 0 |
f32 | 0.0 |
f64 | 0.0 |
char | \x00 |
unit | () |
slice | empty |
str | epmty |
Option<T> | None |
String | empty |
Struct
对于自定义的结构体, 如果结构体内部的元素都实现了 Default trait, 那只需要让该结构体 derive Default,
比如:
#[derive(Default)]
pub struct Point {
x: f32,
y: f32,
}以上定义的 Point 结构体, 同时实现了 Default trait. 等同于手动编写的代码:
pub struct Point {
x: f32,
y: f32,
}
impl Default for Point {
fn default() -> Self {
Self {
x: f32::default(),
y: f32::default(),
}
}
} 对于一个实现了 Default trait 的结构体, 在创建该结构体实例时, 可以只手动指定某具元还给, 然后调用
Default::default() 方法用默认值补全剩下的元素:
#[derive(Default)]
pub struct Point {
x: f32,
y: f32,
}
impl Point {
#[inline]
#[must_use]
pub fn from_x(x: f32) -> Self {
Self {
x,
..Default::default()
}
}
}Enum
对于枚举类, 可以通过 #[default] 标签属性来指定哪个值是默认的, 看下面的示例代码:
#[derive(Default)]
pub enum Color {
#[default]
Primary,
Secondary,
Success,
Info,
Warning,
Error,
Inherit,
}Write
一个类型实现了 Write trait 时, 就表示它实现了二进制字节流输出.
Write trait 的定义如下:
pub trait Write {
// Required methods
fn write(&mut self, buf: &[u8]) -> Result<usize>;
fn flush(&mut self) -> Result<()>;
// Provided methods
fn write_vectored(&mut self, bufs: &[IoSlice<'_>]) -> Result<usize> { ... }
fn is_write_vectored(&self) -> bool { ... }
fn write_all(&mut self, buf: &[u8]) -> Result<()> { ... }
fn write_all_vectored(&mut self, bufs: &mut [IoSlice<'_>]) -> Result<()> { ... }
fn write_fmt(&mut self, fmt: Arguments<'_>) -> Result<()> { ... }
fn by_ref(&mut self) -> &mut Self
where Self: Sized { ... }
}通常只需要实现以下两个方法:
write()写入一块数据flush()将缓存回写到存储设备
标准库为多个对象实现了 Write trait:
File, 文件对象TcpStream, TCP socket 对象UnixStream, unix domain socket 对象StdOut与Stderr, 标准输出与错误输出Vec<u8>与VecDeque<u8>, 用作二进制数据缓存
Debug trait 与 Display trait
Debug trait, 是为了方便调试, 可以打印出数据的内部结构.
FromStr trait 与 ToString trait
FromStr trait
从字符串转为指定的类型, 只需要给这个类型实现了 FromStr trait.
trait FromStr: Sized {
type Err;
fn from_str(s: &str) -> Result<Self, Self::Err>;
}比如说, 字符串转为整数, 字符串转为 IPv4Addr:
impl FromStr for Ipv4Addr {
type Err = AddrParseError;
fn from_str(s: &str) -> Result<Ipv4Addr, AddrParseError> {
Self::parse_ascii(s.as_bytes())
}
}ToString trait
std::fmt::Display trait, 在将其它类型转为字符串时, 还可以对其进行格式化.
通常我们不直接为自定义类实现 ToString trait, 而是实现 Display trait, 后者会自动
实现 ToString trait.
trait ToString {
fn to_string(&self) -> String;
}Clone 与 Copy
简单理解, Clone trait 就是实现深拷贝, 它调用结构体中的所有属性的 clone() 方法.
Copy trait 是继承于 Clone trait 的, 是浅拷贝. 它只是简单地复制了结构体中的数据,
而不会调用结构体中所有属性的 clone() 方法. 它与 Drop trait 是互斥的.
所有的基础数据类型 (primitive types) 都实现了 Copy trait.
比如, 字符串类型 String 就只实现 Clone trait, 而不能实现 Copy trait, 因为
String 结构体中会记录一个指向堆内存的指针, 用于存放真实的字符串数据.
Copy trait 中并没有定义什么新的方法, 而只是一个约束 (marker trait).
默认情况下, 赋值语句会移动值, 即转移值的所有权. 但如果这个值实现了 Copy trait,
那么赋值语句并不会转移该值的所有权, 而是复制一份:
let x = 42_i32;
let y = x;什么时候实现 Copy trait?
如果一个结构体比较简单, 并且直接复制它的值的成本很低时, 为了方便使用, 可以实现 Copy trait,
比如:
#[derive(Debug, Default, Clone, Copy, PartialEq, Eq)]
pub struct Point2D {
x: i32,
y: i32,
}上面的例子, size_of::<Point2D>() 是 8 个字节, 而直接存储 &Point2D 也是 8 个字节,
直接复制整个结构体, 并不会带来什么成本, 所以可以考虑给它实现 Copy trait.
但下面的例子:
pub struct File {
fd: i32,
}
impl Drop for File {
fn drop(&mut self) {
// Call self.close();
}
}这个结构体, 是对文件描述符 fd 的包装, 而直接 clone() 以及复制它, 并没有什么实现的操作意义,
所以不应该给它实现 Clone trait 以及 Copy trait.
String 的复制
标准库里的字符串 String, 实现了 Clone trait:
#[derive(PartialEq, PartialOrd, Eq, Ord)]
pub struct String {
vec: Vec<u8>,
}
impl Clone for String {
fn clone(&self) -> Self {
String { vec: self.vec.clone() }
}
fn clone_from(&mut self, source: &Self) {
self.vec.clone_from(&source.vec);
}
}可以看到, 它需要 clone() 内部的 Vec<u8>, 其成本是比较高的.
ToOwned
为了解决 Clone trait 无法复制引用的值本身, 引入了 ToOwned trait.
它可以复制引用的真正的数据, 比如 &str 引用的 String, 只需要为 str 实现
ToOwned<Owned=String> 即可.
trait ToOwned {
type Owned: Borrow<Self>;
fn to_owned(&self) -> Self::Owned;
}&str.to_owned()
将字符串切片转换成 String 对象:
let s: String = "hello".to_owned();用到了 ToOwned trait:
use std::mem;
impl ToOwned for str {
type Owned = String;
#[inline]
fn to_owned(&self) -> String {
unsafe { String::from_utf8_unchecked(self.as_bytes().to_owned()) }
}
fn clone_into(&self, target: &mut String) {
let mut b = mem::take(target).into_bytes();
self.as_bytes().clone_into(&mut b);
*target = unsafe { String::from_utf8_unchecked(b) }
}
}当然, 也可以这样写:
let s: String = "hello".to_string();因为用到了 ToString trait:
impl ToString for str {
#[inline]
fn to_string(&self) -> String {
String::from(self)
}
}相关信息
From trait 与 Into trait
Convert A from B <=> Convert B into A, 通常这个应该是成立的.
如果实现了 From trait, 会自动实现 Into trait:
impl From<A> for B {
fn from(item: A) -> B { }
}
let a: A = b.into();
let a2 = A::from(b);以上两个写法, 都是正确的, 因为 Into trait 在标准库里被自动实现了, 通常只需要手动实现 From trait:
// From implies Into
#[stable(feature = "rust1", since = "1.0.0")]
impl<T, U> Into<U> for T
where
U: From<T>,
{
/// Calls `U::from(self)`.
///
/// That is, this conversion is whatever the implementation of
/// <code>[From]<T> for U</code> chooses to do.
#[inline]
fn into(self) -> U {
U::from(self)
}
}&str 字符串切片可以转换成 Vec<u8> 字节数组, 看一个标准库是如何实现这个转换的:
#[cfg(not(no_global_oom_handling))]
#[stable(feature = "rust1", since = "1.0.0")]
impl From<&str> for Vec<u8> {
/// Allocate a `Vec<u8>` and fill it with a UTF-8 string.
///
/// # Examples
///
/// ```
/// assert_eq!(Vec::from("123"), vec![b'1', b'2', b'3']);
/// ```
fn from(s: &str) -> Vec<u8> {
From::from(s.as_bytes())
}
}要注意的是, From 和 Into trait 是获取了值的所有权的, 有所有权的转移.
其它转换方式
TryFrom 与 TryInto
TryFrom 和 TryInfo 这两个 trait, 主要是为了容错, 因为类型之间的转换有可能是
会失败的. 所以这两个 trait 会返回 Result<> 结构.
它们的定义如下, 可以看到, 接口定义跟 From trait 以及 Into trait 很相似:
pub trait TryFrom<T>: Sized {
type Error;
// Required method
fn try_from(value: T) -> Result<Self, Self::Error>;
}
pub trait TryInto<T>: Sized {
type Error;
// Required method
fn try_into(self) -> Result<T, Self::Error>;
}char 模块实现了将 char 转换成 u8, u16 等数值类型, 下面是代码片段:
#[stable(feature = "u8_from_char", since = "1.59.0")]
impl TryFrom<char> for u8 {
type Error = TryFromCharError;
/// Tries to convert a [`char`] into a [`u8`].
///
/// # Examples
///
/// ```
/// let a = 'ÿ'; // U+00FF
/// let b = 'Ā'; // U+0100
/// assert_eq!(u8::try_from(a), Ok(0xFF_u8));
/// assert!(u8::try_from(b).is_err());
/// ```
#[inline]
fn try_from(c: char) -> Result<u8, Self::Error> {
u8::try_from(u32::from(c)).map_err(|_| TryFromCharError(()))
}
}平时只需要实现 TryFrom trait 即可, 因为 TryInto 已被标准库实现:
// TryFrom implies TryInto
#[stable(feature = "try_from", since = "1.34.0")]
impl<T, U> TryInto<U> for T
where
U: TryFrom<T>,
{
type Error = U::Error;
#[inline]
fn try_into(self) -> Result<U, U::Error> {
U::try_from(self)
}
}一个示例代码
下面的代码定义了MQTT协议的版本.
use std::convert::TryFrom;
/// Current version of MQTT protocol can be:
/// * 3.1
/// * 3.1.1
/// * 5.0
#[repr(u8)]
#[derive(Debug, Default, Clone, Copy, PartialEq, Eq, PartialOrd, Ord, Hash)]
pub enum ProtocolLevel {
/// MQTT 3.1
V3 = 3,
/// MQTT 3.1.1
#[default]
V4 = 4,
/// MQTT 5.0
V5 = 5,
}
#[derive(Debug, Clone, Copy, PartialEq, Eq)]
pub enum DecodeError {
InvalidProtocolLevel,
}
impl TryFrom<u8> for ProtocolLevel {
type Error = DecodeError;
fn try_from(v: u8) -> Result<Self, Self::Error> {
match v {
3 => Ok(Self::V3),
4 => Ok(Self::V4),
5 => Ok(Self::V5),
_ => Err(DecodeError::InvalidProtocolLevel),
}
}
}其它转换方式
AsRef 与 AsMut
当一个类型实现了 AsRef<T> 后, 我们可以得到它的只读引用 &T;
当一个类型实现了 AsMut<T> 后, 我们可以得到它的可变更引用 &mut T.
它们的定义如下:
pub trait AsRef<T>where
T: ?Sized,{
// Required method
fn as_ref(&self) -> &T;
}
pub trait AsMut<T>where
T: ?Sized,{
// Required method
fn as_mut(&mut self) -> &mut T;
}比如 String 实现了 AsRef<str> 及 AsRef<[u8]>, 所以 String 可以作为
&str 及 &[u8] 使用:
impl AsRef<str> for String {
#[inline]
fn as_ref(&self) -> &str {
self
}
}
impl AsMut<str> for String {
#[inline]
fn as_mut(&mut self) -> &mut str {
self
}
}
impl AsRef<[u8]> for String {
#[inline]
fn as_ref(&self) -> &[u8] {
self.as_bytes()
}
}Vec<T> 也实现了 AsRef<[T]>, 所以它可以作为 &[T] 使用:
impl<T> AsRef<[T]> for Vec<T> {
fn as_ref(&self) -> &[T] {
self
}
}
impl<T> AsMut<[T]> for Vec<T> {
fn as_mut(&mut self) -> &mut [T] {
self
}
}Deref 与 DerefMut
Deref, DerefMut trait 主要用于一些智能指针类型, 比如 Box, Rc, Arc.
Deref trait 的定义:
pub trait Deref: ?Sized {
type Target: ?Sized;
fn deref(&self) -> &Self::Target;
}
pub trait DerefMut: Deref {
// Required method
fn deref_mut(&mut self) -> &mut Self::Target;
}Deref trait 用于解析引用 (dereference) 操作, 比如 *v.
Deref coercion
- 当需要调用
String::find()方法, 而值r的类型是Rc<String>时, 可以直接写r.find('?'), 不需要写完整的(*r).find('?'), 因为&Rc<String>自动被转换成了&String类型 str定义的方法, 都可以被String对象直接使用, 因为&String可以自动被转换成&str
Box<T> 的实现:
impl<T: ?Sized> Deref for Box<T> {
type Target = T;
fn deref(&self) -> &T {
&**self
}
}
impl<T: ?Sized> DerefMut for Box<T> {
fn deref_mut(&mut self) -> &mut T {
&mut **self
}
}Vec<T> 也有实现:
impl<T> ops::Deref for Vec<T> {
type Target = [T];
#[inline]
fn deref(&self) -> &[T] {
unsafe { slice::from_raw_parts(self.as_ptr(), self.len) }
}
}
impl<T> ops::DerefMut for Vec<T> {
#[inline]
fn deref_mut(&mut self) -> &mut [T] {
unsafe { slice::from_raw_parts_mut(self.as_mut_ptr(), self.len) }
}
}
Borrow 与 BorrowMut
trait Borrow<Borrowed: ?Sized> {
fn borrow(&self) -> &Borrowed;
}
trait BorrowMut<Borrowed: ?Sized>: Borrow<Borrowed> {
fn borrow_mut(&mut self) -> &mut Borrowed;
}Borrow trait 与 AsRef trait 实现是一致的, 差别只在于 Borrow trait 更严格一些.
即要求被引用的对象的 hash 值是一致的. 比如哈稀表的实现:
impl HashMap<K, V> where K: Eq + Hash
{
pub fn get<Key>(&self, k: &Key) -> Option<&V>
where Key: ?Sized + Eq + Hash, K: Borrow<Key>, V: ?Sized
{ ... }
}Send trait 与 Sync trait
Send trait 从一个线程移动 (move) 到另一个线程.
Sync trait 在线程之间安全地共享引用, 它是基于 Send trait 做的扩展.
Sized 与 ?Sized
实现了 Sized trait 的类型, 在编译期可以确定内存大小.
Sized trait 是默认实现的.
struct S<T> { }这种写法等同于:
struct S<T: Sized> { }以下写法就表示类型 T 不一定必须是 Sized trait, 所以 ?Sized 也被称为 Unsized trait:
struct S<T: ?Sized> { }Hash 与 Hasher
如果一个类型实现了 Hash trait, 就表示该类型的值可用在需要计算哈稀的地方.
pub trait Hash {
// Required method
fn hash<H>(&self, state: &mut H)
where H: Hasher;
// Provided method
fn hash_slice<H>(data: &[Self], state: &mut H)
where H: Hasher,
Self: Sized { ... }
}通常可以直接 [derive(Hash)] 让编译器自动实现:
#[derive(Hash)]
pub struct Point2D {
x: i32,
y: i32,
}以上代码就相当于手动实现的:
use std::hash::{Hash, Hasher};
pub struct Point2D {
x: i32,
y: i32,
}
impl Hash for Point2D {
fn hash<H: Hasher>(&self, state: &mut H) {
self.x.hash(state);
self.y.hash(state);
}
}比如标准库里的 HashMap 和 HashSet 都依赖于这个 trait.
Hash 与 Eq
如果同一个类型的两个值相等, 那它们的哈稀也该应该相等. 所以平时都是一并实现这两个 trait:
#[derive(PartialEq, Eq, Hash)]
pub struct Point2D {
x: i32,
y: i32,
}标准库里的 hash 函数实现
目前, Rust 标准库使用 SipHash 1-3 作为默认的哈稀函数, 具体可以参考以下链接:
Any
Any trait 常用于 trait object, 用于实现类型反射.
有几种使用形式:
&dyn Any, 调用downcast_ref(), 得到只读引用&mut dyn Any, 调用downcast_mut(), 得到可变更引用Box<dyn Any>, 调用downcast()方法, 得到Box<T>
比如:
use std::any::Any;
let b: Box<dyn Any> = Box::new("hello".to_owned());
assert!(b.downcast::<String>().is_ok());智能指针
比如 Box<dyn Any> 或者 Arc<dyn Any>, 在获取 type_id()时, 应先把它们转成引用:
use std::any::{Any, TypeId};
let b: Box<dyn Any> = Box::new(42_i32);
let actual_id = ( & * b).type_id();
assert_eq!(actual_id, TypeId::of::<i32>());向上转型
有时候, 我们需要从一个 trait object 转型为一个具体的类型, 举个例子:
接口部分的代码 (platform.rs):
pub trait Platform {
fn rect(&self, element: dyn Element) -> Rect;
fn scale(&self) -> Option<Scale>;
}
pub struct State {
platform: Rc<dyn Platform>,
}特定平台实现的代码 (canvas_platform.rs):
pub struct CanvasPlatform {
...
}
impl Platform for CanvasPlatform {
...
}这里, State 结构体里面只存放了一个 Platform trait object, 我们并不能直接调用 CanvasPlatform
对象特有的方法. 为此, 可以给 Platform trait 添加一个特别的方法, 让它能转换成 Any trait:
pub trait Platform {
fn as_any(&self) -> &dyn Any;
...
}然后为 CanvasPlatform 实现这个方法:
impl Platform for CanvasPlatform {
#[inline]
#[must_use]
fn as_any(&self) -> &dyn Any {
self
}
}更复杂的转型可以考虑使用第三方库 bevy_reflect.
相关内容
容器 Containers
现代的语言多少都提供了一些常用的容器类, 下面的表格, 将 Rust 的容器类与其它语言作了对比:
| Rust | 描述 | C++ | Python |
|---|---|---|---|
| Vec | 列表(动态数组) | vector | list |
| VecDeque | 双端队列 | deque | collections.deque |
| LinkedList | 双向链表 | list | - |
| BinaryHeap | 优先级队列 | priority_queue | heapq |
| HashMap<K, V> where K: Eq + Hash | 哈稀表 | unordered_map<K, V> | dict |
| BTreeMap<K, V> where K: Ord | 有序键值对(B-树) | map<K, V> | - |
| HashSet | 基于哈稀的集合 | unordered_set | set |
| BTreeSet | 有序集合 (B-树) | set | - |
接下来, 会对这些容器类做具体说明.
Vector
使用 Vector
创建新的 Vector
创建 vector 的方法有好些, 比如:
Vec::new()空白的 Vector, capacity = 0, len = 0vec![1, 2, 3]指定它的初始值, capacity = 3, len = 3vec![42; 10]包含10个元素, 每个的值都是42let v: Vec<i32> = (0..5).collect()从 iterator 转换, 但需要指定数据类型let mut v = Vec::<i32>::with_capacity(10);初始化一个空的, 但预分配10个元素的空间
结构体定义与内存布局
Vec<T> vector 比较灵活, 里面的元素都在堆内存上分配.
第三方库 smallvec 提供了方法, 可以在栈上分配小容量的 vector, 对性能做了优化.
下面的代码片段展示了 Vec<T> 在标准库中的定义:
pub struct Vec<T> {
buf: RawVec<T>,
len: usize,
}
pub(crate) struct RawVec<T> {
ptr: Unique<T>,
cap: usize,
}
#[repr(transparent)]
pub struct Unique<T: ?Sized> {
pointer: NonNull<T>,
_marker: PhantomData<T>,
}
#[repr(transparent)]
pub struct NonNull<T: ?Sized> {
pointer: *const T,
}可以看到, 它主要有三部分组成:
pointer: 指向堆内存的指针cap: 当前分配的堆内存最多能存放的元数个数len: 当前在堆内存中存放的有效元素的个数
举个例子, let numbers: Vec<i32> = vec![0, 1, 2]; 的内存布局如下:

而下面的 names 对象的内存布局要更加复杂:
let mut names = Vec::with_capacity(3);
names.push("Rust".to_owned());
names.push("C++".to_owned());
assert_eq!(names.len(), 2);
assert_eq!(names.capacity(), 3);
管理容量
影响 Vec<T> 的容量的方法有很多种, 接下来我们分别列举主要的几种形式.
Vec 分配的堆内存大小等于 size_of::<T>() * vec.capacity().
new() 函数
这个函数就比较简单了, 它并不会分配堆内存, 容量等于 0.
fn main() {
let numbers = Vec::<i32>::new();
assert_eq!(numbers.len(), 0);
assert_eq!(numbers.capacity(), 0);
}可以看看标准库中 Vec::new() 的代码实现:
impl<T> Vec<T> {
#[inline]
#[must_use]
pub const fn new() -> Self {
Vec { buf: RawVec::NEW, len: 0 }
}
}
impl<T> RawVec<T> {
/// HACK(Centril): This exists because stable `const fn` can only call stable `const fn`, so
/// they cannot call `Self::new()`.
///
/// If you change `RawVec<T>::new` or dependencies, please take care to not introduce anything
/// that would truly const-call something unstable.
pub const NEW: Self = Self::new();
/// Creates the biggest possible `RawVec` (on the system heap)
/// without allocating. If `T` has positive size, then this makes a
/// `RawVec` with capacity `0`. If `T` is zero-sized, then it makes a
/// `RawVec` with capacity `usize::MAX`. Useful for implementing
/// delayed allocation.
#[must_use]
pub const fn new() -> Self {
Self::new_in()
}
/// Like `new`, but parameterized over the choice of allocator for
/// the returned `RawVec`.
pub const fn new_in() -> Self {
// `cap: 0` means "unallocated". zero-sized types are ignored.
Self { ptr: Unique::dangling(), cap: Cap::ZERO }
}
}with_capacity(cap) 函数
该函数在创建 vec 的同时, 还给它分配足够多的堆内存, 以便存放 cap 个元素.
vec![] 宏, 以及从迭代器创建
从这两种方法创建 vec 对象时, 都要先获取元素的个数 len, 然后设置新创建的 vec 对象的容量恰好等于 len,
看下面的代码片段:
let v1 = vec![1, 2, 3];
let v2: Vec<i32> = [1, 2, 3].into_iter().collect();
assert_eq!(v1, v2);
assert_eq!(v1.capacity(), 3);
assert_eq!(v2.capacity(), 3);push() 函数, 向 vec 中加入新元素
以下的代码示例展示了 vec 的扩容策略, 那就是 2 倍扩容, 不管当前的 vec 对象已经占用了多大的内存,
在需要扩容时, 一直都是 2倍扩容.
use std::mem::size_of;
fn main() {
let mut v1 = Vec::<i32>::new();
println!("len of v1: {}, cap: {}", v1.len(), v1.capacity());
v1.push(1);
println!("len of v1: {}, cap: {}", v1.len(), v1.capacity());
v1.push(2);
v1.push(3);
v1.push(4);
v1.push(5);
println!("len of v1: {}, cap: {}", v1.len(), v1.capacity());
let mut v2: Vec<i64> = Vec::new();
println!(
"len of v2: {}, cap: {}, size: {}",
v2.len(),
v2.capacity(),
v2.capacity() * size_of::<i64>()
);
let mut old_cap = v2.capacity();
for i in 0..10_000_000 {
v2.push(i);
if v2.capacity() != old_cap {
old_cap = v2.capacity();
println!(
"len of v2: {}, cap: {}, size: {}",
v2.len(),
v2.capacity(),
v2.capacity() * size_of::<i64>()
);
}
}
}pop() 函数, 从 vec 中移除元素, 会不会自动释放内存?
先看一下测试代码:
fn main() {
let mut v1: Vec<i32> = Vec::new();
for i in 0..1_000_000 {
v1.push(i);
}
println!("capacity: {}, len: {}", v1.capacity(), v1.len());
while v1.pop().is_some() {
// Ignore
}
println!("capacity: {}, len: {}", v1.capacity(), v1.len());
// 手动释放内存
v1.shrink_to_fit();
println!("shrink_to_fit(), capacity: {}, len: {}", v1.capacity(), v1.len());
}可以发现, 它并不会自动释放多余的内存, 需要手动调用 resize(), shrink_to_fit() 等函数.
reverse(additional) 函数
这个函数要求数组至少预留 additional 个元数的空间.
fn main() {
let mut v1 = vec![1, 2, 3];
println!("len: {}, cap: {}", v1.len(), v1.capacity());
v1.reserve(12);
println!("len: {}, cap: {}", v1.len(), v1.capacity());
v1.reserve(13);
println!("len: {}, cap: {}", v1.len(), v1.capacity());
}可以发现, 上面的例子中, 数组多分配了一些空间. 我们看一下标准库中的代码:
fn grow_amortized(&mut self, len: usize, additional: usize) -> Result<(), TryReserveError> {
...
// Nothing we can really do about these checks, sadly.
let required_cap = len.checked_add(additional).ok_or(CapacityOverflow)?;
// This guarantees exponential growth. The doubling cannot overflow
// because `cap <= isize::MAX` and the type of `cap` is `usize`.
let cap = cmp::max(self.cap.0 * 2, required_cap);
let cap = cmp::max(Self::MIN_NON_ZERO_CAP, cap);
let new_layout = Layout::array::<T>(cap);
...
}如果要留出的空间比当前容量的 2 倍少的话, 会直接使用 2 倍扩容 的策略.
shrink_to_fit() 函数
这个函数比较容易理解, 调整数组的容量, 移除多余的未使用的内存, 这样 len() == capacity().
resize() 函数
调整数组中的元素个数, 如果新的个数比当前的少, 就移除一部分;
如果比当前的个数多, 就添加一部分, 使用指定的值, 同时数组的容量调整, 依然是按照 2 倍扩容 的策略.
fn main() {
let mut v1: Vec<i32> = Vec::new();
v1.resize(42, 1);
println!("len: {}, cap: {}", v1.len(), v1.capacity());
v1.resize(52, 2);
println!("len: {}, cap: {}", v1.len(), v1.capacity());
v1.resize(32, 2);
println!("len: {}, cap: {}", v1.len(), v1.capacity());
}迭代器
VecDeque
用法
结构定义与内存布局
管理容量
一个示例程序
use std::collections::VecDeque;
fn main() {
let v1 = VecDeque::<i32>::from([1, 2, 3, 4, 5]);
println!("len of v1: {}, cap of v1: {}", v1.len(), v1.capacity());
let mut v2 = VecDeque::<i32>::new();
println!("len of v2: {}, cap of v2: {}", v2.len(), v2.capacity());
v2.push_back(1);
println!("len of v2: {}, cap of v2: {}", v2.len(), v2.capacity());
v2.push_back(2);
v2.push_back(3);
v2.push_back(4);
v2.push_back(5);
println!("len of v2: {}, cap of v2: {}", v2.len(), v2.capacity());
for i in 0..10 {
v2.push_back(i);
}
println!("len of v2: {}, cap of v2: {}", v2.len(), v2.capacity());
v2.push_back(1);
v2.push_back(2);
println!("len of v2: {}, cap of v2: {}", v2.len(), v2.capacity());
v2.shrink_to_fit();
println!("len of v2: {}, cap of v2: {}", v2.len(), v2.capacity());
v2.push_back(3);
println!("len of v2: {}, cap of v2: {}", v2.len(), v2.capacity());
}
迭代器
与 Vec 比较
何时该选择 Vec, 何时该选 VecDeque
LinkedList
BinaryHeap
HashMap 与 HashSet
目前, Rust 标准库里的哈稀表使用的是 hashbrown crate, 它基于 SwissTable hash 的 c++ 版本.
Entry API
这种接口设计, 可以很方便的进行原地操作(in-place operation), 比如插入以及修改, 而不用重新查找.
以下代码用于统计文件中的单词数 (word count):
use std::collections::HashMap;
use std::io::{self, BufRead};
fn main() -> Result<(), io::Error> {
let mut words = HashMap::<String, i32>::new();
for line in io::stdin().lock().lines() {
for word in line?.split_whitespace() {
words
.entry(word.to_owned())
.and_modify(|counter| *counter += 1)
.or_insert(1);
}
}
for (word, counter) in &words {
println!("{word}: {counter}");
}
Ok(())
}相关内容
参考
BTreeMap
字符串 String
Unicode 编码
UTF-8 编码
String 类
String 类用于记录有效的 UTF-8 编码字串.
String 与 Vec 间的转换
字符串格式化
format!() 宏用于生成格式化的字符串, 它类似于 C 语言中的 printf() 以及 Python 中的 str.format() 函数.
let name = "Julia";
let greating = format!("Hello, {}", name);如果是结构体的话, 使用 {:#?} 可以实现类似 "pretty printing" 的效果, 多行打印结构体信息:
let value = [1, 1, 2, 3, 5];
println!("value: {:#?}", value);位置参数 Positional parameters
使用参数的位置索引, 比如 {0}, {1}, {2} 这种的.
如果省略了里面的位置标记, 那就会提供一个计数器, 从0开始计数.
看一个例子:
fn main() {
let s = format!("{} {} {}", 1, 2, 3);
assert_eq!(s, "1 2 3");
// `{}` 从 0 开始计数
let s = format!("{1} {} {2}", 1, 2, 3);
assert_eq!(s, "2 1 3");
let s = format!("{1} {2} {0}", 1, 2, 3);
assert_eq!(s, "2 3 1");
}具名参数 Named parameters
还支持类似于 python 中的那种格式化, 使用参数名称, 实现更灵活更易读的参数引用:
fn main() {
println!("Jolia {age}", age = 25);
let value = [1, 1, 2, 3, 5];
println!("value: {value:?}");
}格式化参数 Formatting parameters
宽度 Width
可以指定参数所占用的最小宽度 (最少字符数), 如果宽度不够, 可以使用空格或者指定的字符来填充.
指定参数占用的宽度值, 该值需要是 usize 类型, 比如 {name:width$}, 这里的 name 是要被
格式化的参数, 而 width 参数就指定了它占用的宽度, 注意 width 后面那个 $ 是作为后缀存在的.
fn main() {
let expected = "Hello x !";
// 注意这里是直接指定宽度值 5
let s = format!("Hello {:5}!", 'x');
assert_eq!(s, expected);
// 这里 `{:1$}` 引用了位置参数 1 的值, 作为字符串的宽度值
let s = format!("Hello {0:1$}!", "x", 5);
assert_eq!(s, expected);
// 这里交换了被格式化的参数与位置参数的索引位置.
let s = format!("Hello {1:0$}!", 5, 'x');
assert_eq!(s, expected);
// 使用了具名参数作为宽度值
let s = format!("Hello {:width$}!", 'x', width = 5);
assert_eq!(s, expected);
let width: usize = 5;
// 使用了具名参数作为宽度值
let s = format!("Hello {:width$}!", 'x');
assert_eq!(s, expected);
}对齐方式与填充字符 Alignment and fill
在设定了字符串的宽度值时, 同时可以指定字符串的对齐方式以及多余空间要填充的字符.
字符串的对齐方式有三种:
<左对齐, 如果不指定对齐方式, 默认就是左对齐^居中>右对齐
字符串宽度与对齐方式的语法是 string:char<width, 可以这样解析:
- 左对齐, 也可以是右中对齐或者右对齐, 要注意的是这里并没有考虑有些语言中从右到左的布局方式 (R2L), 我们默认是L2R
- 字符串的宽度值是
width, 比如5 - 空白处要填充的字符是
char, 比如-或者. - 如果指定了要填充的字符, 则必须同时指定对齐方式
- 如果没有指定对齐方式, 默认是左对齐
- 默认的填充字符是空格
看一些代码示例:
fn main() {
let width: usize = 5;
// 左对齐
let s = format!("Hello {:<width$}!", 'x');
assert_eq!(s, "Hello x !");
// 居中对齐
let s = format!("Hello {:^width$}!", 'x');
assert_eq!(s, "Hello x !");
// 右对齐
let s = format!("Hello {:>width$}!", 'x');
assert_eq!(s, "Hello x!");
// 左对齐, 使用 `.` 填充
let s = format!("Hello {:.<width$}!", 'x');
assert_eq!(s, "Hello x....!");
// 居中对齐, 使用 `-` 填充
let s = format!("Hello {:-^width$}!", 'x');
assert_eq!(s, "Hello --x--!");
// 右对齐, 用 `0` 填充
let s = format!("Hello {:0>5}", 'x');
assert_eq!(s, "Hello 0000x");
// 整数的十六进制形式, 右对齐, 字符串宽度值为8, 使用 `0` 填充空位
let s = format!("Hello 0x{:0>8x}", 12345678);
assert_eq!(s, "Hello 0x00bc614e");
}数值的符号与填充
上面讲到的对齐与字符宽度等, 都是通用的格式化手段. 这里要介绍的是数值类型特有的格式化手段.
+, 默认情况下, 只要负数才会被打印-符号, 而无符号数以及正数, 都会忽略掉符号位. 使用+可以强制打印数值的符号-, 目前不支持, 会被忽略掉0, 使用0进行数值填充, 而且对齐方式被强制为左对齐#表示要使用另外一种格式化形式:?, 使用 pretty-printing 形式调用fmt::Debugtrait, 会添加换行符和缩进x, 使用小写的十六进制格式, 并且添加0x前缀X, 使用大写的十六进制格式, 并且添加0X前缀b, 使用小写的二进制格式, 并且添加0b前缀o, 使用八进制格式, 并且添加0o前缀
看下面的示例代码:
fn main() {
let x: i32 = 42;
// 强制指定 `+` 符号
let s = format!("Hello, {x:+}");
assert_eq!(s, "Hello, +42");
// 使用 `0` 作为填充字符, 需要指定字符串的宽度值
let s = format!("Hello, {x:#04}");
assert_eq!(s, "Hello, 0042");
// 小写的十六进制
let s = format!("Hello, {x:#x}");
assert_eq!(s, "Hello, 0x2a");
// 大写的十六进制
let s = format!("Hello, {x:#X}");
assert_eq!(s, "Hello, 0x2A");
// 二进制
let s = format!("Hello, {x:#b}");
assert_eq!(s, "Hello, 0b101010");
// 八进制
let s = format!("Hello, {x:#o}");
assert_eq!(s, "Hello, 0o52");
}数值精度 Precision
常用格式化符号 Formatting Traits
println!("{formatting}", arg);, 这里的 formatting 就是本节要讨论的 Formatting traits,
标准库里定义了一些 traits, 用于修饰被格式化的参数, 以得到期望的形式.
| 符号 | 描述 |
|---|---|
| 空白 | 调用 fmt::Display trait |
:? | 调用 fmt::Debug trait |
:x? | 调用 fmt::Debug trait, 并使用小写的十六进制整数 |
:X? | 调用 fmt::Debug trait, 并使用大写的十六进制整数 |
:o | 调用 fmt::Octal trait, 转换成八进制 |
:x | 调用 fmt::LowerHex trait, 转换成小写的十六进制 |
:X | 调用 fmt::UpperHex trait, 转换成大写的十六进制 |
:b | 调用 fmt::Binary trait, 转换成二进制 |
:e | 调用 fmt::LowerExp trait, 转换成小写的科学计数法格式 |
:E | 调用 fmt::UpperExp trait, 转换成大写的科学计数法格式 |
:p | 调用 fmt::Pointer trait, 转换成指针形式 |
在标准库中已经为很多基础数据类型实现了, 上表中列出来的 fmt 模块中的各个 traits.
下面的代码示例展示了如何使用格式化参数:
fn main() {
let x = 42;
println!("八进制: 0o{:o}", x);
println!("十进制: {}", x);
println!("小写的十六进制: 0x{:x}", x);
println!("大写的十六进制: 0x{:X}", x);
println!("二进制: 0b{:b}", x);
println!("x 的地址: {:p}", &x);
let x2 = 1234567890;
println!("小写的科学计数法: {:e}", x2);
println!("大写的科学计数法: {:E}", x2);
let s = "Hello, Rust";
println!("Display: {}", s);
println!("Debug: {:?}", s.as_bytes());
}相关的宏定义
标准库中定义了一系列与字符串格式化相关的宏, 它们分别是:
format!write!writeln!print!println!eprint!eprintln!format_args!
format! 宏
TODO
String 内存布局
String 内部由 Vec<u8> 实现, 但它会保证里面的是有效的 UTF-8 编码的字符串.
&str 是指向 String 的引用, 它也能保证都是有效的 UTF-8 编码的, 可以认为它是 &[u8].
String::len() 或者 &str::len() 得到的是里面的字节数;
如果要得到里面的 UTF-8 字符串长度, 需要用 String::chars()::count() 方法.
下面的代码片段展示了 String 以及字符串切片 &str 的基本用法:
fn main() {
let mut msg = String::from("Hello, Rust");
msg.reserve(2);
let lang = &msg[7..];
assert_eq!(lang, "Rust");
assert_eq!(msg.len(), 11);
assert_eq!(msg.capacity(), 13);
assert_eq!(lang.len(), 4);
}这里对应的内存布局如下图所示:

在 rust 标准库中, String 类的定义如下:
#[derive(PartialEq, PartialOrd, Eq, Ord)]
#[cfg_attr(not(test), lang = "String")]
pub struct String {
vec: Vec<u8>,
}对于字符串 msg 来说:
- String 类型内部就是一个
Vec<u8> buffer ptr指向的是堆内存的起始地址len则表示当前在 vector 中已经存放了多个少元素- 而
capacity指向的是分配的堆内存可以存放的元素个数
对于字符串节片 &str:
- 它是一个胖指针
- 里面的
buffer ptr指向的是堆内存上切片的起始地址 - 而
len则是指示切片的长度是4个元素
其它类型的字符串
有时并不需要保证是有效的 UTF-8 编码的字符串:
std::ffi::CString或者&CStr表示C语言中以 null 结尾的字符串OsString或者&OsStr用来处理命令行参数或者环境变量std::path::PathBuf或者&Path表示文件路径Vec<u8>或者&[u8]用于二进制的数据
字符串之间的转换
参考
输入输出 IO
Readers and Writers
Readtrait, 面向字节的读取接口BufRead基于Readtrait, 实现了依行读取文本等方法Writetrait, 面向字节及 UTF-8 字符串的写入接口
BufRead 只支持 UTF-8 编码
FromIterator trait 可以转换 Result trait 所包装的类型.
Vec<u8> 实现了 Write trait, 这个在 C++ 中称作是偏特化. 用于向列表中填入新的数据.
Path
- String, 是在堆上分配的内存的 str
- OsString, 是在堆上分配的内存的 OsStr
- PathBuf, 是在堆上分配的内存的 Path
对于路径名, 不需要是有效的 Unicode 名, 所以不能直接用 String, 因为 String
要求必须是有效的 Unicode. 我们需要使用 OsStr 及 OsString. OsStr 是
Unicode 的超集. 可以用它来表示路径名, 命令行参数, 以及环境变量. 在 Unix 平台,
OsStr 可表示任意的字节序.
Path 跟 OsStr 几乎类似, 只是加了一些方便处理路径的方法.
对于绝对路径及相对路径, 使用 Path; 对于路径的一部分, 使用 OsStr.
内存管理基础
管理好内存, 对于像 Rust 和 C++ 这样的系统级编程语言来说, 都是极为关键的.
在更深入地介绍管理内存的细节之前, 我们先理一下内存相关的基础知识.
本章的学习目标:
- 掌握进程的内存结构
- 了解内存映射与虚拟内存
- 理解 RAII 机制
- 掌握 Drop trait 的触发时机, 这个是重点
进程内存结构 Segments
物理地址与虚拟地址
进程运行期间的内存结构
如何判断一个指针地址属于哪个段的内存
线程的栈结构
mmap 一个文件
mmap 匿名映射
malloc 大块内存, 使用 mmap
如何查看可执文件的符号
RAII
RAII是 Resource Acquisition Is Initialization 的缩写, 最初来自于 C++.
一句话概括就是, 将资源(包括堆内存, 文件句柄, socket, 锁, 数据库连接等等)的管理与对象的生命周期绑定.
利用在栈上创建的局部变量的自动析构来保证它管理的资源一定被释放.
标准库中的 File 类
//! Redefinition of `File` struct
#![allow(dead_code)]
use crate::file_desc::FileDesc;
/// An object providing access to an open file on the filesystem.
///
/// An instance of a `File` can be read and/or written depending on what options
/// it was opened with. Files also implement `Seek` to alter the logical cursor
/// that the file contains internally.
///
/// Files are automatically closed when they go out of scope. Errors detected
/// on closing are ignored by the implementation of `Drop`. Use the method
/// `sync_all` if these errors must be manually handled.
pub struct File(FileDesc);标准库中的 TcpStream 类
//! Redefinition of `TcpStream`
#![allow(clippy::module_name_repetitions)]
#![allow(dead_code)]
use crate::file_desc::FileDesc;
/// A TCP stream between a local and a remote socket.
///
/// After creating a `TcpStream` by either `connect`ing to a remote host or
/// `accept`ing a connection on a `TcpListener`, data can be transmitted
/// by reading and writing to it.
///
/// The connection will be closed when the value is dropped. The reading and writing
/// portions of the connection can also be shut down individually with the `shutdown`
/// method.
pub struct TcpStream {
inner: Socket,
}
pub(crate) struct Socket(FileDesc);标准库中的 Mutex 和 MutexGuard 类
//! Redefinition of MutexGuard
/// A mutual exclusion primitive useful for protecting shared data
///
/// This mutex will block threads waiting for the lock to become available. The
/// mutex can be created via a [`new`] constructor. Each mutex has a type parameter
/// which represents the data that it is protecting. The data can only be accessed
/// through the RAII guards returned from [`lock`] and [`try_lock`], which
/// guarantees that the data is only ever accessed when the mutex is locked.
pub struct Mutex<T: ?Sized> {
inner: sys::Mutex,
poison: poison::Flag,
data: UnsafeCell<T>,
}
/// An RAII implementation of a "scoped lock" of a mutex. When this structure is
/// dropped (falls out of scope), the lock will be unlocked.
///
/// The data protected by the mutex can be accessed through this guard via its
/// [`Deref`] and [`DerefMut`] implementations.
///
/// This structure is created by the [`lock`] and [`try_lock`] methods on
/// [`Mutex`].
pub struct MutexGuard<'a, T: ?Sized + 'a> {
lock: &'a Mutex<T>,
poison: poison::Guard,
}
impl<T: ?Sized> Drop for MutexGuard<'_, T> {
#[inline]
fn drop(&mut self) {
unsafe {
self.lock.poison.done(&self.poison);
self.lock.inner.unlock();
}
}
}
impl<T: ?Sized> Mutex<T> {
/// Acquires a mutex, blocking the current thread until it is able to do so.
///
/// This function will block the local thread until it is available to acquire
/// the mutex. Upon returning, the thread is the only thread with the lock
/// held. An RAII guard is returned to allow scoped unlock of the lock. When
/// the guard goes out of scope, the mutex will be unlocked.
///
/// The exact behavior on locking a mutex in the thread which already holds
/// the lock is left unspecified. However, this function will not return on
/// the second call (it might panic or deadlock, for example).
pub fn lock(&self) -> LockResult<MutexGuard<'_, T>> {
unsafe {
self.inner.lock();
MutexGuard::new(self)
}
}
/// Attempts to acquire this lock.
///
/// If the lock could not be acquired at this time, then [`Err`] is returned.
/// Otherwise, an RAII guard is returned. The lock will be unlocked when the
/// guard is dropped.
///
/// This function does not block.
///
/// # Errors
///
/// If another user of this mutex panicked while holding the mutex, then
/// this call will return the [`Poisoned`] error if the mutex would
/// otherwise be acquired.
///
/// If the mutex could not be acquired because it is already locked, then
/// this call will return the [`WouldBlock`] error.
pub fn try_lock(&self) -> TryLockResult<MutexGuard<'_, T>> {
unsafe {
if self.inner.try_lock() {
Ok(MutexGuard::new(self)?)
} else {
Err(TryLockError::WouldBlock)
}
}
}
/// Immediately drops the guard, and consequently unlocks the mutex.
///
/// This function is equivalent to calling [`drop`] on the guard but is more self-documenting.
/// Alternately, the guard will be automatically dropped when it goes out of scope.
pub fn unlock(guard: MutexGuard<'_, T>) {
drop(guard);
}
}标准库中的 Box 类
use core::ptr::{self, NonNull, Unique};
/// A pointer type that uniquely owns a heap allocation of type `T`.
pub struct Box<
T: ?Sized,
#[unstable(feature = "allocator_api", issue = "32838")] A: Allocator = Global,
>(Unique<T>, A);
impl<T> Box<T> {
/// Allocates memory on the heap and then places `x` into it.
///
/// This doesn't actually allocate if `T` is zero-sized.
#[inline(always)]
#[must_use]
pub fn new(x: T) -> Self {
#[rustc_box]
Box::new(x)
}
}
unsafe impl<#[may_dangle] T: ?Sized, A: Allocator> Drop for Box<T, A> {
#[inline]
fn drop(&mut self) {
// the T in the Box is dropped by the compiler before the destructor is run
let ptr = self.0;
unsafe {
let layout = Layout::for_value_raw(ptr.as_ptr());
if layout.size() != 0 {
self.1.deallocate(From::from(ptr.cast()), layout);
}
}
}
}标准库中的 Rc 类
//! Refinition of Rc
//!
//! Single-threaded reference-counting pointers. 'Rc' stands for 'Reference
//! Counted'.
//! The type [`Rc<T>`][`Rc`] provides shared ownership of a value of type `T`,
//! allocated in the heap. Invoking [`clone`][clone] on [`Rc`] produces a new
//! pointer to the same allocation in the heap. When the last [`Rc`] pointer to a
//! given allocation is destroyed, the value stored in that allocation (often
//! referred to as "inner value") is also dropped.
use std::cell::Cell;
/// A single-threaded reference-counting pointer. 'Rc' stands for 'Reference
/// Counted'.
pub struct Rc<
T: ?Sized,
#[unstable(feature = "allocator_api", issue = "32838")] A: Allocator = Global,
> {
ptr: NonNull<RcBox<T>>,
phantom: PhantomData<RcBox<T>>,
alloc: A,
}
// This is repr(C) to future-proof against possible field-reordering, which
// would interfere with otherwise safe [into|from]_raw() of transmutable
// inner types.
#[repr(C)]
struct RcBox<T: ?Sized> {
strong: Cell<usize>,
weak: Cell<usize>,
value: T,
}
impl<T: ?Sized, A: Allocator> !Send for Rc<T, A> {}
impl<T: ?Sized, A: Allocator> !Sync for Rc<T, A> {}
impl<T> Rc<T> {
/// Constructs a new `Rc<T>`.
pub fn new(value: T) -> Rc<T> {
// There is an implicit weak pointer owned by all the strong
// pointers, which ensures that the weak destructor never frees
// the allocation while the strong destructor is running, even
// if the weak pointer is stored inside the strong one.
unsafe {
Self::from_inner(
Box::leak(Box::new(RcBox {
strong: Cell::new(1),
weak: Cell::new(1),
value,
}))
.into(),
)
}
}
}
unsafe impl<#[may_dangle] T: ?Sized, A: Allocator> Drop for Rc<T, A> {
/// Drops the `Rc`.
///
/// This will decrement the strong reference count. If the strong reference
/// count reaches zero then the only other references (if any) are
/// [`Weak`], so we `drop` the inner value.
fn drop(&mut self) {
unsafe {
self.inner().dec_strong();
if self.inner().strong() == 0 {
// destroy the contained object
ptr::drop_in_place(Self::get_mut_unchecked(self));
// remove the implicit "strong weak" pointer now that we've
// destroyed the contents.
self.inner().dec_weak();
if self.inner().weak() == 0 {
self.alloc
.deallocate(self.ptr.cast(), Layout::for_value(self.ptr.as_ref()));
}
}
}
}
}参考
Drop 对象的时机
Drop trait 在好些地方都有所提及, 但是它们的重点不太一样, 比如前文有介绍
Drop trait 的基本用法, 以及 所有权转移.
在这一节中, 我们重点介绍 Drop trait 被调用的时机.
谁负责调用 Drop trait
编译器, 确且地说是编译器自动生成的汇编代码, 帮我们自动管理对像的释放, 通过调用 Drop trait.
就像在 C++ 语言中, 编译器会自动调用对象的析构函数.
但是, 跟 C++ 相比, Rust 管理对象的释放过程要复杂得多, 后者的对象会有 未初始化 uninit 的状态,
如果处于这个状态, 那么编译器就不会调用该对象的 Drop trait.
静态释放 static drop
表达式比较简单, 可以在编译期间确定变量的值是否需要被释放.
fn main() {
// x 初始始化
let mut x = Box::new(42_i32);
// 创建可变更引用
let y = &mut x;
// x 被重新赋值, 旧的值自动被 drop
*y = Box::new(41);
// x 的作用域到此结束, drop 它
}我们使用命令 rustc --emit asm static-drop.rs 生成对应的汇编代码,
下面展示了核心部分的代码, 并加上了几行注释:
.section .text._ZN11static_drop4main17h68890bb49a778ebaE,"ax",@progbits
.p2align 4, 0x90
.type _ZN11static_drop4main17h68890bb49a778ebaE,@function
_ZN11static_drop4main17h68890bb49a778ebaE:
.Lfunc_begin2:
.cfi_startproc
.cfi_personality 155, DW.ref.rust_eh_personality
.cfi_lsda 27, .Lexception2
subq $104, %rsp
.cfi_def_cfa_offset 112
.Ltmp6:
; malloc(4)
movl $4, %esi
movq %rsi, %rdi
callq _ZN5alloc5alloc15exchange_malloc17h73c35ae157034338E
.Ltmp7:
movq %rax, 40(%rsp)
jmp .LBB18_2
.LBB18_1:
.Ltmp8:
movq %rax, %rcx
movl %edx, %eax
movq %rcx, 88(%rsp)
movl %eax, 96(%rsp)
movq 88(%rsp), %rax
movq %rax, 32(%rsp)
jmp .LBB18_13
.LBB18_2:
; x.ptr = malloc(4)
; *(x.ptr) = 42
movq 40(%rsp), %rax
movl $42, (%rax)
movq %rax, 48(%rsp)
.Ltmp9:
; malloc(4)
movl $4, %esi
movq %rsi, %rdi
callq _ZN5alloc5alloc15exchange_malloc17h73c35ae157034338E
.Ltmp10:
; (x2.ptr) = malloc(4)
movq %rax, 24(%rsp)
jmp .LBB18_4
.LBB18_3:
.Ltmp11:
movq %rax, %rcx
movl %edx, %eax
movq %rcx, 72(%rsp)
movl %eax, 80(%rsp)
movq 72(%rsp), %rax
movq %rax, 8(%rsp)
movl 80(%rsp), %eax
movl %eax, 20(%rsp)
jmp .LBB18_6
.LBB18_4:
movq 24(%rsp), %rax
; *(x2.ptr) = 41
movl $41, (%rax)
jmp .LBB18_7
.LBB18_5:
.Ltmp15:
leaq 48(%rsp), %rdi
callq _ZN4core3ptr49drop_in_place$LT$alloc..boxed..Box$LT$i32$GT$$GT$17hac96f08cecbb6861E
.Ltmp16:
jmp .LBB18_12
.LBB18_6:
movl 20(%rsp), %eax
movq 8(%rsp), %rcx
movq %rcx, 56(%rsp)
movl %eax, 64(%rsp)
jmp .LBB18_5
.LBB18_7:
.Ltmp12:
; drop(x)
leaq 48(%rsp), %rdi
callq _ZN4core3ptr49drop_in_place$LT$alloc..boxed..Box$LT$i32$GT$$GT$17hac96f08cecbb6861E
.Ltmp13:
jmp .LBB18_10
.LBB18_8:
movq 24(%rsp), %rax
movq %rax, 48(%rsp)
jmp .LBB18_5
.LBB18_9:
.Ltmp14:
movq %rax, %rcx
movl %edx, %eax
movq %rcx, 56(%rsp)
movl %eax, 64(%rsp)
jmp .LBB18_8
.LBB18_10:
; x = x2
movq 24(%rsp), %rax
movq %rax, 48(%rsp)
leaq 48(%rsp), %rdi
; drop(x)
callq _ZN4core3ptr49drop_in_place$LT$alloc..boxed..Box$LT$i32$GT$$GT$17hac96f08cecbb6861E
addq $104, %rsp
.cfi_def_cfa_offset 8
retq
阅读汇编代码时, 最好对比着 Rust 代码, 方便理解.
但是汇编代码有上百行, 我们把汇编代码转译成 C 代码, 大概如下:
#include <stdlib.h>
#include <stdint.h>
int main(void) {
// let mut x = Box::new(42);
int32_t* x = (int32_t*) malloc(sizeof(int32_t));
*x = 42;
// let y = &mut x;
int32_t** y = &x;
// *y = Box::new(41);
int32_t* x2 = (int32_t*)malloc(sizeof(int32_t));
*x2 = 41;
free(x);
x = x2;
free(x);
return 0;
}
这个过程就比较清晰了吧, 编译上面的 C 代码, 并且用 valgrind 或者 sanitizers 等工具检测,
可以发现它进行了两次堆内存分配, 两次内存回收, 没有发现内存泄露的问题.

动态释放 dynamic drop
表达式有比较复杂的分支或者分支条件在运行期间才能判定, 通过在栈内存上设置 Drop Flag 来完成.
程序运行期间, 修改 drop-flag 标记, 来确定是否要调用该对象的 Drop trait.
先看一个示例程序:
use std::time::{SystemTime, UNIX_EPOCH};
fn main() {
let now = SystemTime::now();
let timestamp = now.duration_since(UNIX_EPOCH).unwrap_or_default();
let x: Box<i32>;
if timestamp.as_millis().is_multiple_of(2) {
x = Box::new(42);
println!("x: {x}");
}
}可以看到, 只有在程序运行时, 才能根据当前的时间标签决定要不要初始化变量 x, 这种情况就要用到 Drop Flag 了.
上面的 Rust 代码生成的汇编代码如下, 我们加入了一些注释:
.section .text._ZN12dynamic_drop4main17h353a883be865ee26E,"ax",@progbits
.p2align 4, 0x90
.type _ZN12dynamic_drop4main17h353a883be865ee26E,@function
_ZN12dynamic_drop4main17h353a883be865ee26E:
.Lfunc_begin3:
.cfi_startproc
.cfi_personality 155, DW.ref.rust_eh_personality
.cfi_lsda 27, .Lexception3
subq $248, %rsp
.cfi_def_cfa_offset 256
; 设置 x.drop-flag = 0
movb $0, 199(%rsp)
; let now = SystemTime::now();
movq _ZN3std4time10SystemTime3now17h4779e0425deae935E@GOTPCREL(%rip), %rax
callq *%rax
// now.seconds =
movq %rax, 48(%rsp)
// now.nano-seconds =
movl %edx, 56(%rsp)
; let timestamp = now.duration_since(UNIX_EPOCH).unwrap_or_default()
movq _ZN3std4time10SystemTime14duration_since17h0f40caf46c5e1553E@GOTPCREL(%rip), %rax
xorl %ecx, %ecx
movl %ecx, %edx
leaq 80(%rsp), %rdi
movq %rdi, 32(%rsp)
leaq 48(%rsp), %rsi
callq *%rax
movq 32(%rsp), %rdi
callq _ZN4core6result19Result$LT$T$C$E$GT$17unwrap_or_default17h8fe62a20db70e668E
; timestamp has value
// timestamp.seconds =
movq %rax, 64(%rsp)
// timestamp.nano-seconds =
movl %edx, 72(%rsp)
.Ltmp9:
; timestamp.as_millis()
leaq 64(%rsp), %rdi
callq _ZN4core4time8Duration9as_millis17h3157e191997c534eE
.Ltmp10:
movq %rax, 40(%rsp)
jmp .LBB23_4
.LBB23_1:
testb $1, 199(%rsp)
jne .LBB23_17
jmp .LBB23_16
.LBB23_2:
.Ltmp18:
movq %rax, %rcx
movl %edx, %eax
movq %rcx, 16(%rsp)
movl %eax, 28(%rsp)
jmp .LBB23_3
.LBB23_3:
movq 16(%rsp), %rcx
movl 28(%rsp), %eax
movq %rcx, 200(%rsp)
movl %eax, 208(%rsp)
jmp .LBB23_1
.LBB23_4:
jmp .LBB23_5
.LBB23_5:
; 判定 millis % 2 是否为 0
movq 40(%rsp), %rax
; test-bit(millis) == 1
testb $1, %al
jne .LBB23_9
jmp .LBB23_6
.LBB23_6:
; millis % 2 == 0 进入这个代码块
.Ltmp11:
; x = Box::new(42);
; malloc(4);
movl $4, %esi
movq %rsi, %rdi
callq _ZN5alloc5alloc15exchange_malloc17hbc6d664071ad5e2fE
.Ltmp12:
; x.ptr = xxx
movq %rax, 8(%rsp)
jmp .LBB23_8
.LBB23_7:
.Ltmp13:
movq %rax, %rcx
movl %edx, %eax
movq %rcx, 232(%rsp)
movl %eax, 240(%rsp)
movq 232(%rsp), %rcx
movl 240(%rsp), %eax
movq %rcx, 16(%rsp)
movl %eax, 28(%rsp)
jmp .LBB23_3
.LBB23_8:
movq 8(%rsp), %rax
; 设置堆内存上的值
; *(x.ptr) = 42;
movl $42, (%rax)
jmp .LBB23_10
.LBB23_9:
; millis % 2 == 1, 才进入这个分支
; 判断 x.drop_flag == 1
; 如果是 1, 就说明它初始化了, 需要被 drop
; 如果是 0, 就说明 x 是 uninit, 什么都不用做
testb $1, 199(%rsp)
jne .LBB23_15
jmp .LBB23_14
.LBB23_10:
movq 8(%rsp), %rax
; x.drop-flag = 1
movb $1, 199(%rsp)
; println!("x: {x}");
movq %rax, 104(%rsp)
leaq 104(%rsp), %rax
movq %rax, 216(%rsp)
leaq _ZN69_$LT$alloc..boxed..Box$LT$T$C$A$GT$$u20$as$u20$core..fmt..Display$GT$3fmt17h5ad2dd804fe02f48E(%rip), %rax
movq %rax, 224(%rsp)
movq 216(%rsp), %rax
movq %rax, 176(%rsp)
movq 224(%rsp), %rax
movq %rax, 184(%rsp)
movups 176(%rsp), %xmm0
movaps %xmm0, 160(%rsp)
.Ltmp14:
leaq .L__unnamed_9(%rip), %rsi
leaq 112(%rsp), %rdi
movl $2, %edx
leaq 160(%rsp), %rcx
movl $1, %r8d
callq _ZN4core3fmt9Arguments6new_v117hd2ff9f250d646380E
.Ltmp15:
jmp .LBB23_12
.LBB23_12:
.Ltmp16:
movq _ZN3std2io5stdio6_print17h8f9e07feda690a3dE@GOTPCREL(%rip), %rax
leaq 112(%rsp), %rdi
callq *%rax
.Ltmp17:
jmp .LBB23_13
.LBB23_13:
; if millis % 2 == 0 { ... } 代码块运行完成
; 进入最后的清理阶段
jmp .LBB23_9
.LBB23_14:
; return 0
movb $0, 199(%rsp)
addq $248, %rsp
.cfi_def_cfa_offset 8
retq
.LBB23_15:
.cfi_def_cfa_offset 256
; 这个是正常的工作流调用的
; drop(x);
leaq 104(%rsp), %rdi
callq _ZN4core3ptr49drop_in_place$LT$alloc..boxed..Box$LT$i32$GT$$GT$17ha5010c067d13d768E
jmp .LBB23_14
.LBB23_16:
movq 200(%rsp), %rdi
callq _Unwind_Resume@PLT
.LBB23_17:
.Ltmp19:
; 这个是处理 unwind 异常时调用的
; drop(x);
leaq 104(%rsp), %rdi
callq _ZN4core3ptr49drop_in_place$LT$alloc..boxed..Box$LT$i32$GT$$GT$17ha5010c067d13d768E
.Ltmp20:
jmp .LBB23_16
.LBB23_18:
.Ltmp21:
movq _ZN4core9panicking16panic_in_cleanup17hd62aa59d1fda1c9fE@GOTPCREL(%rip), %rax
callq *%rax
.Lfunc_end23:
.size _ZN12dynamic_drop4main17h353a883be865ee26E, .Lfunc_end23-_ZN12dynamic_drop4main17h353a883be865ee26E
.cfi_endproc
其行为如下:
- 栈空间初始化完成后, 就设置变量 x 的
drop-flag = 0 - 然后计算当前的时间标签, 判断是否为偶数
- 如果为偶数, 继续
- 如果为奇数, 跳转到第4步
- 分配堆内存, 并设置内存里的值为
42; 初始化 x, 并设置x.drop-flag = 1- 组装参数, 调用
print()打印字符串
- 组装参数, 调用
- 判断
x.drop-flag == 1, 如果是1, 就调用Box::drop(&mut x)来释放它
我们将汇编代码的行为, 作为注释加入到原先的 Rust 代码中, 更方便阅读:
use std::time::{SystemTime, UNIX_EPOCH};
fn main() {
// 函数栈内存在初始完成后, 设置 x.drop-flag
// x.drop-flag = 0;
let now = SystemTime::now();
let timestamp = now.duration_since(UNIX_EPOCH).unwrap_or_default();
// 声明 x, 但没有初始化它, 所以 x 是 uninit 的
let x: Box<i32>;
// 如果毫秒是偶数, 就进入分支
if timestamp.as_millis().is_multiple_of(2) {
// 分配堆内存 malloc(4)
// 并设置堆内存上的值为 42
// 初始化 x
x = Box::new(42);
// 设置 drop-flag 的值
// x.drop-flag = 1
println!("x: {x}");
}
// x 超出其作用域, 判定要不要释放它, 就像下面的伪代码显示的.
// if x.drop-flag == 1 {
// core::ptr::drop_in_place(*x as *mut i32);
// }
}我们甚至可以将上面的汇编代码转译成对应的 C 代码:
#include <stdio.h>
#include <stdlib.h>
#include <stdbool.h>
#include <stdint.h>
#include <time.h>
int main(void) {
bool x_drop_flag = false;
int32_t* x;
struct timespec now;
if (clock_gettime(CLOCK_REALTIME, &now) == -1) {
// Ignored
}
int64_t millis = now.tv_sec * 1000 + now.tv_nsec / 1000000;
if (millis % 2 == 0) {
x = (int32_t*) malloc(sizeof(int32_t));
*x = 42;
x_drop_flag = true;
printf("x: %d\n", *x);
}
if (x_drop_flag) {
free(x);
}
return 0;
}
更有趣的是, 我们可以用 gdb/lldb 来手动修改 x.drop-flag, 如果把它设置为 1, 并且 x 未初始化的话,
在进程结束时, 就可能会产生段错误 segfault.
dynamic-drop`dynamic_drop::main::h5787b1b14685d565:
0x5555555696e0 <+0>: subq $0x118, %rsp ; imm = 0x118
0x5555555696e7 <+7>: movb $0x0, 0xcf(%rsp)
-> 0x5555555696ef <+15>: movq 0x4165a(%rip), %rax
0x5555555696f6 <+22>: callq *%rax
0x5555555696f8 <+24>: movq %rax, 0x30(%rsp)
上面展示的是 main() 函数初始化时的代码, 它调整完栈顶后, 立即重置了 x.drop-flag = 0.
在后面的代码运行前, 我们可以使用命令 p *(char*)($rsp + 0xcf) = 1 将 x.drop-flag 设置为1.
等进程结束时, x 超出了作用域, 就要检查 x.drop-flag 的值. 如果x 未初始化的话, 它内部的
指针可能指向任意的地址, 所以就产生了段错误.
我们再看一下段错误时的函数的调用栈:
* thread #1, name = 'dynamic-drop', stop reason = signal SIGSEGV: invalid address (fault address: 0xe8)
frame #0: 0x00007ffff7e0a6aa libc.so.6`__GI___libc_free(mem=0x00000000000000f0) at malloc.c:3375:7
(lldb) bt
* thread #1, name = 'dynamic-drop', stop reason = signal SIGSEGV: invalid address (fault address: 0xe8)
* frame #0: 0x00007ffff7e0a6aa libc.so.6`__GI___libc_free(mem=0x00000000000000f0) at malloc.c:3375:7
frame #1: 0x000055555556a000 dynamic-drop`_$LT$alloc..alloc..Global$u20$as$u20$core..alloc..Allocator$GT$::deallocate::hfe4b1fe0680a312e at alloc.rs:119:14
frame #2: 0x0000555555569fcd dynamic-drop`_$LT$alloc..alloc..Global$u20$as$u20$core..alloc..Allocator$GT$::deallocate::hfe4b1fe0680a312e(self=0x00007fffffff
dd00, ptr=(pointer = ""), layout=Layout @ 0x00007fffffffdb88) at alloc.rs:256:22
frame #3: 0x0000555555569b89 dynamic-drop`_$LT$alloc..boxed..Box$LT$T$C$A$GT$$u20$as$u20$core..ops..drop..Drop$GT$::drop::hea3c2fa5449fa588(self=0x00007ffff
fffdcf8) at boxed.rs:1247:17
frame #4: 0x0000555555569ae8 dynamic-drop`core::ptr::drop_in_place$LT$alloc..boxed..Box$LT$i32$GT$$GT$::h4bec233740204caa((null)=0x00007fffffffdcf8) at mod.
rs:514:1
手动调用 drop() 函数
上面的代码演示了 Drop Flag 是如何工作的, 接下来, 我们看一下手动调用 drop() 函数释放了对象后,
它的行为是怎么样的?
先看示例代码:
use std::time::{SystemTime, UNIX_EPOCH};
fn main() {
let now = SystemTime::now();
let timestamp = now.duration_since(UNIX_EPOCH).unwrap_or_default();
let x: Box<i32>;
if timestamp.as_millis().is_multiple_of(2) {
x = Box::new(42);
println!("x: {x}");
drop(x);
}
}将上面的代码生成汇编代码, 我们还加上了几条注释:
.section .text._ZN11manual_drop4main17h6a90a7c6667c6acfE,"ax",@progbits
.p2align 4, 0x90
.type _ZN11manual_drop4main17h6a90a7c6667c6acfE,@function
_ZN11manual_drop4main17h6a90a7c6667c6acfE:
.Lfunc_begin3:
.cfi_startproc
.cfi_personality 155, DW.ref.rust_eh_personality
.cfi_lsda 27, .Lexception3
subq $248, %rsp
.cfi_def_cfa_offset 256
movb $0, 199(%rsp)
movq _ZN3std4time10SystemTime3now17h4779e0425deae935E@GOTPCREL(%rip), %rax
callq *%rax
movq %rax, 48(%rsp)
movl %edx, 56(%rsp)
movq _ZN3std4time10SystemTime14duration_since17h0f40caf46c5e1553E@GOTPCREL(%rip), %rax
xorl %ecx, %ecx
movl %ecx, %edx
leaq 80(%rsp), %rdi
movq %rdi, 32(%rsp)
leaq 48(%rsp), %rsi
callq *%rax
movq 32(%rsp), %rdi
callq _ZN4core6result19Result$LT$T$C$E$GT$17unwrap_or_default17h28c150cee05a8583E
movq %rax, 64(%rsp)
movl %edx, 72(%rsp)
.Ltmp9:
leaq 64(%rsp), %rdi
callq _ZN4core4time8Duration9as_millis17hd86e02e1e172ae4fE
.Ltmp10:
movq %rax, 40(%rsp)
jmp .LBB24_4
.LBB24_1:
; 检查 x.drop-flag == 1
testb $1, 199(%rsp)
jne .LBB24_16
jmp .LBB24_15
.LBB24_2:
.Ltmp20:
movq %rax, %rcx
movl %edx, %eax
movq %rcx, 16(%rsp)
movl %eax, 28(%rsp)
jmp .LBB24_3
.LBB24_3:
movq 16(%rsp), %rcx
movl 28(%rsp), %eax
movq %rcx, 200(%rsp)
movl %eax, 208(%rsp)
jmp .LBB24_1
.LBB24_4:
jmp .LBB24_5
.LBB24_5:
movq 40(%rsp), %rax
testb $1, %al
jne .LBB24_9
jmp .LBB24_6
.LBB24_6:
.Ltmp11:
; 进入 millis % 2 == 1 的分支
; malloc(4)
movl $4, %esi
movq %rsi, %rdi
callq _ZN5alloc5alloc15exchange_malloc17h48568ba0c1cf90faE
.Ltmp12:
movq %rax, 8(%rsp)
jmp .LBB24_8
.LBB24_7:
.Ltmp13:
movq %rax, %rcx
movl %edx, %eax
movq %rcx, 232(%rsp)
movl %eax, 240(%rsp)
movq 232(%rsp), %rcx
movl 240(%rsp), %eax
movq %rcx, 16(%rsp)
movl %eax, 28(%rsp)
jmp .LBB24_3
.LBB24_8:
; x.ptr = malloc(4);
movq 8(%rsp), %rax
; *(x.ptr) = 42
movl $42, (%rax)
jmp .LBB24_10
.LBB24_9:
movb $0, 199(%rsp)
addq $248, %rsp
.cfi_def_cfa_offset 8
retq
.LBB24_10:
.cfi_def_cfa_offset 256
movq 8(%rsp), %rax
; x.drop-flag = 1
movb $1, 199(%rsp)
movq %rax, 104(%rsp)
leaq 104(%rsp), %rax
movq %rax, 216(%rsp)
leaq _ZN69_$LT$alloc..boxed..Box$LT$T$C$A$GT$$u20$as$u20$core..fmt..Display$GT$3fmt17h2b03e6eb572a9ffaE(%rip), %rax
movq %rax, 224(%rsp)
movq 216(%rsp), %rax
movq %rax, 176(%rsp)
movq 224(%rsp), %rax
movq %rax, 184(%rsp)
movups 176(%rsp), %xmm0
movaps %xmm0, 160(%rsp)
.Ltmp14:
leaq .L__unnamed_9(%rip), %rsi
leaq 112(%rsp), %rdi
movl $2, %edx
leaq 160(%rsp), %rcx
movl $1, %r8d
callq _ZN4core3fmt9Arguments6new_v117h86651149b4254342E
.Ltmp15:
jmp .LBB24_12
.LBB24_12:
.Ltmp16:
movq _ZN3std2io5stdio6_print17h8f9e07feda690a3dE@GOTPCREL(%rip), %rax
leaq 112(%rsp), %rdi
callq *%rax
.Ltmp17:
jmp .LBB24_13
.LBB24_13:
; x.drop-flag = 0
movb $0, 199(%rsp)
; drop(x)
movq 104(%rsp), %rdi
.Ltmp18:
callq _ZN4core3mem4drop17hf19ef99eb1293173E
.Ltmp19:
jmp .LBB24_14
.LBB24_14:
jmp .LBB24_9
.LBB24_15:
movq 200(%rsp), %rdi
callq _Unwind_Resume@PLT
.LBB24_16:
.Ltmp21:
leaq 104(%rsp), %rdi
callq _ZN4core3ptr49drop_in_place$LT$alloc..boxed..Box$LT$i32$GT$$GT$17h668a38bfbe5d4573E
.Ltmp22:
jmp .LBB24_15
.LBB24_17:
.Ltmp23:
movq _ZN4core9panicking16panic_in_cleanup17hd62aa59d1fda1c9fE@GOTPCREL(%rip), %rax
callq *%rax
.Lfunc_end24:
.size _ZN11manual_drop4main17h6a90a7c6667c6acfE, .Lfunc_end24-_ZN11manual_drop4main17h6a90a7c6667c6acfE
.cfi_endproc
可以看到, 当执行到 drop(x); 时, 编译器:
- 先重置
x.drop-flag = 0 - 接着调用
core::mem::drop(x);
而编译器自动释放对象 x 时, 会调用另一个函数
core::ptr::drop_in_place(*x as *mut i32).
将上面的汇编代码合并到之前的 Rust 代码, 大致如下:
use std::time::{SystemTime, UNIX_EPOCH};
fn main() {
// 设置 x 的 Drop Flag
// x.drop-flag = 0;
let now = SystemTime::now();
let timestamp = now.duration_since(UNIX_EPOCH).unwrap_or_default();
let x: Box<i32>;
if timestamp.as_millis().is_multiple_of(2) {
// 设置 x.drop-flag = 1
// 为 x 分配堆内存, 并设置其值为 42
x = Box::new(42);
println!("x: {x}");
// 设置 x.drop-flag = 0
// 调用 core::mem::drop(x);
drop(x);
}
// 判断 x.drop-flag
// if x.drop-flag == 1 {
// core::ptr::drop_in_place(*x as *mut i32);
// }
}Drop 是零成本抽像吗?
我们分析了上面的 Rust 程序, 可以明显地发现, 编译器生成的代码在支持动态 drop 时, 需要反复地判断
drop-flag 是不是被设置, 如果被设置成1, 就要调用该类型的 Drop trait.
这种行为, 跟我们在 C 代码中手动判断指针是否为 NULL 是一样的, 每次给变量分配新的堆内存之前, 就要先判定一下它的当前是否为空指针:
int* x;
if (x != NULL) {
free(x);
}
x = malloc(4);
...
if (x != NULL) {
free(x);
}
x = malloc(4);
...
但这些条件判断代码, Rust 编译器自动帮我们生成了, 而且可以保证没有泄露.
不要自动 Drop
到这里, 就要进入内存管理的深水区了, 上面提到了 Rust 会帮我们自动管理内存, 在合适的时机自动调用
对象的 Drop trait.
但与此同是, Rust 标准库中提供了一些手段, 可以让我们绕过这个机制, 但好在它们大都是 unsafe 的.
遇到这些代码, 要打起精神, 因为 Rustc 编译器可能帮不上你了.
ManuallyDrop
ManuallyDrop 做了什么? 对于栈上的对象, 不需要调用该对象的 Drop trait.
先看一个 ManuallyDrop 的一个例子:
use std::mem::ManuallyDrop;
use std::time::{SystemTime, UNIX_EPOCH};
fn main() {
let now = SystemTime::now();
let timestamp = now.duration_since(UNIX_EPOCH).unwrap_or_default();
let x: Box<i32>;
let millis = timestamp.as_millis();
if millis.is_multiple_of(2) {
x = Box::new(42);
println!("x: {x}");
let _x_no_dropping = ManuallyDrop::new(x);
} else if millis.is_multiple_of(3) {
x = Box::new(41);
println!("x: {x}");
}
}上面的代码, 如果 millis 是偶数的话, x 会被标记为 ManuallyDrop, 这样的话编译器将不再自动
调用它的 Drop trait, 这里就是一个内存泄露点.
我们来看一下生成的汇编代码:
.section .text._ZN13manually_drop4main17hc0c2c79e8eb75025E,"ax",@progbits
.p2align 4, 0x90
.type _ZN13manually_drop4main17hc0c2c79e8eb75025E,@function
_ZN13manually_drop4main17hc0c2c79e8eb75025E:
.Lfunc_begin3:
.cfi_startproc
.cfi_personality 155, DW.ref.rust_eh_personality
.cfi_lsda 27, .Lexception3
subq $408, %rsp
.cfi_def_cfa_offset 416
; x.drop-flag = 0
movb $0, 319(%rsp)
movq _ZN3std4time10SystemTime3now17h4779e0425deae935E@GOTPCREL(%rip), %rax
callq *%rax
movq %rax, 80(%rsp)
movl %edx, 88(%rsp)
movq _ZN3std4time10SystemTime14duration_since17h0f40caf46c5e1553E@GOTPCREL(%rip), %rax
xorl %ecx, %ecx
movl %ecx, %edx
leaq 112(%rsp), %rdi
movq %rdi, 56(%rsp)
leaq 80(%rsp), %rsi
callq *%rax
movq 56(%rsp), %rdi
callq _ZN4core6result19Result$LT$T$C$E$GT$17unwrap_or_default17hb4028d84d22833d3E
movq %rax, 96(%rsp)
movl %edx, 104(%rsp)
.Ltmp9:
leaq 96(%rsp), %rdi
callq _ZN4core4time8Duration9as_millis17h1c5ed4310d34772cE
.Ltmp10:
movq %rdx, 64(%rsp)
movq %rax, 72(%rsp)
jmp .LBB23_5
.LBB23_1:
; x.drop-flag == 1
testb $1, 319(%rsp)
jne .LBB23_28
jmp .LBB23_27
.LBB23_2:
.Ltmp25:
movq %rax, %rcx
movl %edx, %eax
movq %rcx, 40(%rsp)
movl %eax, 52(%rsp)
jmp .LBB23_3
.LBB23_3:
movq 40(%rsp), %rcx
movl 52(%rsp), %eax
movq %rcx, 24(%rsp)
movl %eax, 36(%rsp)
jmp .LBB23_4
.LBB23_4:
movq 24(%rsp), %rcx
movl 36(%rsp), %eax
movq %rcx, 320(%rsp)
movl %eax, 328(%rsp)
jmp .LBB23_1
.LBB23_5:
jmp .LBB23_6
.LBB23_6:
; millis % 2 == 0
movq 72(%rsp), %rax
testb $1, %al
jne .LBB23_10
jmp .LBB23_7
.LBB23_7:
.Ltmp18:
movl $4, %esi
movq %rsi, %rdi
callq _ZN5alloc5alloc15exchange_malloc17he729bf437884de0dE
.Ltmp19:
movq %rax, 16(%rsp)
jmp .LBB23_9
.LBB23_8:
.Ltmp20:
movq %rax, %rcx
movl %edx, %eax
movq %rcx, 392(%rsp)
movl %eax, 400(%rsp)
movq 392(%rsp), %rcx
movl 400(%rsp), %eax
movq %rcx, 40(%rsp)
movl %eax, 52(%rsp)
jmp .LBB23_3
.LBB23_9:
movq 16(%rsp), %rax
; *(x.ptr) = 42
movl $42, (%rax)
jmp .LBB23_11
.LBB23_10:
jmp .LBB23_17
.LBB23_11:
movq 16(%rsp), %rax
; x.drop-flag = 1
movb $1, 319(%rsp)
movq %rax, 136(%rsp)
leaq 136(%rsp), %rax
movq %rax, 352(%rsp)
leaq _ZN69_$LT$alloc..boxed..Box$LT$T$C$A$GT$$u20$as$u20$core..fmt..Display$GT$3fmt17h2d3ff932e53a7b07E(%rip), %rax
movq %rax, 360(%rsp)
movq 352(%rsp), %rax
movq %rax, 208(%rsp)
movq 360(%rsp), %rax
movq %rax, 216(%rsp)
movups 208(%rsp), %xmm0
movaps %xmm0, 192(%rsp)
.Ltmp21:
leaq .L__unnamed_9(%rip), %rsi
leaq 144(%rsp), %rdi
movl $2, %edx
leaq 192(%rsp), %rcx
movl $1, %r8d
callq _ZN4core3fmt9Arguments6new_v117hd27b08a38d223f7cE
.Ltmp22:
jmp .LBB23_13
.LBB23_13:
.Ltmp23:
movq _ZN3std2io5stdio6_print17h8f9e07feda690a3dE@GOTPCREL(%rip), %rax
leaq 144(%rsp), %rdi
callq *%rax
.Ltmp24:
jmp .LBB23_14
.LBB23_14:
; x.drop-flag = 0
; let _x_no_dropping = ManuallyDrop::new(x)
movb $0, 319(%rsp)
movq 136(%rsp), %rax
movq %rax, 368(%rsp)
jmp .LBB23_16
.LBB23_16:
testb $1, 319(%rsp)
jne .LBB23_26
jmp .LBB23_25
.LBB23_17:
movq 72(%rsp), %rax
movabsq $-6148914691236517206, %rcx
movq %rax, %rdi
imulq %rcx, %rdi
movabsq $-6148914691236517205, %rcx
movq %rcx, 8(%rsp)
mulq %rcx
movq %rax, %rsi
movq 64(%rsp), %rax
movq %rdx, %rcx
movq 8(%rsp), %rdx
addq %rdi, %rcx
imulq %rdx, %rax
addq %rax, %rcx
movabsq $6148914691236517205, %rax
movq %rax, %rdx
subq %rsi, %rdx
sbbq %rcx, %rax
jb .LBB23_16
jmp .LBB23_18
.LBB23_18:
.Ltmp11:
movl $4, %esi
movq %rsi, %rdi
callq _ZN5alloc5alloc15exchange_malloc17he729bf437884de0dE
.Ltmp12:
movq %rax, (%rsp)
jmp .LBB23_20
.LBB23_19:
.Ltmp13:
movq %rax, %rcx
movl %edx, %eax
movq %rcx, 376(%rsp)
movl %eax, 384(%rsp)
movq 376(%rsp), %rcx
movl 384(%rsp), %eax
movq %rcx, 24(%rsp)
movl %eax, 36(%rsp)
jmp .LBB23_4
.LBB23_20:
movq (%rsp), %rax
; *(x.ptr) = 41;
movl $41, (%rax)
movq (%rsp), %rax
; x.drop-flag = 1
movb $1, 319(%rsp)
movq %rax, 136(%rsp)
leaq 136(%rsp), %rax
movq %rax, 336(%rsp)
leaq _ZN69_$LT$alloc..boxed..Box$LT$T$C$A$GT$$u20$as$u20$core..fmt..Display$GT$3fmt17h2d3ff932e53a7b07E(%rip), %rax
movq %rax, 344(%rsp)
movq 336(%rsp), %rax
movq %rax, 296(%rsp)
movq 344(%rsp), %rax
movq %rax, 304(%rsp)
movups 296(%rsp), %xmm0
movaps %xmm0, 272(%rsp)
.Ltmp14:
leaq .L__unnamed_9(%rip), %rsi
leaq 224(%rsp), %rdi
movl $2, %edx
leaq 272(%rsp), %rcx
movl $1, %r8d
callq _ZN4core3fmt9Arguments6new_v117hd27b08a38d223f7cE
.Ltmp15:
jmp .LBB23_23
.LBB23_23:
.Ltmp16:
movq _ZN3std2io5stdio6_print17h8f9e07feda690a3dE@GOTPCREL(%rip), %rax
leaq 224(%rsp), %rdi
callq *%rax
.Ltmp17:
jmp .LBB23_24
.LBB23_24:
jmp .LBB23_16
.LBB23_25:
movb $0, 319(%rsp)
addq $408, %rsp
.cfi_def_cfa_offset 8
retq
.LBB23_26:
.cfi_def_cfa_offset 416
; core::ptr::drop_in_place(x)
leaq 136(%rsp), %rdi
callq _ZN4core3ptr49drop_in_place$LT$alloc..boxed..Box$LT$i32$GT$$GT$17h52d911587572c48aE
jmp .LBB23_25
.LBB23_27:
movq 320(%rsp), %rdi
callq _Unwind_Resume@PLT
.LBB23_28:
.Ltmp26:
; drop(x);
leaq 136(%rsp), %rdi
callq _ZN4core3ptr49drop_in_place$LT$alloc..boxed..Box$LT$i32$GT$$GT$17h52d911587572c48aE
.Ltmp27:
jmp .LBB23_27
.LBB23_29:
.Ltmp28:
movq _ZN4core9panicking16panic_in_cleanup17hd62aa59d1fda1c9fE@GOTPCREL(%rip), %rax
callq *%rax
.Lfunc_end23:
.size _ZN13manually_drop4main17hc0c2c79e8eb75025E, .Lfunc_end23-_ZN13manually_drop4main17hc0c2c79e8eb75025E
.cfi_endproc
上面的汇编代码比较长, 将它的行为作为注释加到原先的 Rust 代码中, 更容易阅读:
use std::mem::ManuallyDrop;
use std::time::{SystemTime, UNIX_EPOCH};
fn main() {
// 重置 x 的 Drop Flag:
// x.drop-flag = 0
let now = SystemTime::now();
let timestamp = now.duration_since(UNIX_EPOCH).unwrap_or_default();
let x: Box<i32>;
let millis = timestamp.as_millis();
if millis.is_multiple_of(2) {
// 设置 x 的 Drop Flag:
// x.drop-flag = 1
// 为 x 分配堆内存, 并设置它的值为42
x = Box::new(42);
println!("x: {x}");
// 这里, ManuallyDrop 会重置 x 的 Drop Flag:
// x.drop-flag = 0
let _x_no_dropping = ManuallyDrop::new(x);
} else if millis.is_multiple_of(3) {
// 设置 x 的 Drop Flag:
// x.drop-flag = 1
// 为 x 分配堆内存, 并设置它的值为41
x = Box::new(41);
println!("x: {x}");
}
// x 的值超出作用域, 判断要不要 drop 它:
// if x.drop-flag == 1 {
// core::ptr::drop_in_place(x);
// }
}Box::leak
另一个例子是 Box::leak() 它也会抑制编译器自动调用对象的 Drop trait.
看下面的例子, 也会产生内存泄露:
use std::time::{SystemTime, UNIX_EPOCH};
fn main() {
let now = SystemTime::now();
let timestamp = now.duration_since(UNIX_EPOCH).unwrap_or_default();
let x: Box<i32>;
let millis = timestamp.as_millis();
if millis.is_multiple_of(2) {
x = Box::new(42);
println!("x: {x}");
let _x_ptr = Box::leak(x);
} else if millis.is_multiple_of(3) {
x = Box::new(41);
println!("x: {x}");
}
}我们追踪 Box::leak() 的源代码可以发现, 它的内部也是调用了 ManuallyDrop::new() 的:
impl Box {
#[inline]
pub fn leak<'a>(b: Self) -> &'a mut T
where
A: 'a,
{
unsafe { &mut *Box::into_raw(b) }
}
#[inline]
pub fn into_raw(b: Self) -> *mut T {
// Make sure Miri realizes that we transition from a noalias pointer to a raw pointer here.
unsafe { addr_of_mut!(*&mut *Self::into_raw_with_allocator(b).0) }
}
pub fn into_raw_with_allocator(b: Self) -> (*mut T, A) {
let mut b = mem::ManuallyDrop::new(b);
// We carefully get the raw pointer out in a way that Miri's aliasing model understands what
// is happening: using the primitive "deref" of `Box`. In case `A` is *not* `Global`, we
// want *no* aliasing requirements here!
// In case `A` *is* `Global`, this does not quite have the right behavior; `into_raw`
// works around that.
let ptr = addr_of_mut!(**b);
let alloc = unsafe { ptr::read(&b.1) };
(ptr, alloc)
}
}ptr 模块
最后一个要介绍的是 ptr 模块中的几个函数:
- write()
- copy()
- copy_nonoverlapping()
它们也会抑制编译器自动调用对象的 Drop trait.
我们不再举例了, 而是直接看一下 Vec<T> 的源代码, 看它是怎么实现插入元素和弹出元素的;
use std::ptr;
impl<T> Vec<T> {
#[inline]
pub fn push(&mut self, value: T) {
// Inform codegen that the length does not change across grow_one().
let len = self.len;
// This will panic or abort if we would allocate > isize::MAX bytes
// or if the length increment would overflow for zero-sized types.
if len == self.buf.capacity() {
self.buf.grow_one();
}
unsafe {
let end = self.as_mut_ptr().add(len);
ptr::write(end, value);
self.len = len + 1;
}
}
#[inline]
pub fn pop(&mut self) -> Option<T> {
if self.len == 0 {
None
} else {
unsafe {
self.len -= 1;
core::hint::assert_unchecked(self.len < self.capacity());
Some(ptr::read(self.as_ptr().add(self.len())))
}
}
}
}参考
std::ptr 模块
ptr::read() 与 ptr::write() 函数
这两个函数用于从原始指针读取当前值以及向其写入新的值.
要注意的是, 不管 T 有没有实现 Copy trait, read() 这个操作都可以完成, 因为它是字节级别的拷贝.
pub const unsafe fn read<T>(src: *const T) -> T;
pub unsafe fn write<T>(dst: *mut T, src: T);这两个函数是 Rust 操作内存的基础, 像标准库中的 ptr 和 mem 模块中的函数, 很多都是利用这两个函数实现的.
要使用它们, 需要先满足前置条件, 不然对指针的操作就会出现未定义行为:
- 原始指针必须是有效指针
- 原始指针应该是内存对齐的, 如果没有对齐, 可以考虑
read_unaligned()和write_unaligned()函数 - 对于
read(src), 原始指针必须指向一个被初始化了的地址
use std::ptr;
fn main() {
let mut s = 42;
unsafe {
let s2 = &mut s as *mut i32;
let num = ptr::read(s2);
assert_eq!(num, 42);
ptr::write(s2, num + 1);
}
assert_eq!(s, 43);
}它类似于下面的C代码:
#include <assert.h>
int main() {
int s = 42;
{
int* s2 = &s;
int num = *s2;
assert(num == 42);
*s2 = num + 1;
}
assert(s == 43);
return 0;
}
ptr::addr_of!() 与 ptr::addr_of_mut!() 宏
这两个宏用于取得变量的内存地址, 它们分别返回的是 *const T 和 *mut T.
它们不需要先经过 "创建引用" 这一步, 因为有些情况, 当结构体的内存未对齐时, 是不能创建引用的.
use std::ptr;
#[derive(Debug, Default)]
struct Point {
x: i32,
y: i32,
}
fn main() {
let mut point = Point::default();
let x_ptr: *const i32 = ptr::addr_of!(point.x);
unsafe {
assert_eq!(ptr::read(x_ptr), 0);
}
let y_ptr: *mut i32 = ptr::addr_of_mut!(point.y);
unsafe {
ptr::write(y_ptr, 42);
}
assert_eq!(point.y, 42);
}ptr::eq() 与 ptr::addr_eq() 函数
它们都用于比较原始指针 (*const T) 是否相等.
pub fn eq<T>(a: *const T, b: *const T) -> bool
where
T: ?Sized;
pub fn addr_eq<T, U>(p: *const T, q: *const U) -> bool
where
T: ?Sized,
U: ?Sized;可以看到, 它们的定义是差不多的. 区别在于:
eq()除了比较胖指针的指针地址外, 还会比较胖指针里的 metadata, 例如 (length, vtable 等等)addr_eq()只比较胖指针的指针地址, 只要地址相同, 就返回 true
看下面的例子:
use std::fmt;
use std::ptr;
fn main() {
let msg: String = "Hello, Rust".to_owned();
let msg2: String = "Hello, Rust".to_owned();
let msg_ref: &dyn fmt::Debug = &msg;
let msg_ref2: &dyn fmt::Debug = &msg;
let msg_dsp_ref: &dyn fmt::Display = &msg;
let msg2_ref: &dyn fmt::Debug = &msg2;
assert!(ptr::eq(msg_ref, msg_ref2));
assert!(!ptr::eq(msg_ref, msg2_ref));
assert!(ptr::addr_eq(msg_ref, msg_dsp_ref));
assert!(!ptr::addr_eq(msg_ref, msg2_ref));
}上面的代码中的变量, 其内存布局大致如下图所示, 要注意里面的 trait object 的指针:

ptr::swap() 与 ptr::replace() 函数
这两个函数的定义如下:
pub unsafe fn swap<T>(x: *mut T, y: *mut T);
pub unsafe fn replace<T>(dst: *mut T, src: T) -> T;- swap() 用于交换两个指针
- replace() 用于交dest 指向 src 对象的地址, 并返回原先的值
使用这两个函数, 要满足必要条件:
- src/dst 要是有效的地址, 可读可写
- src/dst 要被初始化
- src/dst 要内存对齐
看一下示例代码:
use std::ptr;
fn main() {
let mut msg = ['b', 'u', 's', 't'];
let c = unsafe { ptr::replace(&mut msg[0], 'r') };
assert_eq!(msg[0], 'r');
assert_eq!(c, 'b');
let mut msg2 = ['b', 'u', 's', 't'];
let mut c2 = 'r';
unsafe {
ptr::swap(&mut msg2[0], &mut c2);
}
assert_eq!(msg2[0], 'r');
assert_eq!(c2, 'b');
}replace() 的实现
replace() 函数的实现如下:
#[inline]
pub const unsafe fn replace<T>(dst: *mut T, src: T) -> T {
unsafe {
ub_checks::assert_unsafe_precondition!(
check_language_ub,
"ptr::replace requires that the pointer argument is aligned and non-null",
(
addr: *const () = dst as *const (),
align: usize = align_of::<T>(),
) => ub_checks::is_aligned_and_not_null(addr, align)
);
mem::replace(&mut *dst, src)
}
}这个函数会先检查一下代码是否对齐, 然后就直接调用 mem::replace() 来交换两个内存地址.
swap() 的实现
swap() 函数的实现如下:
#[inline]
pub const unsafe fn swap<T>(x: *mut T, y: *mut T) {
// Give ourselves some scratch space to work with.
// We do not have to worry about drops: `MaybeUninit` does nothing when dropped.
let mut tmp = MaybeUninit::<T>::uninit();
// Perform the swap
// SAFETY: the caller must guarantee that `x` and `y` are
// valid for writes and properly aligned. `tmp` cannot be
// overlapping either `x` or `y` because `tmp` was just allocated
// on the stack as a separate allocated object.
unsafe {
copy_nonoverlapping(x, tmp.as_mut_ptr(), 1);
copy(y, x, 1); // `x` and `y` may overlap
copy_nonoverlapping(tmp.as_ptr(), y, 1);
}
}可以看到, 它分成了以下几步:
- 在栈上分配一个临时对象 tmp
- 将目标对象 dst 拷贝到 tmp
- 将源对象 src 拷贝到 dst
- 最后将 tmp 拷贝到 src
可以发现这个步骤比较多, 如果 src 与 dst 的内存没有重叠, 可以使用 swap_nonoverlapping(),
这个函数效率更高.
ptr::swap_nonoverlapping() 函数
这个函数与前文讲到的 swap() 函数类似, 但用于交换的两块内存不重叠.
其接口定义如下:
pub unsafe fn swap_nonoverlapping<T>(x: *mut T, y: *mut T, count: usize);看一下代码示例:
use std::ptr;
fn main() {
let mut src = b"r".to_vec();
let mut dst = b"bust".to_vec();
unsafe {
//ptr::swap_nonoverlapping(ptr::from_mut(&mut src[0]), ptr::from_mut(&mut dst[0]), 1);
ptr::swap_nonoverlapping(&mut src[0], &mut dst[0], 1);
}
assert_eq!(src, b"b");
assert_eq!(dst, b"rust");
}ptr::copy() 与 ptr::copy_nonoverlapping() 函数
这两个函数都用于将一块内存从 src 拷贝到目的地址.
pub const unsafe fn copy<T>(src: *const T, dst: *mut T, count: usize);
pub const unsafe fn copy_nonoverlapping<T>(
src: *const T,
dst: *mut T,
count: usize
);它们的区别在于:
copy()中的 src 和 dst 是可以有内存重叠的, 类似于 C 语言中的memmove()copy_nonoverlaping()中的 src 和 dst 不可以有内存重叠, 类似于 C 语言中的memcopy()
看一个例子:
use std::ptr;
fn main() {
let src = b"hello";
let mut dst = b"world".to_vec();
unsafe {
ptr::copy(
ptr::from_ref(&src[0]),
ptr::from_mut(&mut dst[0]),
src.len(),
);
}
assert_eq!(dst, src);
unsafe {
ptr::copy_nonoverlapping(ptr::from_ref(&src[0]), ptr::from_mut(&mut dst[4]), 1);
}
assert_eq!(dst[4], b'h');
}对应的 C 语言的实现:
#include <assert.h>
#include <string.h>
#include <stdlib.h>
int main() {
const char src[] = "hello";
char dst[] = "world";
memmove(dst, src, strlen(src));
assert(strcmp(dst, "hello") == 0);
memcpy(&dst[4], src, 1);
assert(dst[4] == 'h');
return 0;
}
ptr::drop_in_place() 函数
ptr::slice_from_raw_parts() 函数
ptr::slice_from_raw_parts() 以及 ptr::slice_from_raw_parts_mut() 函数用于手动构造切片引用. 它们的函数接口如下:
pub const fn slice_from_raw_parts<T>(data: *const T, len: usize) -> *const [T];
pub fn slice_from_raw_parts_mut<T>(data: *mut T, len: usize) -> *mut [T];用法也比较简单, 看一个示例:
use std::{mem, ptr};
fn main() {
let numbers = [1, 1, 2, 3, 5, 8];
let len: usize = numbers.len();
let num_ptr: *const i32 = numbers.as_ptr();
let num_raw_ref: *const [i32] = ptr::slice_from_raw_parts(num_ptr, len);
let num_ref: &[i32] = unsafe {
&*num_raw_ref
};
assert_eq!(num_ref, [1, 1, 2, 3, 5, 8]);
let num_ref2: &[i32] = unsafe { mem::transmute::<(*const i32, usize), &[i32]>((num_ptr, len)) };
assert_eq!(num_ref, num_ref2);
}上面的代码中展示了两种构造切片引用的方法:
ptr::slice_from_raw_parts(num_ptr, len);unsafe { mem::transmute::<(*const i32, usize), &[i32]>((num_ptr, len)) }
ptr::null() 与 null_mut() 函数
这两个函数用于创建空指针, 它指向的内存地址是 0, 常用它们来初始化或者重置原始指针.
它们的区别是:
null()用于创建只读的空指针, 即不能通过该指针修改它指向的内存, 返回的是*const T指针, 类似于C代码的写法:const i32* ptr = NULL;null_mut()用于创建可改写的空指针 (mutable pointer), 返回的是*mut T指针, 类似于C代码的写法:i32* ptr = NULL;
use std::ptr;
fn main() {
let ptr: *const i32 = ptr::null();
assert!(ptr.is_null());
}这一组函数常用于 FFI 相关的代码, 比如下面的代码片段, 调用 mmap(2) 时, 将 start_pointer 设置为空指针,
这样的话 linux 内核会自动选择合适的地址作为内存页的起始地址:
use std::ffi::c_void;
use std::ptr;
fn main() {
let path = "/etc/passwd";
let fd = unsafe { nc::openat(nc::AT_FDCWD, path, nc::O_RDONLY, 0o644) };
assert!(fd.is_ok());
let fd = fd.unwrap();
let mut sb = nc::stat_t::default();
let ret = unsafe { nc::fstat(fd, &mut sb) };
assert!(ret.is_ok());
let offset: usize = 0;
let length: usize = sb.st_size as usize - offset;
// Offset for mmap must be page aligned.
let pa_offset: usize = offset & !(nc::PAGE_SIZE - 1);
let map_length = length + offset - pa_offset;
let addr = unsafe {
nc::mmap(
ptr::null(),
map_length,
nc::PROT_READ,
nc::MAP_PRIVATE,
fd,
pa_offset as nc::off_t,
)
};
assert!(addr.is_ok());
let addr: *const c_void = addr.unwrap();
let stdout = 1;
// Create buffer slice.
let buf: &[u8] = unsafe {
&*ptr::slice_from_raw_parts(
addr.wrapping_add(offset)
.wrapping_sub(pa_offset)
.cast::<u8>(),
length,
)
};
let n_write = unsafe { nc::write(stdout, buf) };
assert!(n_write.is_ok());
assert_eq!(n_write, Ok(length as nc::ssize_t));
let ret = unsafe { nc::munmap(addr, map_length) };
assert!(ret.is_ok());
let ret = unsafe { nc::close(fd) };
assert!(ret.is_ok());
}NonNUll
NonNull<T> 实现类似可变指针 *mut T 的功能, 同时有以下区别:
- 指针非空 (non-zero)
- 类型协变 covariant
它在标准库里是这样定义的:
#[repr(transparent)]
pub struct NonNull<T: ?Sized> {
pointer: *const T,
}从定义中可以看到, 它只是存储了一个原始指针, 并没有所有权相关的.
NonNull<T> 没有实现 Send 以及 Sync traits:
/// `NonNull` pointers are not `Send` because the data they reference may be aliased.
impl<T: ?Sized> ! Send for NonNull<T> {}
/// `NonNull` pointers are not `Sync` because the data they reference may be aliased.
impl<T: ?Sized> ! Sync for NonNull<T> {}协变性 Covariance
其它类型, 比如 Box<T>, Rc<T>, Arc<T>, Vec<T>, LinkedList<T>, 都有协变性.
是这些范型类拥有的属性:
- 如果
T是U的子类, 意味着F<T>是F<u>的子类, 则F<T>对T是协变的 (covariant) - 如果
T是U的子类, 意味着F<U>是F<T>的子类, 则F<T>对T是协变的 (covariant) - 否则,
F<T>对T是不变的 (invariant)
内存布局
因为有了空指针优化(null pointer optimization),
NoneNull<T> 与 Option<NonNull<T>> 拥有一样的内存大小以及对齐方式.
use std::ptr::NonNull;
use std::mem::{align_of, size_of};
assert_eq!(size_of::<NonNull<i16>>(), size_of::<Option<NonNull<i16>>>());
assert_eq!(align_of::<NonNull<i16>>(), align_of::<Option<NonNull<i16>>>());
assert_eq!(size_of::<NonNull<str>>(), size_of::<Option<NonNull<str>>>());
assert_eq!(align_of::<NonNull<str>>(), align_of::<Option<NonNull<str>>>());常用方法
new(),new_unchecked(), 创建新的NonNull对象as_ptr()得到*mut T指针as_ref()得到只读引用as_mut()得到可变更引用
use std::ptr::NonNull;
fn main() {
let mut x = 1_u32;
let mut ptr = NonNull::new(&mut x as *mut u32).expect("Invalid pointer");
unsafe {
*ptr.as_ptr() += 1;
}
let x_value = unsafe { *ptr.as_ptr() };
assert_eq!(x_value, 2);
assert_eq!(x, 2);
let x_ref = unsafe { ptr.as_mut() };
*x_ref += 1;
assert_eq!(x, 3);
}上面的代码片段, 其栈上的内存布局如下图所示:

参考
Unique
这个类型目前还是 unstable 状态, 但它已被标准库大量使用.
Unique<T> 是对 *mut T 原始指针的包装, 但前者在逻辑上拥有指针指向的对象的所有权.
Unique 结构体的定义是:
#[repr(transparent)]
pub struct Unique<T: ?Sized> {
pointer: NonNull<T>,
_marker: PhantomData<T>,
}如果 T 实现了 Send trait 和 Sync trait, 则 Unique<T> 也实现它:
unsafe impl<T: Send + ?Sized> Send for Unique<T> {}
unsafe impl<T: Sync + ?Sized> Sync for Unique<T> {}常用方法
new(),new_unchecked(), 创建新的Unique对象as_ptr()得到*mut T指针as_ref()得到只读引用as_mut()得到可变更引用
#![allow(internal_features)]
#![feature(ptr_internals)]
use std::ptr::Unique;
fn main() {
let mut x = 1_u32;
let mut ptr = Unique::new(&mut x as *mut u32).expect("Invalid pointer");
unsafe {
*ptr.as_ptr() += 1;
}
let x_value = unsafe { *ptr.as_ptr() };
assert_eq!(x_value, 2);
assert_eq!(x, 2);
let x_ref = unsafe { ptr.as_mut() };
*x_ref += 1;
assert_eq!(x, 3);
}std::mem 模块
mem::offset_of!() 宏
这个宏用于获取结构体成员的相对于结构体起始内存的偏移量, 类似于 libc 中的 offsetof() 函数.
下面是一个示例程序:
#![allow(non_camel_case_types)]
use std::mem;
// rustc 决定内存布局
pub struct linux_dirent_t {
pub d_ino: u64,
pub d_off: u64,
pub d_reclen: u16,
pub d_type: u8,
pub d_name: *mut u8,
}
// 使用 C ABI 兼容的内存布局
#[repr(C)]
pub struct linux_dirent_c_t {
pub d_ino: u64,
pub d_off: u64,
pub d_reclen: u16,
pub d_type: u8,
pub d_name: *const u8,
}
// 为结构体添加 packed attribute, 忽略结构体内成员的内存对齐.
#[repr(C, packed)]
pub struct linux_dirent_packed_t {
pub d_ino: u64,
pub d_off: u64,
pub d_reclen: u16,
pub d_type: u8,
pub d_name: *const u8,
}
fn main() {
assert_eq!(mem::offset_of!(linux_dirent_t, d_name), 16);
assert_eq!(mem::offset_of!(linux_dirent_c_t, d_name), 24);
assert_eq!(mem::offset_of!(linux_dirent_packed_t, d_name), 19);
}对应的 C 代码如下:
#include <stdint.h>
#include <stddef.h>
#include <assert.h>
struct linux_dirent_s {
uint64_t d_ino;
uint64_t d_off;
uint16_t d_reclen;
uint8_t d_type;
char* d_name;
};
struct linux_dirent_packed_s {
uint64_t d_ino;
uint64_t d_off;
uint16_t d_reclen;
uint8_t d_type;
char* d_name;
} __attribute__((packed));
int main(void) {
assert(offsetof(struct linux_dirent_s, d_name) == 24);
assert(offsetof(struct linux_dirent_packed_s, d_name) == 19);
return 0;
}
mem::size_of() 与 mem::size_of_val() 函数
它们用于获取对象的内存大小.
差别在于:
- size_of::
(), 获取指定类型的内存大小 - size_of_val(val), 获取某个值的内存大小
它们的函数接口如下:
pub const fn size_of<T>() -> usize;
pub fn size_of_val<T>(val: &T) -> usize where T: ?Sized;其用法可以参看下面的代码片段:
#![allow(non_camel_case_types)]
use std::mem::size_of;
#[repr(C)]
pub struct linux_dirent_c_t {
pub d_ino: u64,
pub d_off: i64,
pub d_reclen: u16,
pub d_name: [u8; 1],
}
fn main() {
assert_eq!(size_of::<linux_dirent_c_t>(), 24);
}对应的 C 代码如下:
#include <stdint.h>
#include <stddef.h>
#include <assert.h>
struct linux_dirent_s {
uint64_t u64;
int64_t d_off;
uint16_t d_reclen;
char d_name[];
};
int main() {
assert(sizeof(struct linux_dirent_s) == 24);
return 0;
}
常见类型的内存大小
基础数据类型占用的内存大小, 如下表所示:
| T | size_of:: | C 语言中对应的类型 |
|---|---|---|
| () | 0 | void, 它是 zero sized type, ZST |
| bool | 1 | |
| u8 | 1 | unisigned char |
| i8 | 1 | signed char |
| u16 | 2 | unsigned short |
| i16 | 2 | short |
| u32 | 4 | unsigned int |
| i32 | 4 | int |
| u64 | 8 | unsigned long |
| i64 | 8 | long |
| usize | 8 | size_t |
| isize | 8 | isize_t |
| u128 | 16 | - |
| i128 | 16 | - |
| char | 4 | - |
| [T; N ] | N * siz_of:: | T[N] |
| &T | 8 | - |
| &mut T | 8 | - |
| *const T | 8 | const T* |
| *mut T | 8 | T* |
| Box | 8 | - |
| dyn Trait | 16 | - |
备注: 以上表格中的数据来自于 64 位的操作系统, 比如 x86_64, aarch64 或者 riscv64.
mem::align_of() 与 mem::align_of_val() 函数
这一组函数用于获取类型的内存对齐大小.
其差别在于:
- align_of() 获取某个类型的对齐大小
- align_of_val() 获取某个值所属类型的对齐大小
它们的函数接口如下:
pub const fn align_of<T>() -> usize;
pub fn align_of_val<T>(val: &T) -> usize where T: ?Sized;下面是一个基本的用例:
#![allow(non_camel_case_types)]
use std::mem::align_of;
// rustc 决定内存布局
pub struct linux_dirent_t {
pub d_ino: u64,
pub d_off: u64,
pub d_reclen: u16,
pub d_type: u8,
pub d_name: *mut u8,
}
// 使用 C ABI 兼容的内存布局
#[repr(C)]
pub struct linux_dirent_c_t {
pub d_ino: u64,
pub d_off: u64,
pub d_reclen: u16,
pub d_type: u8,
pub d_name: *const u8,
}
// 为结构体添加 packed attribute, 忽略结构体内成员的内存对齐.
#[repr(C, packed)]
pub struct linux_dirent_packed_t {
pub d_ino: u64,
pub d_off: u64,
pub d_reclen: u16,
pub d_type: u8,
pub d_name: *const u8,
}
#[repr(C, packed(2))]
pub struct linux_dirent_packed2_t {
pub d_ino: u64,
pub d_off: u64,
pub d_reclen: u16,
pub d_type: u8,
pub d_name: *const u8,
}
#[repr(C, align(16))]
pub struct linux_dirent_align_t {
pub d_ino: u64,
pub d_off: u64,
pub d_reclen: u16,
pub d_type: u8,
pub d_name: *const u8,
}
fn main() {
assert_eq!(align_of::<linux_dirent_t>(), 8);
assert_eq!(align_of::<linux_dirent_c_t>(), 8);
assert_eq!(align_of::<linux_dirent_packed_t>(), 1);
assert_eq!(align_of::<linux_dirent_packed2_t>(), 2);
assert_eq!(align_of::<linux_dirent_align_t>(), 16);
}参考
mem::zeroed() 函数
这个函数类似于 libc 中的 bzero(), 将一个结构体中的所有字节都置为 0.
比如, 下面的一个示例程序:
use std::mem;
#[derive(Debug, Default, Clone, Copy, Eq, PartialEq, Hash)]
pub struct Point {
pub x: i32,
pub y: i32,
}
fn main() {
let zeroed_point: Point = unsafe { mem::zeroed() };
let default_point = Point::default();
assert_eq!(zeroed_point, default_point);
}对应的 C 代码如下:
#include <assert.h>
#include <stdint.h>
#include <string.h>
struct point_s {
int32_t x;
int32_t y;
};
typedef struct point_s point_t;
int main(int argc, char** argv) {
point_t zeroed_point;
bzero(&zeroed_point, sizeof(point_t));
point_t default_point = {.x = 0, .y = 0};
return 0;
}
mem::MaybeUninit 类
mem::ManuallyDrop 类与 mem::forget() 函数
ManuallyDropT 的析构函数 (基于 Drop trait 实现的).
可以用它来调整结构体中成员的 drop 顺序.
看下面一个例子:
use std::mem::ManuallyDrop;
pub struct Sheep {
name: String,
}
pub struct Cow {
name: String,
}
pub struct Horse {
name: String,
}
impl Drop for Sheep {
fn drop(&mut self) {
println!("Dropping sheep {}", self.name);
}
}
impl Drop for Cow {
fn drop(&mut self) {
println!("Dropping cow {}", self.name);
}
}
impl Drop for Horse {
fn drop(&mut self) {
println!("Dropping horse {}", self.name);
}
}
pub struct Animals {
sheep: ManuallyDrop<Sheep>,
#[allow(dead_code)]
horse: Horse,
cow: ManuallyDrop<Cow>,
}
impl Drop for Animals {
fn drop(&mut self) {
println!("Dropping animals");
unsafe {
// 手动调用 `drop()` 释放这两个对象.
ManuallyDrop::drop(&mut self.sheep);
ManuallyDrop::drop(&mut self.cow);
// 而 horse 对象会被自动释放.
}
}
}
#[allow(unused_variables)]
fn main() {
let animals = Animals {
sheep: ManuallyDrop::new(Sheep {
name: "Doly".to_owned(),
}),
horse: Horse {
name: "Tom".to_owned(),
},
cow: ManuallyDrop::new(Cow {
name: "Jery".to_owned(),
}),
};
// 使用 mem::forget() 会导致内存泄露
//mem::forget(animals);
}查看上面例子的打印日志, 可以发现结构体 Animals 的析构顺序是:
- Animals
- Sheep
- Cow
- Horse
而下面的代码是结构体的一般写法, 其析构顺序是:
- Animals
- Sheep
- Horse
- Cow
struct Animals {
sheep: Sheep,
horse: Horse,
cow: Cow,
}mem::forget() 函数
forget() 函数就是利用了 ManuallyDrop 类, 看看该函数的实现:
pub const fn forget<T>(t: T) {
let _ = ManuallyDrop::new(t);
}不正确的使用 forget() 函数会产生内存泄露, 看一个例子:
use std::mem;
fn main() {
let msg = String::from("Hello, Rust");
mem::forget(msg);
// msg 的堆内存没有被释放, 产生了内存泄露
}参考
mem::replace() 函数
传入一个同类型的值, 并与目标值进行交换.
该函数的接口如下:
pub const fn replace<T>(dest: &mut T, src: T) -> T;可以看到, 目标值 dest 是以可变更引用的形式 &mut T 传入的, 这样的话, 类型 T 必须做到内存对齐.
如果无法满足内存对齐的要求, 可以使用 ptr::replace().
接下来看一个基本的示例程序:
use std::mem;
fn main() {
let mut v = [Box::new(2), Box::new(3), Box::new(4)];
let ret = mem::replace(&mut v[1], Box::new(42));
assert_eq!(*ret, 3);
assert_eq!(*v[1], 42);
let mut v1 = vec![1, 2, 3];
let mut v2 = vec![4, 5];
// 使用语法糖
(v1, v2) = (v2, v1);
v2 = mem::replace(&mut v1, v2);
assert_eq!(v2, vec![4, 5]);
}replace() 函数的实现
这个函数的内部实现也较简单, 直接看源代码:
use std::ptr;
#[inline]
pub const fn replace<T>(dest: &mut T, src: T) -> T {
// It may be tempting to use `swap` to avoid `unsafe` here. Don't!
// The compiler optimizes the implementation below to two `memcpy`s
// while `swap` would require at least three. See PR#83022 for details.
// SAFETY: We read from `dest` but directly write `src` into it afterwards,
// such that the old value is not duplicated. Nothing is dropped and
// nothing here can panic.
unsafe {
let result = ptr::read(dest);
ptr::write(dest, src);
result
}
}整个过程有以下几步:
- 先在栈上创建一个临地对象
result - 将目标值
dest的所有字节都拷贝到result; 发生所有权转移, 此时result拥有了dest所指向值的所有权, 但dest并不会被 drop - 将源值
src的所有字节都拷贝到dest; 发生了所有权转移, 此时dest拥有了src所指向值的所有权, 但src并不会被 drop - 最后将
result返回
mem::swap() 函数
用于交换相同类型的两个可变更引用.
该函数的接口声明如下:
pub fn swap<T>(x: &mut T, y: &mut T);下面是一个简单的用例程序:
use std::mem;
fn main() {
let mut x = [1, 2, 3];
let mut y = [4, 5];
mem::swap(&mut x[0], &mut y[0]);
assert_eq!(x, [4, 2, 3]);
assert_eq!(y, [1, 5]);
}swap() 函数的实现
该函数的源代码如下:
#[inline]
pub const fn swap<T>(x: &mut T, y: &mut T) {
// SAFETY: `&mut` guarantees these are typed readable and writable
// as well as non-overlapping.
unsafe { intrinsics::typed_swap(x, y) }
}
mod intrinsics {
#[inline]
#[rustc_intrinsic]
pub const unsafe fn typed_swap<T>(x: *mut T, y: *mut T) {
// SAFETY: The caller provided single non-overlapping items behind
// pointers, so swapping them with `count: 1` is fine.
unsafe { ptr::swap_nonoverlapping(x, y, 1) };
}
}可以看到, 这个函数仅仅使用了 ptr::swap_nonoverlapping().
mem::take() 函数
与 mem::swap() 类似, 但是使用默认值 T::default() 来替换.
该函数接口声明如下:
pub fn take<T: Default>(dest: &mut T) -> T;看一个示例程序:
use std::mem;
#[derive(Debug, Default)]
struct Point {
x: f32,
y: f32,
}
fn main() {
let mut p = Point { x: 3.0, y: 4.0 };
let old_p = mem::take(&mut p);
assert_eq!(old_p.x, 3.0);
assert_eq!(p.x, 0.0);
assert_eq!(p.y, 0.0);
}take() 函数的实现
这个函数非常简单, 它直接调用的 replace() 函数:
#[inline]
pub fn take<T: Default>(dest: &mut T) -> T {
replace(dest, T::default())
}mem::transmute() 函数
这个函数用于将一个值从当前类型转换成另一种类型. 类似于C语言中的强制类型转换. 要注意的是, 源类型与目标类型应该大小相同.
use std::mem;
fn main() {
let pack: [u8; 4] = [0x01, 0x02, 0x03, 0x04];
#[allow(unnecessary_transmutes)]
let pack_u32 = unsafe { mem::transmute::<[u8; 4], u32>(pack) };
assert_eq!(pack_u32, 0x04030201);
}相同的功能, 用C语言实现:
#include <stdint.h>
#include <stdlib.h>
#include <assert.h>
int main() {
uint8_t pack[4] = {0x01, 0x02, 0x03, 0x04};
uint32_t pack_u32 = *(uint32_t*)pack;
assert(pack_u32 == 0x04030201);
return 0;
}
将枚举转换为 u8
用这个函数也可以将枚举结构中的签标 tag 值转为 u8 或者别的整数类型:
use std::mem;
#[derive(Debug, Clone, Copy)]
pub enum Shape {
Rectangle,
Circle,
Ellipse,
}
impl Shape {
pub fn tag(&self) -> u8 {
unsafe { mem::transmute(*self) }
}
}
fn main() {
let c = Shape::Circle;
println!("c.tag() is {}", c.tag());
}手动构造切片引用
切片引用本身就是一个胖指针:
- data ptr: 指向切片元素的起始内存
- len: 切片中元素的个数
use std::mem;
fn main() {
let nums = [0_i32, 1, 2, 3];
let slice: &[i32] = unsafe {
let nums_addr: usize = nums.as_ptr() as usize;
let len = nums.len();
mem::transmute([nums_addr, len])
};
assert_eq!(slice.len(), 4);
assert_eq!(slice[2], 2);
assert_eq!(slice[3], 3);
}其它转换方式
智能指针 Smart pointers
智能指针的概念, 源自于 C++ 语言. C++ 不支持垃圾回收 (garbage collection), 在引入智能指针之前, 需要开发者手动管理内存的分配与回收.
后来的 C++11 中, 强化了智能指针的概念, 并引入了 std::shared_ptr 和 std::unique_ptr,
使用这种方式, 极大地简化了对堆内存的管理. 并将 RAII 这种机制推广到管理一般的资源, 比如文件句柄, socket,
数据库连接等等.
所谓的 RAII 机制, 就是使用栈上的对象来管理堆上内存的生命周期的方法. 即在出栈时 会调用这个对象的 destructor 方法, 来释放对应的堆内存.
Rust 也同样不支持垃圾回收, 很多对象的创建与销毁都可以在编译期间确定; 但有时这样的方式不够灵活, 需要 在程序运行期间动态地管理资源. Rust 语言引入了 RAII 机制, 并在标准库的很多地方都有使用. 同样地, 在 Rust 的标准库中, 也有对应的智能智针, 而且种类更加丰富
std::unique_ptr, 不能共享 heap 上的内存, 对应于std::boxed::Boxstd::shared_ptr, 以引用计数的方式共享 heap 上的内存, 它本身是线程安全的. 对应于std::rc::Rc(只用于同一线程, 不是线程安全的) 以及std::sync::Arc(用于线程间共享, 线程安全)std::weak_ptr, 不以引用计数的方式共享内存, 对应于std::rc::Weak以及 std::sync::Weak. 它用于辅助std:: shared_ptr` 以解决循环引用问题, 本身不会影响引用计数的数值
本章学习目标:
- 掌握原始指针的用法
- 掌握常用的几种智能智针
- 了解写时复制机制
参考
原始指针 raw pointer
Rust 支持原始指针, 原始指针与 C 语言中的指针是完全一样的.
与 C 语言一样, 可以用 *ptr 的方法对指针进行解引用, 用于访问指针指向的内存.
只读指针 const pointer
不能通过只读指针, 来修改指针指向的内存的值.
只读指针的形式是 *const T, 相当于 C 语言中的 const T*.
*const c_void 对应于 C 语言中的 const void*, 可以代表指向任意类型的指针, 使用时需要显式地转型.
具体来说, 只读的原始指针分为三种:
*const T, 指向元素T的原始指针*const [T], 指向切片的原始指针*const [T; N], 指向数组的原始指针, 这里包含了数组中的元素类型T以及元数的个数N
*const T
这个原始指针的用处要更广泛一些, 它可以与 C 语言中的 const T* 进行互操作, 是 ABI 兼容的.
先看一个示例程序:
use std::ffi::c_void;
use std::ptr;
fn main() {
let x: i32 = 42;
// 指向基础数据类型 x 的原始指针
let x_ptr: *const i32 = ptr::addr_of!(x);
// 读取指针指向的内存所保存的值
unsafe { assert_eq!(*x_ptr, 42); }
// 另一种方式来读取
unsafe { assert_eq!(x_ptr.read(), 42); }
// 类型转换
let void_ptr: *const c_void = x_ptr.cast();
// 判断原始指针是否为空指针
assert!(!void_ptr.is_null());
let numbers = [1, 2, 3, 4, 5];
// 指向数组中第一个元素的原始指针
let first_num: *const i32 = numbers.as_ptr();
// 访问数组中的第一个元素
unsafe { assert_eq!(*first_num, 1); }
// 访问数组中的第二个元素
unsafe { assert_eq!(*first_num.add(1), 2) }
// 访问数组中的第四个元素
unsafe { assert_eq!(*first_num.offset(3), 4); }
// 访问数组中的第五个元素
unsafe { assert_eq!(*first_num.byte_offset((4 * size_of::<i32>()) as isize), 5) }
}上面代码, 对应的内存操作如下图所示:

下面还列出了指针的常用运算.
is_null(), 判断指针是否为空cast(), 转换为指向另一种数据类型的指针cast_mut(), 将不可变更指针转换为可变更指针addr(), 得到指针的地址, 相当于x_ptr as usize
指针偏移运算:
offset()byte_offset()wrapping_offset()wrapping_byte_offset()add()byte_add()wrapping_add()wrapping_byte_add()sub()byte_sub()wrapping_sub()wrapping_byte_sub()
两指针之间的关系:
offset_from()byte_offset_from()sub_ptr()
*const [T] 与 *const [T; N]
针对这两个指针的操作方式比较受限.
先看一个用例程序:
#![feature(array_ptr_get)]
#![feature(slice_ptr_get)]
use std::ptr;
fn main() {
// 在栈上的整数数组
let numbers: [i32; 5] = [1, 1, 2, 3, 5];
// 指向数组的原始指针
let num_ptr: *const [i32; 5] = &numbers as *const [i32; 5];
assert!(!num_ptr.is_null());
assert_eq!(size_of_val(&num_ptr), 8);
unsafe { assert_eq!((*num_ptr)[0], 1); }
unsafe { assert_eq!((*num_ptr)[4], 5); }
// 得到 *const [T] 原始指针
let num_ptr_slice: *const [i32] = &numbers as *const [i32];
assert_eq!(size_of_val(&num_ptr_slice), 16);
assert_eq!(num_ptr.as_slice(), num_ptr_slice);
assert_eq!(num_ptr.as_ptr(), num_ptr_slice.as_ptr());
assert_eq!(num_ptr_slice.len(), 5);
unsafe { assert_eq!((*num_ptr_slice)[0], 1); }
unsafe { assert_eq!((*num_ptr_slice)[4], 5); }
let num_slice: &[i32] = &numbers;
assert_eq!(num_slice.len(), 5);
// 从 *const [T] 转换成 &[T]
let num_slice2: &[i32] = unsafe {
&*num_ptr_slice
};
// 这两个切片是完全相同的
assert!(ptr::eq(num_slice, num_slice2));
// 指向数组中第一个元素的原始指针
let num_first_ptr: *const i32 = numbers.as_ptr();
// 另一种方法, 得到指向数组中第一个元素的原始指针
let num_first_ptr2: *const i32 = num_ptr_slice.cast();
// 这两个原始指针指向同一个内存地址
assert!(ptr::addr_eq(num_first_ptr, num_first_ptr2));
unsafe { assert_eq!(*num_first_ptr, numbers[0]); }
}*const [T] 本身是一个切片引用, 它的内存布局与 &[T] 是一致的, 甚至可以进行互换.
*const [T; N] 占用的内存中, 只有一个指向原始数组的指针, 并不包含数组的元素个数, 元素个数是编译器处理的.
其内存操作如下图所示:

可变更指针 mutable pointer
可变更指针的形式是 *mut T, 相当于 C 语言中的 T*.
而 *mut c_void 相当于 C 语言中的 void*, 可以代表指向任意类型的指针, 在使用时需要显式地转型.
所谓的可变更指针, 是可以通过该指针来修改指针所指向的内存的值.
与不可变更指针类型, 可变更指针也有三种形式:
*mut T, 指向元素T的原始指针*mut [T], 指向切片的原始指针*mut [T; N], 指向数组的原始指针, 这里包含了数组中的元素类型T以及元数的个数N
*mut T
先看一个示例程序:
use std::ptr;
fn main() {
let mut x: i32 = 42;
// 指向基础数据类型 x 的原始指针
let x_ptr: *mut i32 = ptr::addr_of_mut!(x);
// 修改指针指向的内存所保存的值
unsafe { *x_ptr = 43; }
// 读取数值
unsafe { assert_eq!(x_ptr.read(), 43); }
// 类型转换
let i8_ptr: *mut i8 = x_ptr.cast();
#[cfg(target_endian = "little")]
unsafe {
assert_eq!(*i8_ptr, 43);
}
#[cfg(target_endian = "big")]
unsafe {
assert_eq!(*i8_ptr.add(3), 43);
}
let mut numbers = [1, 2, 3, 4, 5];
// 指向数组中第一个元素的原始指针
let first_num: *mut i32 = numbers.as_mut_ptr();
// 修改数组中的第一个元素
unsafe { *first_num = 2; }
// 修改数组中的第二个元素
unsafe { *first_num.add(1) = 4; }
// 修改数组中的第二个元素
unsafe { *first_num.wrapping_add(2) = 6; }
// 修改数组中的第四个元素
unsafe { *first_num.offset(3) = 8; }
// 修改数组中的第五个元素
unsafe { *first_num.byte_offset((4 * size_of::<i32>()) as isize) = 10; }
assert_eq!(numbers, [2, 4, 6, 8, 10]);
}上面代码, 对应的内存操作如下图所示:

这里的, i8_ptr 比较有意思, 它只是指向了 x 的第一个字节, 如果是小端 (little endian) 的系统,
里面存放的数值恰好是 43.
下面还列出了可变更指针的常用运算.
is_null(), 判断指针是否为空cast(), 转换为指向另一种数据类型的指针cast_const(), 将可变更指针转为*const Taddr(), 得到指针的地址, 相当于x_ptr as usize
指针偏移运算:
offset()byte_offset()wrapping_offset()wrapping_byte_offset()add()byte_add()wrapping_add()wrapping_byte_add()sub()byte_sub()wrapping_sub()wrapping_byte_sub()
两指针之间的关系:
offset_from()byte_offset_from()sub_ptr()
*mut [T] 与 *mut [T; N]
先看一个用例程序:
#![feature(array_ptr_get)]
#![feature(slice_ptr_get)]
use std::ptr;
fn main() {
// 在栈上的整数数组
let mut numbers: [i32; 5] = [1, 2, 3, 4, 5];
// 指向数组的原始指针
let num_ptr: *mut [i32; 5] = ptr::addr_of_mut!(numbers);
assert!(!num_ptr.is_null());
assert_eq!(size_of_val(&num_ptr), 8);
unsafe {
(*num_ptr)[0] = 2;
(*num_ptr)[1] = 4;
}
// 得到 *mut [T] 原始指针
let num_ptr_slice: *mut [i32] = ptr::addr_of_mut!(numbers);
assert_eq!(size_of_val(&num_ptr_slice), 16);
assert_eq!(num_ptr.as_mut_slice(), num_ptr_slice);
assert_eq!(num_ptr.as_mut_ptr(), num_ptr_slice.as_mut_ptr());
assert_eq!(num_ptr_slice.len(), 5);
unsafe {
(*num_ptr_slice)[2] = 6;
(*num_ptr_slice)[3] = 8;
}
let num_slice: &mut [i32] = &mut numbers;
assert_eq!(num_slice.len(), 5);
num_slice[4] = 10;
// 从 *mut [T] 转换成 &[T]
let num_slice2: &mut [i32] = unsafe {
&mut *num_ptr_slice
};
// 这两个切片是完全相同的
assert!(ptr::eq(num_slice, num_slice2));
assert_eq!(numbers, [2, 4, 6, 8, 10]);
// 指向数组中第一个元素的原始指针
let num_first_ptr: *mut i32 = numbers.as_mut_ptr();
// 另一种方法, 得到指向数组中第一个元素的原始指针
let num_first_ptr2: *mut i32 = num_ptr_slice.cast();
// 这两个原始指针指向同一个内存地址
assert!(ptr::addr_eq(num_first_ptr, num_first_ptr2));
unsafe { assert_eq!(*num_first_ptr, 2); }
}*mut [T] 本身是一个切片引用, 它的内存布局与 &mut [T] 是一致的, 甚至可以进行互换.
*mut [T; N] 占用的内存中, 只有一个指向原始数组的指针, 并不包含数组的元素个数, 元素个数是编译器处理的.
其内存操作如下图所示:

模拟 C++ 中的 const_cast::
前文有介绍过, Rust 中声明的变量默认都是只读的, 除非显式地声明为 mut, 比如 let mut x = 42;.
但有时候, 可能需要实现像 C++ 中的 const_cast() 那样的类型转换工作, 以方便在函数内部修改一个不可变变量的值.
以下代码片段演示了如何通过原始指针进行类型转换的操作:
fn main() {
let x = 42;
let x_ptr = &x as *const i32;
let x_mut_ptr: *mut i32 = x_ptr.cast_mut();
unsafe {
x_mut_ptr.write(43);
}
assert_eq!(x, 43);
}上面的示例中, 通过取得只读变量 x 的内存地址, 直接将新的值写入到该地址, 就可以强制修改它的值.
胖指针 Fat pointer
胖指针的内存布局
参考
使用 Box 分配堆内存
常用方法
let x = Box::new(42_i32);
let ptr: * mut i32 = Box::into_raw(x);
let x2 = unsafe { Box::from_raw(ptr) };
assert_eq!(*x2, 42);Box<T> 类
Box<T> 用于分配堆内存, 并拥有这块内存的所有权.
它在标准库里的定义比较简单:
/// A pointer type that uniquely owns a heap allocation of type `T`.
pub struct Box<T: ?Sized>(Unique<T>);Box<T> 也常用于FFI, 后面的章节会有更详细的介绍.
Box<T> 与 &T 之间的关系
Deref
函数指针
也可以用 Box<T> 来包装函数指针:
impl<Args: Tuple, F: FnOnce<Args> + ?Sized, A: Allocator> FnOnce<Args> for Box<F, A> {
type Output = <F as FnOnce<Args>>::Output;
extern "rust-call" fn call_once(self, args: Args) -> Self::Output {
<F as FnOnce<Args>>::call_once(*self, args)
}
}
impl<Args: Tuple, F: FnMut<Args> + ?Sized, A: Allocator> FnMut<Args> for Box<F, A> {
extern "rust-call" fn call_mut(&mut self, args: Args) -> Self::Output {
<F as FnMut<Args>>::call_mut(self, args)
}
}
impl<Args: Tuple, F: Fn<Args> + ?Sized, A: Allocator> Fn<Args> for Box<F, A> {
extern "rust-call" fn call(&self, args: Args) -> Self::Output {
<F as Fn<Args>>::call(self, args)
}
}Box::leak() 函数
Box<[T]> 类
Box<[T]> 与 Vec<T> 之间的转换
Box<[T]> 与 &[T] 之间的关系
Box<dyn Trait> 类
Box<dyn Trait> 与 &dyn Trait 之间的关系
Box<dyn Any> 实现类型反射
Box<dyn Any> 可以实现类似 C 语言中的 void* 的效果, 可以较为快捷进行向下转型:
use std::any::Any;
fn print_is_string(value: Box<dyn Any>) {
if let Ok(s) = value.downcast::<String>() {
println!("string: {s}");
}
}参考
探寻 Box<T> 内部
Rc 在线程内的引用计数
指向相同元素的 Rc
如果要支持跨线程的引用计数, 请使用 Arc<T>.
相关知识
Rc 的内存布局
Rc 与 &T 的转换
&T 的转换使用 Weak 解决循环引用的问题
参考
内部可变性: Rc<Refcell> 的使用
参考
对比 C++ 里的 shared_from_this
C++ 里的 shared_ptr<T> 实现 shared_from_this.
Rc<[T]> 切片
Cell
Cell 及其相关类, 用于实现 Shared Mutable Access (SMA).
用于实现内部可变性 Interior Mutability.
它们是在运行期间 (runtime), 而不是在编译期 (compile time), 检查对象的所有权.
内部可变性 Interior Mutability
对于一个表面上看起来不可变的值, 其内部却包含了可变更的元素.
这个类似于 C++ 类中给某个元素添加了 mutable 修饰符.
Rust 引入这个特性, 就是为了解决自身的不足. 默认情况下, 变量都是只读的, 又不允许使用可变更引用 (mutable reference), 为同时只能有一个可变更引用访问该变量.
- Rust 禁止 shared mutable accesses, SMA.
- 引入内部可变性这种特性, 通过在运行时检查所有权, 来缓解上述规则的限制带来的语言表达力不足的问题
可以使用 std::cell::Cell 及 std::cell:RefCell 实现这样的效果.
impl<T> Cell<T>
where T: Copy
{
pub fn new(t: T) -> Cell<T> {
...
}
pub fn get(&self) -> T {
...
}
pub fn set(&self, t: T) {
...
}
}这里可以看到, Cell::set() 方法在声明时并不会改变 self.
另外, Cell 要求 T 实现了 Copy trait, 而且其 get() 和 set() 方法都会
复制新的值. 这种限制有几点不足, 第一是频繁的拷贝数据会浪费资源, 第二是有些类型
并不支持拷贝, 比如说文件句柄.
为了解决以上问题, rust 又引入了 RefCell 类型.
impl<T> RefCell<T>
{
pub fn new(t: T) -> RefCell<T> {
...
}
pub fn borrow(&self) -> &T {
...
}
pub fn borrow_mut(&self) -> &mut T {
...
}
}Cell 类
Cell 的内存布局
Cell 与 &T 的转换
&T 的转换RefCell 类
RefCell 的内存布局
RefCell 与 &T 的转换
&T 的转换OnceCell
LazyCell
UnsafeCell 类
写时复制 Cow 与 ToOwned
Cow (Clone on Write) 是一个枚举类型.
enum Cow<'a, B: ?Sized + 'a>
where B: ToOwned
{
Borrowed(&'a B),
Owned(<B as ToOwned>::Owned),
}内存管理
内存模型 Memory Model
参考
marker::PhantomData 类
使用 PhantomData<T>, 用于处理编译期生命周期的问题, PhantomData<T> 本身不占用内存.
以下示例中, 结构体 S 的大小跟 i32 是一致的:
use std::marker::PhantomData;
use std::mem::size_of_val;
struct S<A, B> {
first: A,
phantom: PhantomData<B>,
}
fn main() {
let s: S<char, f64> = S {
first: 'a',
phantom: PhantomData,
};
println!("size of s: {}", size_of_val(&s));
}固定内存 pin::Pin 以及 marker::Unpin
自引用 Ref to self
参考
初始化内存 Initialize Memory
Rust 栈上的变量在被赋值之前是未初始化的, 不能被使用; 直接读取未经初始化的内存会 导致未定义行为 (undefined behavior), 这是不被编译器允许的.
fn main() {
let x: i32;
println!("x: {}", x);
}同样的, 如果一个值从变量上移走了 (move), 除非这个值实现了 Copy trait, 否则
原先的变量在逻辑上又成了未初始化的了, 尽管实际上它占有的值是没变化的.
以下代码片段里, x 最后是未初始化的, 所以编译器就会在第三行代码报错.
let x = Box::new(42);
let y = x;
println!("x: {:?}", x);内存对齐 Memory Alignment
repr(u8)
repr(c)
repr(packed)
使用这种对齐方式非常受限.
repr(align(N))
内存布局 Memory Layout
数组 Array
元组 Tuple
切片 Slice, &[T]
动态数组 Vec
字符串 String
Option
Union
Trait Object
Box
Box<[T]>
Box
VecDeque
HashMap<K, V>
BTreeMap<K, V>
Closure
Rc
Cell
RefCell
Cow
Arc
Mutex
References
空类 Zero Sized Types
Vec 中对空类的优化
C++ 中的空类
先看代码示例:
#include <cassert>
#include<iostream>
class Empty { };
class ContainsEmpty {
public:
int x;
Empty e;
};
class WithEBO: public Empty {
public:
int x;
};
int main() {
Empty e1;
Empty e2;
assert(&e1 != &e2);
assert(sizeof(Empty) == 1);
assert(sizeof(ContainsEmpty) == 8);
assert(sizeof(WithEBO) == sizeof(int));
return 0;
}
尽管上面的 Empty 类是一个空的类, 它仍然要占用1个字节的内存.
C++ 对空类的优化: EBO Empty Base Optimization
通过横向对比可以看到, 这两种语言在处理空类的问题上的方法并不相同, 而Rust中的做法更符合常理, 心智负担也更小.
Sanitizers
Sanitizers 是较轻量级的内存检测工具, 最初是在 C/C++ 编译器中实现的.
Rustc 支持的 sanitizer 种类有:
- AddressSanitizer, 选项名是
address, 支持检测以下问题:- 堆内存越界 (out-of-bounds of heap), 栈内存越界, 全局变量越界
- 访问已被释放的内存 use after free
- 重复释放的内存 double free
- 释放无效内存 invalid free
- 内存没有被释放, 造成泄露 memory leak
- LeakSanitizer, 选项名是
leak, 用于检测内存泄露, 可以配合address选项使用 - MemorySanitizer, 选项名是
memory, 用于检测读取未初始化的内存 - ThreadSanitizer, 选项名是
thread, 用于检测数据竞态 (data race) - ControlFlowIntegrity
- Hardware-associated AddressSanitizer
- KernelControlFlowIntegrity
目前只有 nightly 通道的 rust 工具链支持 Sanitizers, 使用 -Z santizier=xxx 来激活相应的工具.
检测内存泄露
比如, 下面的示例代码中有两个泄露位点:
use std::mem;
fn main() {
let msg = String::from("Hello, Rust");
assert_eq!(msg.chars().count(), 11);
// 创建 ManuallyDrop, 阻止 String::drop() 方法被调用.
mem::forget(msg);
let numbers = vec![1, 2, 3, 5, 8, 13];
let slice = numbers.into_boxed_slice();
// 转换成原始指针, 不会再调用 Vec<i32>::drop() 方法
let _ptr: *mut [i32] = Box::leak(slice);
}使用以下命令, 运行 sanitizer:
RUSTFLAGS="-Zsanitizer=address" cargo +nightly run --bin san-memory-leak
运行后产生了如下的日志:
Finished `dev` profile [unoptimized + debuginfo] target(s) in 0.10s
Running `/tmp/intro-to-rust/target/debug/san-memory-leak`
=================================================================
==26078==ERROR: LeakSanitizer: detected memory leaks
Direct leak of 24 byte(s) in 1 object(s) allocated from:
#0 0x55da5c1e5e5f in malloc /rustc/llvm/src/llvm-project/compiler-rt/lib/asan/asan_malloc_linux.cpp:68:3
#1 0x55da5c21076f in alloc::alloc::alloc::h18d98aef82814903 /rustc/20ae37c18df95f9246c019b04957d23b4164bf7a/library/alloc/src/alloc.rs:100:9
#2 0x55da5c210a4e in alloc::alloc::Global::alloc_impl::hdf5500cbdd5c13e5 /rustc/20ae37c18df95f9246c019b04957d23b4164bf7a/library/alloc/src/alloc.rs:183:73
#3 0x55da5c2105aa in _$LT$alloc..alloc..Global$u20$as$u20$core..alloc..Allocator$GT$::allocate::h57656c0cb9113886 /rustc/20ae37c18df95f9246c019b04957d23b4164bf7a/library/alloc/src/alloc.rs:243:9
#4 0x55da5c2105aa in alloc::alloc::exchange_malloc::h4869f251cc126da0 /rustc/20ae37c18df95f9246c019b04957d23b4164bf7a/library/alloc/src/alloc.rs:332:18
#5 0x55da5c213a9a in core::ops::function::FnOnce::call_once::h179e0f184daf3550 /rustc/20ae37c18df95f9246c019b04957d23b4164bf7a/library/core/src/ops/function.rs:250:5
#6 0x55da5c22ef0c in core::ops::function::impls::_$LT$impl$u20$core..ops..function..FnOnce$LT$A$GT$$u20$for$u20$$RF$F$GT$::call_once::h8ee6b536c2e4e076 /rustc/20ae37c18df95f9246c019b04957d23b4164bf7a/library/core/src/ops/function.rs:284:13
#7 0x55da5c22ef0c in std::panicking::try::do_call::h5c8c98de8ed5bd5b /rustc/20ae37c18df95f9246c019b04957d23b4164bf7a/library/std/src/panicking.rs:553:40
#8 0x55da5c22ef0c in std::panicking::try::h6315052de0e5fa0e /rustc/20ae37c18df95f9246c019b04957d23b4164bf7a/library/std/src/panicking.rs:517:19
#9 0x55da5c22ef0c in std::panic::catch_unwind::h1530d3793f92a4bb /rustc/20ae37c18df95f9246c019b04957d23b4164bf7a/library/std/src/panic.rs:350:14
#10 0x55da5c22ef0c in std::rt::lang_start_internal::_$u7b$$u7b$closure$u7d$$u7d$::he545ff4063dfc2c8 /rustc/20ae37c18df95f9246c019b04957d23b4164bf7a/library/std/src/rt.rs:141:48
#11 0x55da5c22ef0c in std::panicking::try::do_call::h09c77e8b42da26d9 /rustc/20ae37c18df95f9246c019b04957d23b4164bf7a/library/std/src/panicking.rs:553:40
#12 0x55da5c22ef0c in std::panicking::try::h7a9b2c58b7302b3b /rustc/20ae37c18df95f9246c019b04957d23b4164bf7a/library/std/src/panicking.rs:517:19
#13 0x55da5c22ef0c in std::panic::catch_unwind::h464a2cd7183a7af5 /rustc/20ae37c18df95f9246c019b04957d23b4164bf7a/library/std/src/panic.rs:350:14
#14 0x55da5c22ef0c in std::rt::lang_start_internal::h99fdbebdafe8d634 /rustc/20ae37c18df95f9246c019b04957d23b4164bf7a/library/std/src/rt.rs:141:20
#15 0x55da5c214db8 in std::rt::lang_start::hc7e4f2c854274dbd /rustc/20ae37c18df95f9246c019b04957d23b4164bf7a/library/std/src/rt.rs:158:17
#16 0x55da5c21054d in main (/tmp/intro-to-rust/target/debug/san-memory-leak+0xbb54d) (BuildId: 161357dd922a2020d2b2bd4d81313ce5fb2b7a72)
Direct leak of 11 byte(s) in 1 object(s) allocated from:
#0 0x55da5c1e5e5f in malloc /rustc/llvm/src/llvm-project/compiler-rt/lib/asan/asan_malloc_linux.cpp:68:3
#1 0x55da5c21076f in alloc::alloc::alloc::h18d98aef82814903 /rustc/20ae37c18df95f9246c019b04957d23b4164bf7a/library/alloc/src/alloc.rs:100:9
#2 0x55da5c210a4e in alloc::alloc::Global::alloc_impl::hdf5500cbdd5c13e5 /rustc/20ae37c18df95f9246c019b04957d23b4164bf7a/library/alloc/src/alloc.rs:183:73
#3 0x55da5c211638 in _$LT$alloc..alloc..Global$u20$as$u20$core..alloc..Allocator$GT$::allocate::h57656c0cb9113886 /rustc/20ae37c18df95f9246c019b04957d23b4164bf7a/library/alloc/src/alloc.rs:243:9
#4 0x55da5c21304c in alloc::raw_vec::RawVec$LT$T$C$A$GT$::with_capacity_in::hb834086c0ea4b1b2 /rustc/20ae37c18df95f9246c019b04957d23b4164bf7a/library/alloc/src/raw_vec.rs:158:15
#5 0x55da5c21304c in alloc::vec::Vec$LT$T$C$A$GT$::with_capacity_in::hd1af89fce9cfcc1f /rustc/20ae37c18df95f9246c019b04957d23b4164bf7a/library/alloc/src/vec/mod.rs:699:20
#6 0x55da5c21304c in _$LT$T$u20$as$u20$alloc..slice..hack..ConvertVec$GT$::to_vec::hef44f66f7fe89ef0 /rustc/20ae37c18df95f9246c019b04957d23b4164bf7a/library/alloc/src/slice.rs:162:25
#7 0x55da5c2149e4 in alloc::slice::hack::to_vec::hbb17b02e50387cfa /rustc/20ae37c18df95f9246c019b04957d23b4164bf7a/library/alloc/src/slice.rs:111:9
#8 0x55da5c2149e4 in alloc::slice::_$LT$impl$u20$$u5b$T$u5d$$GT$::to_vec_in::ha6ad9e9219b6abe7 /rustc/20ae37c18df95f9246c019b04957d23b4164bf7a/library/alloc/src/slice.rs:462:9
#9 0x55da5c2149e4 in alloc::slice::_$LT$impl$u20$$u5b$T$u5d$$GT$::to_vec::h37bb05672b9af49e /rustc/20ae37c18df95f9246c019b04957d23b4164bf7a/library/alloc/src/slice.rs:437:14
#10 0x55da5c2149e4 in alloc::slice::_$LT$impl$u20$alloc..borrow..ToOwned$u20$for$u20$$u5b$T$u5d$$GT$::to_owned::h26d174d6cec3659e /rustc/20ae37c18df95f9246c019b04957d23b4164bf7a/library/alloc/src/slice.rs:844:14
#11 0x55da5c2149e4 in alloc::str::_$LT$impl$u20$alloc..borrow..ToOwned$u20$for$u20$str$GT$::to_owned::h739fe38078478dff /rustc/20ae37c18df95f9246c019b04957d23b4164bf7a/library/alloc/src/str.rs:212:62
#12 0x55da5c2149e4 in _$LT$alloc..string..String$u20$as$u20$core..convert..From$LT$$RF$str$GT$$GT$::from::hab63273f3f6b8c9b /rustc/20ae37c18df95f9246c019b04957d23b4164bf7a/library/alloc/src/string.rs:2715:11
#13 0x55da5c20ffff in san_memory_leak::main::hcfa228fc530e0524 /tmp/intro-to-rust/code/memory/src/bin/san-memory-leak.rs:8:15
#14 0x55da5c213a9a in core::ops::function::FnOnce::call_once::h179e0f184daf3550 /rustc/20ae37c18df95f9246c019b04957d23b4164bf7a/library/core/src/ops/function.rs:250:5
#15 0x55da5c22ef0c in core::ops::function::impls::_$LT$impl$u20$core..ops..function..FnOnce$LT$A$GT$$u20$for$u20$$RF$F$GT$::call_once::h8ee6b536c2e4e076 /rustc/20ae37c18df95f9246c019b04957d23b4164bf7a/library/core/src/ops/function.rs:284:13
#16 0x55da5c22ef0c in std::panicking::try::do_call::h5c8c98de8ed5bd5b /rustc/20ae37c18df95f9246c019b04957d23b4164bf7a/library/std/src/panicking.rs:553:40
#17 0x55da5c22ef0c in std::panicking::try::h6315052de0e5fa0e /rustc/20ae37c18df95f9246c019b04957d23b4164bf7a/library/std/src/panicking.rs:517:19
#18 0x55da5c22ef0c in std::panic::catch_unwind::h1530d3793f92a4bb /rustc/20ae37c18df95f9246c019b04957d23b4164bf7a/library/std/src/panic.rs:350:14
#19 0x55da5c22ef0c in std::rt::lang_start_internal::_$u7b$$u7b$closure$u7d$$u7d$::he545ff4063dfc2c8 /rustc/20ae37c18df95f9246c019b04957d23b4164bf7a/library/std/src/rt.rs:141:48
#20 0x55da5c22ef0c in std::panicking::try::do_call::h09c77e8b42da26d9 /rustc/20ae37c18df95f9246c019b04957d23b4164bf7a/library/std/src/panicking.rs:553:40
#21 0x55da5c22ef0c in std::panicking::try::h7a9b2c58b7302b3b /rustc/20ae37c18df95f9246c019b04957d23b4164bf7a/library/std/src/panicking.rs:517:19
#22 0x55da5c22ef0c in std::panic::catch_unwind::h464a2cd7183a7af5 /rustc/20ae37c18df95f9246c019b04957d23b4164bf7a/library/std/src/panic.rs:350:14
#23 0x55da5c22ef0c in std::rt::lang_start_internal::h99fdbebdafe8d634 /rustc/20ae37c18df95f9246c019b04957d23b4164bf7a/library/std/src/rt.rs:141:20
#24 0x55da5c214db8 in std::rt::lang_start::hc7e4f2c854274dbd /rustc/20ae37c18df95f9246c019b04957d23b4164bf7a/library/std/src/rt.rs:158:17
#25 0x55da5c21054d in main (/tmp/intro-to-rust/target/debug/san-memory-leak+0xbb54d) (BuildId: 161357dd922a2020d2b2bd4d81313ce5fb2b7a72)
SUMMARY: AddressSanitizer: 35 byte(s) leaked in 2 allocation(s).
尽管它成功检测出了两处内存泄露, 但是只有其中一个错误包含了精确的内存泄露位置:
#13 0x55da5c20ffff in san_memory_leak::main::hcfa228fc530e0524 /tmp/san-memory-leak.rs:8:15
检测内存越界 Out of bounds
下面的代码示例中有三处内存越界发生:
use std::ptr;
fn main() {
// numbers 在堆内存上分配的空间只有 3 个字节.
let mut numbers: Vec<u8> = vec![0, 1, 2];
// 越界写入
unsafe {
let numbers_ptr = numbers.as_mut_ptr();
// 向 numbers 的堆内存连续写入 4 个字节, 最后一个字节是越界的.
ptr::write_bytes(numbers_ptr, 0xf1, 4);
}
// 越界读取
let _off_last_byte: u8 = unsafe {
// 从 numbers 的堆内存读取第 4 个字节
*numbers.as_ptr().offset(4)
};
let mut numbers2: [i32; 3] = [0, 1, 2];
unsafe {
let numbers2_ptr = ptr::addr_of_mut!(numbers2);
// 栈内存越界写入
ptr::write_bytes(numbers2_ptr, 0x1f, 2);
}
assert_eq!(numbers2[0], 0x1f1f1f1f);
}上面代码中对 numbers 的堆内存读写都是越界的:

对变量 numbers2 的栈内存写入也是越界的, 它只有 12 个字节的空间, 却写入了 24 个字节的数据:

使用以下命令, 运行 sanitizer:
RUSTFLAGS="-Zsanitizer=address,leak" cargo +nightly run --bin san-out-of-bounds
只有针对写堆内存越界的错误给出了精准的定位:
#2 0x55998e7730c7 in san_out_of_bounds::main::h3f63e38c2d1ef70e /tmp/san-out-of-bounds.rs:15:9
访问已被释放的内存 use after free
以下的代码示例中, 错误地访问了已经被释放的堆内存:
use std::ptr;
fn main() {
let mut msg = String::from("Hello, Rust");
let msg_ptr = msg.as_mut_ptr();
// 释放 msg 的堆内存
drop(msg);
unsafe {
// 将 msg 中的字符 `R` 转为小写
ptr::write_bytes(msg_ptr.offset(8), b'r', 1);
}
}使用 address sanitizer 来检测它:
RUSTFLAGS="-Zsanitizer=address,leak" cargo +nightly run --bin san-use-after-free
得到如下的报告:
Finished `dev` profile [unoptimized + debuginfo] target(s) in 0.11s
Running `/tmp/san-use-after-free`
=================================================================
==48883==ERROR: AddressSanitizer: heap-use-after-free on address 0x502000000018 at pc 0x55c491cfd1f5 bp 0x7ffc8dc94270 sp 0x7ffc8dc93a40
WRITE of size 1 at 0x502000000018 thread T0
#0 0x55c491cfd1f4 in __asan_memset /rustc/llvm/src/llvm-project/compiler-rt/lib/asan/asan_interceptors_memintrinsics.cpp:67:3
#1 0x55c491d2a4be in core::intrinsics::write_bytes::h275db0bf8dfd8b81 /rustc/20ae37c18df95f9246c019b04957d23b4164bf7a/library/core/src/intrinsics.rs:3132:9
#2 0x55c491d2a4be in san_use_after_free::main::ha6e8e0b3b7b7c0d4 /tmp/san-use-after-free.rs:14:9
#3 0x55c491d293ca in core::ops::function::FnOnce::call_once::h9a7e669c52058242 /rustc/20ae37c18df95f9246c019b04957d23b4164bf7a/library/core/src/ops/function.rs:250:5
#4 0x55c491d2a73d in std::sys::backtrace::__rust_begin_short_backtrace::h24fb90d0dbf25fd4 /rustc/20ae37c18df95f9246c019b04957d23b4164bf7a/library/std/src/sys/backtrace.rs:155:18
#5 0x55c491d29fb4 in std::rt::lang_start::_$u7b$$u7b$closure$u7d$$u7d$::hcbc0207cb2102ed2 /rustc/20ae37c18df95f9246c019b04957d23b4164bf7a/library/std/src/rt.rs:159:18
#6 0x55c491d4589c in core::ops::function::impls::_$LT$impl$u20$core..ops..function..FnOnce$LT$A$GT$$u20$for$u20$$RF$F$GT$::call_once::h8ee6b536c2e4e076 /rustc/20ae37c18df95f9246c019b04957d23b4164bf7a/library/core/src/ops/function.rs:284:13
#7 0x55c491d4589c in std::panicking::try::do_call::h5c8c98de8ed5bd5b /rustc/20ae37c18df95f9246c019b04957d23b4164bf7a/library/std/src/panicking.rs:553:40
#8 0x55c491d4589c in std::panicking::try::h6315052de0e5fa0e /rustc/20ae37c18df95f9246c019b04957d23b4164bf7a/library/std/src/panicking.rs:517:19
#9 0x55c491d4589c in std::panic::catch_unwind::h1530d3793f92a4bb /rustc/20ae37c18df95f9246c019b04957d23b4164bf7a/library/std/src/panic.rs:350:14
#10 0x55c491d4589c in std::rt::lang_start_internal::_$u7b$$u7b$closure$u7d$$u7d$::he545ff4063dfc2c8 /rustc/20ae37c18df95f9246c019b04957d23b4164bf7a/library/std/src/rt.rs:141:48
#11 0x55c491d4589c in std::panicking::try::do_call::h09c77e8b42da26d9 /rustc/20ae37c18df95f9246c019b04957d23b4164bf7a/library/std/src/panicking.rs:553:40
#12 0x55c491d4589c in std::panicking::try::h7a9b2c58b7302b3b /rustc/20ae37c18df95f9246c019b04957d23b4164bf7a/library/std/src/panicking.rs:517:19
#13 0x55c491d4589c in std::panic::catch_unwind::h464a2cd7183a7af5 /rustc/20ae37c18df95f9246c019b04957d23b4164bf7a/library/std/src/panic.rs:350:14
#14 0x55c491d4589c in std::rt::lang_start_internal::h99fdbebdafe8d634 /rustc/20ae37c18df95f9246c019b04957d23b4164bf7a/library/std/src/rt.rs:141:20
#15 0x55c491d29e58 in std::rt::lang_start::had829c785f68a77b /rustc/20ae37c18df95f9246c019b04957d23b4164bf7a/library/std/src/rt.rs:158:17
#16 0x55c491d2a61d in main (/tmp/san-use-after-free+0xbc61d) (BuildId: 40b07716a65da8f8519e83d784d142834d3684f2)
#17 0x7efe01d08c89 in __libc_start_call_main csu/../sysdeps/nptl/libc_start_call_main.h:58:16
#18 0x7efe01d08d44 in __libc_start_main csu/../csu/libc-start.c:360:3
#19 0x55c491c7bc90 in _start (/tmp/san-use-after-free+0xdc90) (BuildId: 40b07716a65da8f8519e83d784d142834d3684f2)
0x502000000018 is located 8 bytes inside of 11-byte region [0x502000000010,0x50200000001b)
freed by thread T0 here:
#0 0x55c491cfea46 in free /rustc/llvm/src/llvm-project/compiler-rt/lib/asan/asan_malloc_linux.cpp:52:3
#1 0x55c491d2ba06 in alloc::alloc::dealloc::he34fc8c895854eae /rustc/20ae37c18df95f9246c019b04957d23b4164bf7a/library/alloc/src/alloc.rs:119:14
#2 0x55c491d2ba06 in _$LT$alloc..alloc..Global$u20$as$u20$core..alloc..Allocator$GT$::deallocate::hd36615ec06478e33 /rustc/20ae37c18df95f9246c019b04957d23b4164bf7a/library/alloc/src/alloc.rs:256:22
#3 0x55c491d2977a in _$LT$alloc..raw_vec..RawVec$LT$T$C$A$GT$$u20$as$u20$core..ops..drop..Drop$GT$::drop::h4f8728bad42a964e /rustc/20ae37c18df95f9246c019b04957d23b4164bf7a/library/alloc/src/raw_vec.rs:600:22
#4 0x55c491d295c9 in core::ptr::drop_in_place$LT$alloc..raw_vec..RawVec$LT$u8$GT$$GT$::hf72af14d538b6207 /rustc/20ae37c18df95f9246c019b04957d23b4164bf7a/library/core/src/ptr/mod.rs:542:1
#5 0x55c491d293ca in core::ops::function::FnOnce::call_once::h9a7e669c52058242 /rustc/20ae37c18df95f9246c019b04957d23b4164bf7a/library/core/src/ops/function.rs:250:5
#6 0x55c491d4589c in core::ops::function::impls::_$LT$impl$u20$core..ops..function..FnOnce$LT$A$GT$$u20$for$u20$$RF$F$GT$::call_once::h8ee6b536c2e4e076 /rustc/20ae37c18df95f9246c019b04957d23b4164bf7a/library/core/src/ops/function.rs:284:13
#7 0x55c491d4589c in std::panicking::try::do_call::h5c8c98de8ed5bd5b /rustc/20ae37c18df95f9246c019b04957d23b4164bf7a/library/std/src/panicking.rs:553:40
#8 0x55c491d4589c in std::panicking::try::h6315052de0e5fa0e /rustc/20ae37c18df95f9246c019b04957d23b4164bf7a/library/std/src/panicking.rs:517:19
#9 0x55c491d4589c in std::panic::catch_unwind::h1530d3793f92a4bb /rustc/20ae37c18df95f9246c019b04957d23b4164bf7a/library/std/src/panic.rs:350:14
#10 0x55c491d4589c in std::rt::lang_start_internal::_$u7b$$u7b$closure$u7d$$u7d$::he545ff4063dfc2c8 /rustc/20ae37c18df95f9246c019b04957d23b4164bf7a/library/std/src/rt.rs:141:48
#11 0x55c491d4589c in std::panicking::try::do_call::h09c77e8b42da26d9 /rustc/20ae37c18df95f9246c019b04957d23b4164bf7a/library/std/src/panicking.rs:553:40
#12 0x55c491d4589c in std::panicking::try::h7a9b2c58b7302b3b /rustc/20ae37c18df95f9246c019b04957d23b4164bf7a/library/std/src/panicking.rs:517:19
#13 0x55c491d4589c in std::panic::catch_unwind::h464a2cd7183a7af5 /rustc/20ae37c18df95f9246c019b04957d23b4164bf7a/library/std/src/panic.rs:350:14
#14 0x55c491d4589c in std::rt::lang_start_internal::h99fdbebdafe8d634 /rustc/20ae37c18df95f9246c019b04957d23b4164bf7a/library/std/src/rt.rs:141:20
#15 0x55c491d29e58 in std::rt::lang_start::had829c785f68a77b /rustc/20ae37c18df95f9246c019b04957d23b4164bf7a/library/std/src/rt.rs:158:17
#16 0x55c491d2a61d in main (/tmp/san-use-after-free+0xbc61d) (BuildId: 40b07716a65da8f8519e83d784d142834d3684f2)
previously allocated by thread T0 here:
#0 0x55c491cfecdf in malloc /rustc/llvm/src/llvm-project/compiler-rt/lib/asan/asan_malloc_linux.cpp:68:3
#1 0x55c491d2b41f in alloc::alloc::alloc::ha10955ac768529c4 /rustc/20ae37c18df95f9246c019b04957d23b4164bf7a/library/alloc/src/alloc.rs:100:9
#2 0x55c491d2b6fe in alloc::alloc::Global::alloc_impl::h952e25fc69d013f2 /rustc/20ae37c18df95f9246c019b04957d23b4164bf7a/library/alloc/src/alloc.rs:183:73
#3 0x55c491d2ba68 in _$LT$alloc..alloc..Global$u20$as$u20$core..alloc..Allocator$GT$::allocate::h3f5cd0999b0016dd /rustc/20ae37c18df95f9246c019b04957d23b4164bf7a/library/alloc/src/alloc.rs:243:9
#4 0x55c491d2992c in alloc::raw_vec::RawVec$LT$T$C$A$GT$::with_capacity_in::h90a3c53535a47f9c /rustc/20ae37c18df95f9246c019b04957d23b4164bf7a/library/alloc/src/raw_vec.rs:158:15
#5 0x55c491d2992c in alloc::vec::Vec$LT$T$C$A$GT$::with_capacity_in::h727aedd763542a12 /rustc/20ae37c18df95f9246c019b04957d23b4164bf7a/library/alloc/src/vec/mod.rs:699:20
#6 0x55c491d2992c in _$LT$T$u20$as$u20$alloc..slice..hack..ConvertVec$GT$::to_vec::h55b023e79ecdd1e4 /rustc/20ae37c18df95f9246c019b04957d23b4164bf7a/library/alloc/src/slice.rs:162:25
#7 0x55c491d29c84 in alloc::slice::hack::to_vec::h4aab7a9196b5dd80 /rustc/20ae37c18df95f9246c019b04957d23b4164bf7a/library/alloc/src/slice.rs:111:9
#8 0x55c491d29c84 in alloc::slice::_$LT$impl$u20$$u5b$T$u5d$$GT$::to_vec_in::h59ef1c2003b2da43 /rustc/20ae37c18df95f9246c019b04957d23b4164bf7a/library/alloc/src/slice.rs:462:9
#9 0x55c491d29c84 in alloc::slice::_$LT$impl$u20$$u5b$T$u5d$$GT$::to_vec::h765ebc2e7b673718 /rustc/20ae37c18df95f9246c019b04957d23b4164bf7a/library/alloc/src/slice.rs:437:14
#10 0x55c491d29c84 in alloc::slice::_$LT$impl$u20$alloc..borrow..ToOwned$u20$for$u20$$u5b$T$u5d$$GT$::to_owned::h78af1272be58f355 /rustc/20ae37c18df95f9246c019b04957d23b4164bf7a/library/alloc/src/slice.rs:844:14
#11 0x55c491d29c84 in alloc::str::_$LT$impl$u20$alloc..borrow..ToOwned$u20$for$u20$str$GT$::to_owned::h881d4cf593dc69cf /rustc/20ae37c18df95f9246c019b04957d23b4164bf7a/library/alloc/src/str.rs:212:62
#12 0x55c491d29c84 in _$LT$alloc..string..String$u20$as$u20$core..convert..From$LT$$RF$str$GT$$GT$::from::he993a3d7b8799ab9 /rustc/20ae37c18df95f9246c019b04957d23b4164bf7a/library/alloc/src/string.rs:2715:11
#13 0x55c491d2a3d5 in san_use_after_free::main::ha6e8e0b3b7b7c0d4 /tmp/san-use-after-free.rs:8:19
#14 0x55c491d293ca in core::ops::function::FnOnce::call_once::h9a7e669c52058242 /rustc/20ae37c18df95f9246c019b04957d23b4164bf7a/library/core/src/ops/function.rs:250:5
#15 0x55c491d4589c in core::ops::function::impls::_$LT$impl$u20$core..ops..function..FnOnce$LT$A$GT$$u20$for$u20$$RF$F$GT$::call_once::h8ee6b536c2e4e076 /rustc/20ae37c18df95f9246c019b04957d23b4164bf7a/library/core/src/ops/function.rs:284:13
#16 0x55c491d4589c in std::panicking::try::do_call::h5c8c98de8ed5bd5b /rustc/20ae37c18df95f9246c019b04957d23b4164bf7a/library/std/src/panicking.rs:553:40
#17 0x55c491d4589c in std::panicking::try::h6315052de0e5fa0e /rustc/20ae37c18df95f9246c019b04957d23b4164bf7a/library/std/src/panicking.rs:517:19
#18 0x55c491d4589c in std::panic::catch_unwind::h1530d3793f92a4bb /rustc/20ae37c18df95f9246c019b04957d23b4164bf7a/library/std/src/panic.rs:350:14
#19 0x55c491d4589c in std::rt::lang_start_internal::_$u7b$$u7b$closure$u7d$$u7d$::he545ff4063dfc2c8 /rustc/20ae37c18df95f9246c019b04957d23b4164bf7a/library/std/src/rt.rs:141:48
#20 0x55c491d4589c in std::panicking::try::do_call::h09c77e8b42da26d9 /rustc/20ae37c18df95f9246c019b04957d23b4164bf7a/library/std/src/panicking.rs:553:40
#21 0x55c491d4589c in std::panicking::try::h7a9b2c58b7302b3b /rustc/20ae37c18df95f9246c019b04957d23b4164bf7a/library/std/src/panicking.rs:517:19
#22 0x55c491d4589c in std::panic::catch_unwind::h464a2cd7183a7af5 /rustc/20ae37c18df95f9246c019b04957d23b4164bf7a/library/std/src/panic.rs:350:14
#23 0x55c491d4589c in std::rt::lang_start_internal::h99fdbebdafe8d634 /rustc/20ae37c18df95f9246c019b04957d23b4164bf7a/library/std/src/rt.rs:141:20
#24 0x55c491d29e58 in std::rt::lang_start::had829c785f68a77b /rustc/20ae37c18df95f9246c019b04957d23b4164bf7a/library/std/src/rt.rs:158:17
#25 0x55c491d2a61d in main (/tmp/san-use-after-free+0xbc61d) (BuildId: 40b07716a65da8f8519e83d784d142834d3684f2)
SUMMARY: AddressSanitizer: heap-use-after-free /rustc/20ae37c18df95f9246c019b04957d23b4164bf7a/library/core/src/intrinsics.rs:3132:9 in core::intrinsics::write_bytes::h275db0bf8dfd8b81
Shadow bytes around the buggy address:
0x501ffffffd80: 00 00 00 00 00 00 00 00 00 00 00 00 00 00 00 00
0x501ffffffe00: 00 00 00 00 00 00 00 00 00 00 00 00 00 00 00 00
0x501ffffffe80: 00 00 00 00 00 00 00 00 00 00 00 00 00 00 00 00
0x501fffffff00: 00 00 00 00 00 00 00 00 00 00 00 00 00 00 00 00
0x501fffffff80: 00 00 00 00 00 00 00 00 00 00 00 00 00 00 00 00
=>0x502000000000: fa fa fd[fd]fa fa fa fa fa fa fa fa fa fa fa fa
0x502000000080: fa fa fa fa fa fa fa fa fa fa fa fa fa fa fa fa
0x502000000100: fa fa fa fa fa fa fa fa fa fa fa fa fa fa fa fa
0x502000000180: fa fa fa fa fa fa fa fa fa fa fa fa fa fa fa fa
0x502000000200: fa fa fa fa fa fa fa fa fa fa fa fa fa fa fa fa
0x502000000280: fa fa fa fa fa fa fa fa fa fa fa fa fa fa fa fa
Shadow byte legend (one shadow byte represents 8 application bytes):
Addressable: 00
Partially addressable: 01 02 03 04 05 06 07
Heap left redzone: fa
Freed heap region: fd
Stack left redzone: f1
Stack mid redzone: f2
Stack right redzone: f3
Stack after return: f5
Stack use after scope: f8
Global redzone: f9
Global init order: f6
Poisoned by user: f7
Container overflow: fc
Array cookie: ac
Intra object redzone: bb
ASan internal: fe
Left alloca redzone: ca
Right alloca redzone: cb
==48883==ABORTING
报告里面写明了错误类型 heap-use-after-free, 并精准定位了出错的位置:
#2 0x55c491d2a4be in san_use_after_free::main::ha6e8e0b3b7b7c0d4 /tmp/san-use-after-free.rs:14:9
检测循环引用 Cyclic references
循环引用的问题常出现在 Rc/Arc 等以引用计数的方式来管理对象的地方. 以下一个示例展示了二叉树中的循环引用问题:
use std::cell::RefCell;
use std::rc::Rc;
#[derive(Default)]
struct TreeNode {
left: Option<Rc<RefCell<TreeNode>>>,
right: Option<Rc<RefCell<TreeNode>>>,
val: i32,
}
impl TreeNode {
#[must_use]
#[inline]
pub const fn is_leaf(&self) -> bool {
self.left.is_none() && self.right.is_none()
}
}
impl Drop for TreeNode {
fn drop(&mut self) {
println!("Will drop node with value: {}", self.val);
}
}
fn main() {
let leaf_node = Rc::new(RefCell::new(TreeNode::default()));
assert!(leaf_node.borrow().is_leaf());
let node1 = Rc::new(RefCell::new(TreeNode {
left: None,
right: Some(leaf_node.clone()),
val: 42,
}));
let node2 = Rc::new(RefCell::new(TreeNode {
left: Some(leaf_node.clone()),
right: Some(node1.clone()),
val: 12,
}));
// 制造一个循环引用
node1.borrow_mut().left = Some(node2.clone());
// 程序运行结束后, node1 和 node2 都不会被正确的释放
}循环引用会导致节点上的对象不能被正常的释放, 内存不会回收并出现内存泄露的问题.

Sanitizer 可以检测到内存泄露的情况, 使用以下命令:
RUSTFLAGS="-Zsanitizer=address,leak" cargo +nightly run --bin san-cyclic-references
可以得到以下日志报告:
Compiling libc v0.2.155
Compiling memory v0.1.0 (/tmp/intro-to-rust/code/memory)
Finished `dev` profile [unoptimized + debuginfo] target(s) in 1.46s
Running `/tmp/intro-to-rust/target/debug/san-cyclic-references`
=================================================================
==154957==ERROR: LeakSanitizer: detected memory leaks
Indirect leak of 48 byte(s) in 1 object(s) allocated from:
#0 0x55e98639e10f in malloc /rustc/llvm/src/llvm-project/compiler-rt/lib/asan/asan_malloc_linux.cpp:68:3
#1 0x55e9863c961f in alloc::alloc::alloc::h71b9c2fa3833688e /rustc/20ae37c18df95f9246c019b04957d23b4164bf7a/library/alloc/src/alloc.rs:100:9
#2 0x55e9863c98fe in alloc::alloc::Global::alloc_impl::h4661849ad8696522 /rustc/20ae37c18df95f9246c019b04957d23b4164bf7a/library/alloc/src/alloc.rs:183:73
#3 0x55e9863c945a in _$LT$alloc..alloc..Global$u20$as$u20$core..alloc..Allocator$GT$::allocate::h89a094a661859bcd /rustc/20ae37c18df95f9246c019b04957d23b4164bf7a/library/alloc/src/alloc.rs:243:9
#4 0x55e9863c945a in alloc::alloc::exchange_malloc::ha5a75c30f8f85d71 /rustc/20ae37c18df95f9246c019b04957d23b4164bf7a/library/alloc/src/alloc.rs:332:18
#5 0x55e9863c9fd2 in san_cyclic_references::main::h92fbd07b3584710d /tmp/intro-to-rust/code/memory/src/bin/san-cyclic-references.rs:33:17
#6 0x55e9863c822a in core::ops::function::FnOnce::call_once::h691941b5fcd7eed2 /rustc/20ae37c18df95f9246c019b04957d23b4164bf7a/library/core/src/ops/function.rs:250:5
#7 0x55e9863e483c in core::ops::function::impls::_$LT$impl$u20$core..ops..function..FnOnce$LT$A$GT$$u20$for$u20$$RF$F$GT$::call_once::h8ee6b536c2e4e076 /rustc/20ae37c18df95f9246c019b04957d23b4164bf7a/library/core/src/ops/function.rs:284:13
#8 0x55e9863e483c in std::panicking::try::do_call::h5c8c98de8ed5bd5b /rustc/20ae37c18df95f9246c019b04957d23b4164bf7a/library/std/src/panicking.rs:553:40
#9 0x55e9863e483c in std::panicking::try::h6315052de0e5fa0e /rustc/20ae37c18df95f9246c019b04957d23b4164bf7a/library/std/src/panicking.rs:517:19
#10 0x55e9863e483c in std::panic::catch_unwind::h1530d3793f92a4bb /rustc/20ae37c18df95f9246c019b04957d23b4164bf7a/library/std/src/panic.rs:350:14
#11 0x55e9863e483c in std::rt::lang_start_internal::_$u7b$$u7b$closure$u7d$$u7d$::he545ff4063dfc2c8 /rustc/20ae37c18df95f9246c019b04957d23b4164bf7a/library/std/src/rt.rs:141:48
#12 0x55e9863e483c in std::panicking::try::do_call::h09c77e8b42da26d9 /rustc/20ae37c18df95f9246c019b04957d23b4164bf7a/library/std/src/panicking.rs:553:40
#13 0x55e9863e483c in std::panicking::try::h7a9b2c58b7302b3b /rustc/20ae37c18df95f9246c019b04957d23b4164bf7a/library/std/src/panicking.rs:517:19
#14 0x55e9863e483c in std::panic::catch_unwind::h464a2cd7183a7af5 /rustc/20ae37c18df95f9246c019b04957d23b4164bf7a/library/std/src/panic.rs:350:14
#15 0x55e9863e483c in std::rt::lang_start_internal::h99fdbebdafe8d634 /rustc/20ae37c18df95f9246c019b04957d23b4164bf7a/library/std/src/rt.rs:141:20
#16 0x55e9863c91d8 in std::rt::lang_start::h554a4489af6c7e14 /rustc/20ae37c18df95f9246c019b04957d23b4164bf7a/library/std/src/rt.rs:158:17
#17 0x55e9863ca29d in main (/tmp/intro-to-rust/target/debug/san-cyclic-references+0xbd29d) (BuildId: 5dc7b4586c73e6fdcab7c038bd63e8862b0b9ec5)
Indirect leak of 48 byte(s) in 1 object(s) allocated from:
#0 0x55e98639e10f in malloc /rustc/llvm/src/llvm-project/compiler-rt/lib/asan/asan_malloc_linux.cpp:68:3
#1 0x55e9863c961f in alloc::alloc::alloc::h71b9c2fa3833688e /rustc/20ae37c18df95f9246c019b04957d23b4164bf7a/library/alloc/src/alloc.rs:100:9
#2 0x55e9863c98fe in alloc::alloc::Global::alloc_impl::h4661849ad8696522 /rustc/20ae37c18df95f9246c019b04957d23b4164bf7a/library/alloc/src/alloc.rs:183:73
#3 0x55e9863c945a in _$LT$alloc..alloc..Global$u20$as$u20$core..alloc..Allocator$GT$::allocate::h89a094a661859bcd /rustc/20ae37c18df95f9246c019b04957d23b4164bf7a/library/alloc/src/alloc.rs:243:9
#4 0x55e9863c945a in alloc::alloc::exchange_malloc::ha5a75c30f8f85d71 /rustc/20ae37c18df95f9246c019b04957d23b4164bf7a/library/alloc/src/alloc.rs:332:18
#5 0x55e9863ca05c in san_cyclic_references::main::h92fbd07b3584710d /tmp/intro-to-rust/code/memory/src/bin/san-cyclic-references.rs:38:17
#6 0x55e9863c822a in core::ops::function::FnOnce::call_once::h691941b5fcd7eed2 /rustc/20ae37c18df95f9246c019b04957d23b4164bf7a/library/core/src/ops/function.rs:250:5
#7 0x55e9863e483c in core::ops::function::impls::_$LT$impl$u20$core..ops..function..FnOnce$LT$A$GT$$u20$for$u20$$RF$F$GT$::call_once::h8ee6b536c2e4e076 /rustc/20ae37c18df95f9246c019b04957d23b4164bf7a/library/core/src/ops/function.rs:284:13
#8 0x55e9863e483c in std::panicking::try::do_call::h5c8c98de8ed5bd5b /rustc/20ae37c18df95f9246c019b04957d23b4164bf7a/library/std/src/panicking.rs:553:40
#9 0x55e9863e483c in std::panicking::try::h6315052de0e5fa0e /rustc/20ae37c18df95f9246c019b04957d23b4164bf7a/library/std/src/panicking.rs:517:19
#10 0x55e9863e483c in std::panic::catch_unwind::h1530d3793f92a4bb /rustc/20ae37c18df95f9246c019b04957d23b4164bf7a/library/std/src/panic.rs:350:14
#11 0x55e9863e483c in std::rt::lang_start_internal::_$u7b$$u7b$closure$u7d$$u7d$::he545ff4063dfc2c8 /rustc/20ae37c18df95f9246c019b04957d23b4164bf7a/library/std/src/rt.rs:141:48
#12 0x55e9863e483c in std::panicking::try::do_call::h09c77e8b42da26d9 /rustc/20ae37c18df95f9246c019b04957d23b4164bf7a/library/std/src/panicking.rs:553:40
#13 0x55e9863e483c in std::panicking::try::h7a9b2c58b7302b3b /rustc/20ae37c18df95f9246c019b04957d23b4164bf7a/library/std/src/panicking.rs:517:19
#14 0x55e9863e483c in std::panic::catch_unwind::h464a2cd7183a7af5 /rustc/20ae37c18df95f9246c019b04957d23b4164bf7a/library/std/src/panic.rs:350:14
#15 0x55e9863e483c in std::rt::lang_start_internal::h99fdbebdafe8d634 /rustc/20ae37c18df95f9246c019b04957d23b4164bf7a/library/std/src/rt.rs:141:20
#16 0x55e9863c91d8 in std::rt::lang_start::h554a4489af6c7e14 /rustc/20ae37c18df95f9246c019b04957d23b4164bf7a/library/std/src/rt.rs:158:17
#17 0x55e9863ca29d in main (/tmp/intro-to-rust/target/debug/san-cyclic-references+0xbd29d) (BuildId: 5dc7b4586c73e6fdcab7c038bd63e8862b0b9ec5)
Indirect leak of 48 byte(s) in 1 object(s) allocated from:
#0 0x55e98639e10f in malloc /rustc/llvm/src/llvm-project/compiler-rt/lib/asan/asan_malloc_linux.cpp:68:3
#1 0x55e9863c961f in alloc::alloc::alloc::h71b9c2fa3833688e /rustc/20ae37c18df95f9246c019b04957d23b4164bf7a/library/alloc/src/alloc.rs:100:9
#2 0x55e9863c98fe in alloc::alloc::Global::alloc_impl::h4661849ad8696522 /rustc/20ae37c18df95f9246c019b04957d23b4164bf7a/library/alloc/src/alloc.rs:183:73
#3 0x55e9863c945a in _$LT$alloc..alloc..Global$u20$as$u20$core..alloc..Allocator$GT$::allocate::h89a094a661859bcd /rustc/20ae37c18df95f9246c019b04957d23b4164bf7a/library/alloc/src/alloc.rs:243:9
#4 0x55e9863c945a in alloc::alloc::exchange_malloc::ha5a75c30f8f85d71 /rustc/20ae37c18df95f9246c019b04957d23b4164bf7a/library/alloc/src/alloc.rs:332:18
#5 0x55e9863c9e8f in san_cyclic_references::main::h92fbd07b3584710d /tmp/intro-to-rust/code/memory/src/bin/san-cyclic-references.rs:30:21
#6 0x55e9863c822a in core::ops::function::FnOnce::call_once::h691941b5fcd7eed2 /rustc/20ae37c18df95f9246c019b04957d23b4164bf7a/library/core/src/ops/function.rs:250:5
#7 0x55e9863e483c in core::ops::function::impls::_$LT$impl$u20$core..ops..function..FnOnce$LT$A$GT$$u20$for$u20$$RF$F$GT$::call_once::h8ee6b536c2e4e076 /rustc/20ae37c18df95f9246c019b04957d23b4164bf7a/library/core/src/ops/function.rs:284:13
#8 0x55e9863e483c in std::panicking::try::do_call::h5c8c98de8ed5bd5b /rustc/20ae37c18df95f9246c019b04957d23b4164bf7a/library/std/src/panicking.rs:553:40
#9 0x55e9863e483c in std::panicking::try::h6315052de0e5fa0e /rustc/20ae37c18df95f9246c019b04957d23b4164bf7a/library/std/src/panicking.rs:517:19
#10 0x55e9863e483c in std::panic::catch_unwind::h1530d3793f92a4bb /rustc/20ae37c18df95f9246c019b04957d23b4164bf7a/library/std/src/panic.rs:350:14
#11 0x55e9863e483c in std::rt::lang_start_internal::_$u7b$$u7b$closure$u7d$$u7d$::he545ff4063dfc2c8 /rustc/20ae37c18df95f9246c019b04957d23b4164bf7a/library/std/src/rt.rs:141:48
#12 0x55e9863e483c in std::panicking::try::do_call::h09c77e8b42da26d9 /rustc/20ae37c18df95f9246c019b04957d23b4164bf7a/library/std/src/panicking.rs:553:40
#13 0x55e9863e483c in std::panicking::try::h7a9b2c58b7302b3b /rustc/20ae37c18df95f9246c019b04957d23b4164bf7a/library/std/src/panicking.rs:517:19
#14 0x55e9863e483c in std::panic::catch_unwind::h464a2cd7183a7af5 /rustc/20ae37c18df95f9246c019b04957d23b4164bf7a/library/std/src/panic.rs:350:14
#15 0x55e9863e483c in std::rt::lang_start_internal::h99fdbebdafe8d634 /rustc/20ae37c18df95f9246c019b04957d23b4164bf7a/library/std/src/rt.rs:141:20
#16 0x55e9863c91d8 in std::rt::lang_start::h554a4489af6c7e14 /rustc/20ae37c18df95f9246c019b04957d23b4164bf7a/library/std/src/rt.rs:158:17
#17 0x55e9863ca29d in main (/tmp/intro-to-rust/target/debug/san-cyclic-references+0xbd29d) (BuildId: 5dc7b4586c73e6fdcab7c038bd63e8862b0b9ec5)
SUMMARY: AddressSanitizer: 144 byte(s) leaked in 3 allocation(s).
报告中确实有发现内存泄露的情况, 并且给出了位置所在:
#5 0x55e9863c9fd2 in san_cyclic_references::main::h92fbd07b3584710d /tmp/intro-to-rust/code/memory/src/bin/san-cyclic-references.rs:33:17#5 0x55e9863ca05c in san_cyclic_references::main::h92fbd07b3584710d /tmp/intro-to-rust/code/memory/src/bin/san-cyclic-references.rs:38:17
检测数据竞态 Data race
多个线程访问同一块内存时, 应该使用互斥锁等手段, 确保不会发生 data race condition.
另外, 如果使用了线程本地存储 (Thread local storage) 的话, 它在每个线程中被单独保存了一份, 各线程只会访问内部的那一份克隆, 所以不存在 data race.
看下面的例子:
use std::cell::Cell;
use std::thread;
// 初始化为 1.
thread_local!(static TLS_COUNTER: Cell<i32> = const { Cell::new(1) });
// 全局变量, 该变量位于 data segment.
static mut SHARED_COUNTER: i32 = 1;
fn main() {
// 设置主线程的 TLS_COUNTER 实例的值为 2.
TLS_COUNTER.set(2);
let t1 = thread::spawn(move || {
// 线程启动时, TLS_COUNTER 的值是 1.
assert_eq!(TLS_COUNTER.get(), 1);
// 修改线程内部的 TLS_COUNTER 实例.
TLS_COUNTER.set(3);
});
TLS_COUNTER.set(4);
t1.join().unwrap();
// 读取主线程中的 TLS_COUNTER 实例.
assert_eq!(TLS_COUNTER.get(), 4);
// 没有任何保护手段的情况下, 直接访问全局变量.
unsafe { SHARED_COUNTER = 2; }
let t2 = thread::spawn(|| {
unsafe {
// 可能发生 data race
SHARED_COUNTER = 3;
}
});
// 可能发生 data race
unsafe { SHARED_COUNTER = 4; }
t2.join().unwrap();
// 无法确定 SHARED_COUNTER 的值
unsafe { assert!(SHARED_COUNTER == 3 || SHARED_COUNTER == 4); }
let _x = 11;
}使用以下命令来检测它:
RUSTFLAGS="-Zsanitizer=thread" cargo +nightly run --bin san-data-race
会得到这个报告:
Finished `dev` profile [unoptimized + debuginfo] target(s) in 0.02s
Running `/tmp/intro-to-rust/target/debug/san-data-race`
==================
WARNING: ThreadSanitizer: data race (pid=174565)
Write of size 4 at 0x558040da1948 by thread T2:
#0 san_data_race::main::_$u7b$$u7b$closure$u7d$$u7d$::hca1d1aa2bd214a46 /tmp/intro-to-rust/code/memory/src/bin/san-data-race.rs:30:13 (san-data-race+0x98906) (BuildId: abaff10be3c90c7a985911bf9fb769fbad66acc6)
#1 std::sys::backtrace::__rust_begin_short_backtrace::he6b9930aee5e4b5d /rustc/20ae37c18df95f9246c019b04957d23b4164bf7a/library/std/src/sys/backtrace.rs:155:18 (san-data-race+0x98cd2) (BuildId: abaff10be3c90c7a985911bf9fb769fbad66acc6)
#2 std::thread::Builder::spawn_unchecked_::_$u7b$$u7b$closure$u7d$$u7d$::_$u7b$$u7b$closure$u7d$$u7d$::h28a2ac9c5e0b3c24 /rustc/20ae37c18df95f9246c019b04957d23b4164bf7a/library/std/src/thread/mod.rs:542:17 (san-data-race+0x9fc82) (BuildId: abaff10be3c90c7a985911bf9fb769fbad66acc6)
#3 _$LT$core..panic..unwind_safe..AssertUnwindSafe$LT$F$GT$$u20$as$u20$core..ops..function..FnOnce$LT$$LP$$RP$$GT$$GT$::call_once::hf30d54c2a60bd049 /rustc/20ae37c18df95f9246c019b04957d23b4164bf7a/library/core/src/panic/unwind_safe.rs:272:9 (san-data-race+0x9ace2) (BuildId: abaff10be3c90c7a985911bf9fb769fbad66acc6)
#4 std::panicking::try::do_call::ha6f651f9e612b27e /rustc/20ae37c18df95f9246c019b04957d23b4164bf7a/library/std/src/panicking.rs:553:40 (san-data-race+0x95170) (BuildId: abaff10be3c90c7a985911bf9fb769fbad66acc6)
#5 __rust_try ea5e5nbwalr06882ygazitcju (san-data-race+0xa0358) (BuildId: abaff10be3c90c7a985911bf9fb769fbad66acc6)
#6 std::panicking::try::h2adff5b2e4f05561 /rustc/20ae37c18df95f9246c019b04957d23b4164bf7a/library/std/src/panicking.rs:517:19 (san-data-race+0x9f0fe) (BuildId: abaff10be3c90c7a985911bf9fb769fbad66acc6)
#7 std::panic::catch_unwind::h2e6602efc4169fb7 /rustc/20ae37c18df95f9246c019b04957d23b4164bf7a/library/std/src/panic.rs:350:14 (san-data-race+0x9f0fe)
#8 std::thread::Builder::spawn_unchecked_::_$u7b$$u7b$closure$u7d$$u7d$::h40871ab9f42880dc /rustc/20ae37c18df95f9246c019b04957d23b4164bf7a/library/std/src/thread/mod.rs:541:30 (san-data-race+0x9f0fe)
#9 core::ops::function::FnOnce::call_once$u7b$$u7b$vtable.shim$u7d$$u7d$::h2b08e2beafe17b93 /rustc/20ae37c18df95f9246c019b04957d23b4164bf7a/library/core/src/ops/function.rs:250:5 (san-data-race+0x95971) (BuildId: abaff10be3c90c7a985911bf9fb769fbad66acc6)
#10 _$LT$alloc..boxed..Box$LT$F$C$A$GT$$u20$as$u20$core..ops..function..FnOnce$LT$Args$GT$$GT$::call_once::hbdeb5d489bfc9e66 /rustc/20ae37c18df95f9246c019b04957d23b4164bf7a/library/alloc/src/boxed.rs:2064:9 (san-data-race+0xc253a) (BuildId: abaff10be3c90c7a985911bf9fb769fbad66acc6)
#11 _$LT$alloc..boxed..Box$LT$F$C$A$GT$$u20$as$u20$core..ops..function..FnOnce$LT$Args$GT$$GT$::call_once::hba97fe3013ab65e8 /rustc/20ae37c18df95f9246c019b04957d23b4164bf7a/library/alloc/src/boxed.rs:2064:9 (san-data-race+0xc253a)
#12 std::sys::pal::unix::thread::Thread::new::thread_start::h01c5ff475a629e37 /rustc/20ae37c18df95f9246c019b04957d23b4164bf7a/library/std/src/sys/pal/unix/thread.rs:108:17 (san-data-race+0xc253a)
Previous write of size 4 at 0x558040da1948 by main thread:
#0 san_data_race::main::ha84b3f5aaacb66cb /tmp/intro-to-rust/code/memory/src/bin/san-data-race.rs:34:14 (san-data-race+0x98e81) (BuildId: abaff10be3c90c7a985911bf9fb769fbad66acc6)
#1 core::ops::function::FnOnce::call_once::h758322e7ded22bf6 /rustc/20ae37c18df95f9246c019b04957d23b4164bf7a/library/core/src/ops/function.rs:250:5 (san-data-race+0x95b3e) (BuildId: abaff10be3c90c7a985911bf9fb769fbad66acc6)
#2 std::sys::backtrace::__rust_begin_short_backtrace::h8c16abfc9d0ab508 /rustc/20ae37c18df95f9246c019b04957d23b4164bf7a/library/std/src/sys/backtrace.rs:155:18 (san-data-race+0x98c91) (BuildId: abaff10be3c90c7a985911bf9fb769fbad66acc6)
#3 std::rt::lang_start::_$u7b$$u7b$closure$u7d$$u7d$::h153ec660acff75c1 /rustc/20ae37c18df95f9246c019b04957d23b4164bf7a/library/std/src/rt.rs:159:18 (san-data-race+0x9c09e) (BuildId: abaff10be3c90c7a985911bf9fb769fbad66acc6)
#4 core::ops::function::impls::_$LT$impl$u20$core..ops..function..FnOnce$LT$A$GT$$u20$for$u20$$RF$F$GT$::call_once::h8ee6b536c2e4e076 /rustc/20ae37c18df95f9246c019b04957d23b4164bf7a/library/core/src/ops/function.rs:284:13 (san-data-race+0xbaeac) (BuildId: abaff10be3c90c7a985911bf9fb769fbad66acc6)
#5 std::panicking::try::do_call::h5c8c98de8ed5bd5b /rustc/20ae37c18df95f9246c019b04957d23b4164bf7a/library/std/src/panicking.rs:553:40 (san-data-race+0xbaeac)
#6 std::panicking::try::h6315052de0e5fa0e /rustc/20ae37c18df95f9246c019b04957d23b4164bf7a/library/std/src/panicking.rs:517:19 (san-data-race+0xbaeac)
#7 std::panic::catch_unwind::h1530d3793f92a4bb /rustc/20ae37c18df95f9246c019b04957d23b4164bf7a/library/std/src/panic.rs:350:14 (san-data-race+0xbaeac)
#8 std::rt::lang_start_internal::_$u7b$$u7b$closure$u7d$$u7d$::he545ff4063dfc2c8 /rustc/20ae37c18df95f9246c019b04957d23b4164bf7a/library/std/src/rt.rs:141:48 (san-data-race+0xbaeac)
#9 std::panicking::try::do_call::h09c77e8b42da26d9 /rustc/20ae37c18df95f9246c019b04957d23b4164bf7a/library/std/src/panicking.rs:553:40 (san-data-race+0xbaeac)
#10 std::panicking::try::h7a9b2c58b7302b3b /rustc/20ae37c18df95f9246c019b04957d23b4164bf7a/library/std/src/panicking.rs:517:19 (san-data-race+0xbaeac)
#11 std::panic::catch_unwind::h464a2cd7183a7af5 /rustc/20ae37c18df95f9246c019b04957d23b4164bf7a/library/std/src/panic.rs:350:14 (san-data-race+0xbaeac)
#12 std::rt::lang_start_internal::h99fdbebdafe8d634 /rustc/20ae37c18df95f9246c019b04957d23b4164bf7a/library/std/src/rt.rs:141:20 (san-data-race+0xbaeac)
#13 main <null> (san-data-race+0x99049) (BuildId: abaff10be3c90c7a985911bf9fb769fbad66acc6)
Location is global 'san_data_race::SHARED_COUNTER::h58377d13dedd594a' of size 4 at 0x558040da1948 (san-data-race+0x123948)
Thread T2 (tid=174570, running) created by main thread at:
#0 pthread_create /rustc/llvm/src/llvm-project/compiler-rt/lib/tsan/rtl/tsan_interceptors_posix.cpp:1023:3 (san-data-race+0x1497b) (BuildId: abaff10be3c90c7a985911bf9fb769fbad66acc6)
#1 std::sys::pal::unix::thread::Thread::new::h2a5a1c43e1035921 /rustc/20ae37c18df95f9246c019b04957d23b4164bf7a/library/std/src/sys/pal/unix/thread.rs:87:19 (san-data-race+0xc2371) (BuildId: abaff10be3c90c7a985911bf9fb769fbad66acc6)
#2 std::thread::Builder::spawn_unchecked::hd5a840405c885ff3 /rustc/20ae37c18df95f9246c019b04957d23b4164bf7a/library/std/src/thread/mod.rs:456:32 (san-data-race+0x9d025) (BuildId: abaff10be3c90c7a985911bf9fb769fbad66acc6)
#3 std::thread::Builder::spawn::ha557a18b7275cb76 /rustc/20ae37c18df95f9246c019b04957d23b4164bf7a/library/std/src/thread/mod.rs:388:18 (san-data-race+0x9cd46) (BuildId: abaff10be3c90c7a985911bf9fb769fbad66acc6)
#4 std::thread::spawn::h0c5c2fd92f0917d0 /rustc/20ae37c18df95f9246c019b04957d23b4164bf7a/library/std/src/thread/mod.rs:698:20 (san-data-race+0x9cd46)
#5 san_data_race::main::ha84b3f5aaacb66cb /tmp/intro-to-rust/code/memory/src/bin/san-data-race.rs:27:14 (san-data-race+0x98e73) (BuildId: abaff10be3c90c7a985911bf9fb769fbad66acc6)
#6 core::ops::function::FnOnce::call_once::h758322e7ded22bf6 /rustc/20ae37c18df95f9246c019b04957d23b4164bf7a/library/core/src/ops/function.rs:250:5 (san-data-race+0x95b3e) (BuildId: abaff10be3c90c7a985911bf9fb769fbad66acc6)
#7 std::sys::backtrace::__rust_begin_short_backtrace::h8c16abfc9d0ab508 /rustc/20ae37c18df95f9246c019b04957d23b4164bf7a/library/std/src/sys/backtrace.rs:155:18 (san-data-race+0x98c91) (BuildId: abaff10be3c90c7a985911bf9fb769fbad66acc6)
#8 std::rt::lang_start::_$u7b$$u7b$closure$u7d$$u7d$::h153ec660acff75c1 /rustc/20ae37c18df95f9246c019b04957d23b4164bf7a/library/std/src/rt.rs:159:18 (san-data-race+0x9c09e) (BuildId: abaff10be3c90c7a985911bf9fb769fbad66acc6)
#9 core::ops::function::impls::_$LT$impl$u20$core..ops..function..FnOnce$LT$A$GT$$u20$for$u20$$RF$F$GT$::call_once::h8ee6b536c2e4e076 /rustc/20ae37c18df95f9246c019b04957d23b4164bf7a/library/core/src/ops/function.rs:284:13 (san-data-race+0xbaeac) (BuildId: abaff10be3c90c7a985911bf9fb769fbad66acc6)
#10 std::panicking::try::do_call::h5c8c98de8ed5bd5b /rustc/20ae37c18df95f9246c019b04957d23b4164bf7a/library/std/src/panicking.rs:553:40 (san-data-race+0xbaeac)
#11 std::panicking::try::h6315052de0e5fa0e /rustc/20ae37c18df95f9246c019b04957d23b4164bf7a/library/std/src/panicking.rs:517:19 (san-data-race+0xbaeac)
#12 std::panic::catch_unwind::h1530d3793f92a4bb /rustc/20ae37c18df95f9246c019b04957d23b4164bf7a/library/std/src/panic.rs:350:14 (san-data-race+0xbaeac)
#13 std::rt::lang_start_internal::_$u7b$$u7b$closure$u7d$$u7d$::he545ff4063dfc2c8 /rustc/20ae37c18df95f9246c019b04957d23b4164bf7a/library/std/src/rt.rs:141:48 (san-data-race+0xbaeac)
#14 std::panicking::try::do_call::h09c77e8b42da26d9 /rustc/20ae37c18df95f9246c019b04957d23b4164bf7a/library/std/src/panicking.rs:553:40 (san-data-race+0xbaeac)
#15 std::panicking::try::h7a9b2c58b7302b3b /rustc/20ae37c18df95f9246c019b04957d23b4164bf7a/library/std/src/panicking.rs:517:19 (san-data-race+0xbaeac)
#16 std::panic::catch_unwind::h464a2cd7183a7af5 /rustc/20ae37c18df95f9246c019b04957d23b4164bf7a/library/std/src/panic.rs:350:14 (san-data-race+0xbaeac)
#17 std::rt::lang_start_internal::h99fdbebdafe8d634 /rustc/20ae37c18df95f9246c019b04957d23b4164bf7a/library/std/src/rt.rs:141:20 (san-data-race+0xbaeac)
#18 main <null> (san-data-race+0x99049) (BuildId: abaff10be3c90c7a985911bf9fb769fbad66acc6)
SUMMARY: ThreadSanitizer: data race /tmp/intro-to-rust/code/memory/src/bin/san-data-race.rs:30:13 in san_data_race::main::_$u7b$$u7b$closure$u7d$$u7d$::hca1d1aa2bd214a46
==================
ThreadSanitizer: reported 1 warnings
通过报告我们能发现, ThreadSanitizer 确实发现了 data race 问题:
Write of size 4 at 0x558040da1948 by thread T2#0 san_data_race::main:: /tmp/san-data-race.rs:30:13 (san-data-race+0x98906)Previous write of size 4 at 0x558040da1948 by main thread:#0 san_data_race::main:: /tmp//san-data-race.rs:34:14 (san-data-race+0x98e81)
参考
使用 valgrind 检查内存泄露
除了上一节介绍的各种 sanitizer 工具外, valgrind 也常用于检查内存泄露等问题. 但与 sanitizer 相比, valgrind 的执行速度可能要慢三十倍, 因为它们的工作方式不同.
sanitizer 工具是在 LLVM 编译器生成代码时, 插入了内存检查相关的代码, 并且带上了 相应的运行时, 这些代码都被直接编译成了汇编代码. 这个工作依赖于从源代码来编译.
而 valgrind 本质上就是一个虚拟机, 它会解析可执行文件 (ELF格式), 然后读取里面的 每一条汇编指令, 将它反汇编成 VEX IR 中间代码, 然后插入一些 valgrind 的运行时代码, 即所谓的插桩过程, 再将 VEX IR 编译成汇编代码. 这个过程是程序在运行过程时实时进行的, 所以可以想象它会有多慢. 但是好处在于 valgrind 不依赖于程序的源代码, 只要程序可以 运行, 就可以用 valgrind 来检测它的问题.
检测内存泄露
比如, 下面的示例代码中有两个泄露位点:
use std::mem;
fn main() {
let msg = String::from("Hello, Rust");
assert_eq!(msg.chars().count(), 11);
// 创建 ManuallyDrop, 阻止 String::drop() 方法被调用.
mem::forget(msg);
let numbers = vec![1, 2, 3, 5, 8, 13];
let slice = numbers.into_boxed_slice();
// 转换成原始指针, 不会再调用 Vec<i32>::drop() 方法
let _ptr: *mut [i32] = Box::leak(slice);
}先将它编译成 debug 程序, cargo build --bin san-memory-leak, 这样的话可执行文件包含 DWARF 格式的调试信息,
更方便进行错误追踪.
先对它进行检查一般的内存错误:
valgrind ./san-memory-leak
此时 valgrind 提示有内存泄露, 可以加上 --leak-check=full 来跟踪具体的泄露位置:
valgrind --leak-check=full ./san-memory-leak
运行的完整日志如下:
==25294== Memcheck, a memory error detector
==25294== Copyright (C) 2002-2022, and GNU GPL'd, by Julian Seward et al.
==25294== Using Valgrind-3.20.0 and LibVEX; rerun with -h for copyright info
==25294== Command: ./san-memory-leak
==25294== Parent PID: 24939
==25294==
==25294==
==25294== HEAP SUMMARY:
==25294== in use at exit: 35 bytes in 2 blocks
==25294== total heap usage: 11 allocs, 9 frees, 2,195 bytes allocated
==25294==
==25294== 11 bytes in 1 blocks are definitely lost in loss record 1 of 2
==25294== at 0x4840808: malloc (in /usr/libexec/valgrind/vgpreload_memcheck-amd64-linux.so)
==25294== by 0x11D6AA: alloc::alloc::alloc (alloc.rs:100)
==25294== by 0x11D7B6: alloc::alloc::Global::alloc_impl (alloc.rs:183)
==25294== by 0x11DF78: <alloc::alloc::Global as core::alloc::Allocator>::allocate (alloc.rs:243)
==25294== by 0x11EEE0: alloc::raw_vec::RawVec<T,A>::try_allocate_in (raw_vec.rs:230)
==25294== by 0x11CCED: with_capacity_in<u8, alloc::alloc::Global> (raw_vec.rs:158)
==25294== by 0x11CCED: with_capacity_in<u8, alloc::alloc::Global> (mod.rs:699)
==25294== by 0x11CCED: <T as alloc::slice::hack::ConvertVec>::to_vec (slice.rs:162)
==25294== by 0x11D48B: to_vec<u8, alloc::alloc::Global> (slice.rs:111)
==25294== by 0x11D48B: to_vec_in<u8, alloc::alloc::Global> (slice.rs:441)
==25294== by 0x11D48B: to_vec<u8> (slice.rs:416)
==25294== by 0x11D48B: to_owned<u8> (slice.rs:823)
==25294== by 0x11D48B: to_owned (str.rs:211)
==25294== by 0x11D48B: <alloc::string::String as core::convert::From<&str>>::from (string.rs:2711)
==25294== by 0x11E011: san_memory_leak::main (san-memory-leak.rs:8)
==25294== by 0x11E89A: core::ops::function::FnOnce::call_once (function.rs:250)
==25294== by 0x11CF4D: std::sys_common::backtrace::__rust_begin_short_backtrace (backtrace.rs:155)
==25294== by 0x11E2F0: std::rt::lang_start::{{closure}} (rt.rs:159)
==25294== by 0x135BFF: call_once<(), (dyn core::ops::function::Fn<(), Output=i32> + core::marker::Sync + core::panic::unwind_safe::RefUnwindSafe)> (function.rs:284)
==25294== by 0x135BFF: do_call<&(dyn core::ops::function::Fn<(), Output=i32> + core::marker::Sync + core::panic::unwind_safe::RefUnwindSafe), i32> (panicking.rs:559)
==25294== by 0x135BFF: try<i32, &(dyn core::ops::function::Fn<(), Output=i32> + core::marker::Sync + core::panic::unwind_safe::RefUnwindSafe)> (panicking.rs:523)
==25294== by 0x135BFF: catch_unwind<&(dyn core::ops::function::Fn<(), Output=i32> + core::marker::Sync + core::panic::unwind_safe::RefUnwindSafe), i32> (panic.rs:149)
==25294== by 0x135BFF: {closure#2} (rt.rs:141)
==25294== by 0x135BFF: do_call<std::rt::lang_start_internal::{closure_env#2}, isize> (panicking.rs:559)
==25294== by 0x135BFF: try<isize, std::rt::lang_start_internal::{closure_env#2}> (panicking.rs:523)
==25294== by 0x135BFF: catch_unwind<std::rt::lang_start_internal::{closure_env#2}, isize> (panic.rs:149)
==25294== by 0x135BFF: std::rt::lang_start_internal (rt.rs:141)
==25294==
==25294== 24 bytes in 1 blocks are definitely lost in loss record 2 of 2
==25294== at 0x4840808: malloc (in /usr/libexec/valgrind/vgpreload_memcheck-amd64-linux.so)
==25294== by 0x11D6AA: alloc::alloc::alloc (alloc.rs:100)
==25294== by 0x11D7B6: alloc::alloc::Global::alloc_impl (alloc.rs:183)
==25294== by 0x11D5E7: allocate (alloc.rs:243)
==25294== by 0x11D5E7: alloc::alloc::exchange_malloc (alloc.rs:332)
==25294== by 0x11E15D: san_memory_leak::main (san-memory-leak.rs:13)
==25294== by 0x11E89A: core::ops::function::FnOnce::call_once (function.rs:250)
==25294== by 0x11CF4D: std::sys_common::backtrace::__rust_begin_short_backtrace (backtrace.rs:155)
==25294== by 0x11E2F0: std::rt::lang_start::{{closure}} (rt.rs:159)
==25294== by 0x135BFF: call_once<(), (dyn core::ops::function::Fn<(), Output=i32> + core::marker::Sync + core::panic::unwind_safe::RefUnwindSafe)> (function.rs:284)
==25294== by 0x135BFF: do_call<&(dyn core::ops::function::Fn<(), Output=i32> + core::marker::Sync + core::panic::unwind_safe::RefUnwindSafe), i32> (panicking.rs:559)
==25294== by 0x135BFF: try<i32, &(dyn core::ops::function::Fn<(), Output=i32> + core::marker::Sync + core::panic::unwind_safe::RefUnwindSafe)> (panicking.rs:523)
==25294== by 0x135BFF: catch_unwind<&(dyn core::ops::function::Fn<(), Output=i32> + core::marker::Sync + core::panic::unwind_safe::RefUnwindSafe), i32> (panic.rs:149)
==25294== by 0x135BFF: {closure#2} (rt.rs:141)
==25294== by 0x135BFF: do_call<std::rt::lang_start_internal::{closure_env#2}, isize> (panicking.rs:559)
==25294== by 0x135BFF: try<isize, std::rt::lang_start_internal::{closure_env#2}> (panicking.rs:523)
==25294== by 0x135BFF: catch_unwind<std::rt::lang_start_internal::{closure_env#2}, isize> (panic.rs:149)
==25294== by 0x135BFF: std::rt::lang_start_internal (rt.rs:141)
==25294== by 0x11E2C9: std::rt::lang_start (rt.rs:158)
==25294== by 0x11E28D: main (in /tmp/intro-to-rust/target/debug/san-memory-leak)
==25294==
==25294== LEAK SUMMARY:
==25294== definitely lost: 35 bytes in 2 blocks
==25294== indirectly lost: 0 bytes in 0 blocks
==25294== possibly lost: 0 bytes in 0 blocks
==25294== still reachable: 0 bytes in 0 blocks
==25294== suppressed: 0 bytes in 0 blocks
==25294==
==25294== For lists of detected and suppressed errors, rerun with: -s
==25294== ERROR SUMMARY: 2 errors from 2 contexts (suppressed: 0 from 0)
里面有两个关键信息:
==25294== by 0x11E011: san_memory_leak::main (san-memory-leak.rs:8)==25294== by 0x11E15D: san_memory_leak::main (san-memory-leak.rs:13)
这里明确指示了被泄露的内存是在哪个地方分配的, 基于这些信息便可以轻松定位到问题.
检测内存越界
下面的代码示例中有三处内存越界发生:
use std::ptr;
fn main() {
// numbers 在堆内存上分配的空间只有 3 个字节.
let mut numbers: Vec<u8> = vec![0, 1, 2];
// 越界写入
unsafe {
let numbers_ptr = numbers.as_mut_ptr();
// 向 numbers 的堆内存连续写入 4 个字节, 最后一个字节是越界的.
ptr::write_bytes(numbers_ptr, 0xf1, 4);
}
// 越界读取
let _off_last_byte: u8 = unsafe {
// 从 numbers 的堆内存读取第 4 个字节
*numbers.as_ptr().offset(4)
};
let mut numbers2: [i32; 3] = [0, 1, 2];
unsafe {
let numbers2_ptr = ptr::addr_of_mut!(numbers2);
// 栈内存越界写入
ptr::write_bytes(numbers2_ptr, 0x1f, 2);
}
assert_eq!(numbers2[0], 0x1f1f1f1f);
}使用 valgrind ./san-out-of-bounds 来检测, 得到如下的报告:
==41511== Memcheck, a memory error detector
==41511== Copyright (C) 2002-2022, and GNU GPL'd, by Julian Seward et al.
==41511== Using Valgrind-3.20.0 and LibVEX; rerun with -h for copyright info
==41511== Command: ./san-out-of-bounds
==41511== Parent PID: 24939
==41511==
==41511== Invalid write of size 1
==41511== at 0x484AD2E: memset (in /usr/libexec/valgrind/vgpreload_memcheck-amd64-linux.so)
==41511== by 0x11CB89: write_bytes<u8> (intrinsics.rs:3153)
==41511== by 0x11CB89: san_out_of_bounds::main (san-out-of-bounds.rs:15)
==41511== by 0x11C46A: core::ops::function::FnOnce::call_once (function.rs:250)
==41511== by 0x11C5DD: std::sys_common::backtrace::__rust_begin_short_backtrace (backtrace.rs:155)
==41511== by 0x11D030: std::rt::lang_start::{{closure}} (rt.rs:159)
==41511== by 0x13374F: call_once<(), (dyn core::ops::function::Fn<(), Output=i32> + core::marker::Sync + core::panic::unwind_safe::RefUnwindSafe)> (function.rs:284)
==41511== by 0x13374F: do_call<&(dyn core::ops::function::Fn<(), Output=i32> + core::marker::Sync + core::panic::unwind_safe::RefUnwindSafe), i32> (panicking.rs:559)
==41511== by 0x13374F: try<i32, &(dyn core::ops::function::Fn<(), Output=i32> + core::marker::Sync + core::panic::unwind_safe::RefUnwindSafe)> (panicking.rs:523)
==41511== by 0x13374F: catch_unwind<&(dyn core::ops::function::Fn<(), Output=i32> + core::marker::Sync + core::panic::unwind_safe::RefUnwindSafe), i32> (panic.rs:149)
==41511== by 0x13374F: {closure#2} (rt.rs:141)
==41511== by 0x13374F: do_call<std::rt::lang_start_internal::{closure_env#2}, isize> (panicking.rs:559)
==41511== by 0x13374F: try<isize, std::rt::lang_start_internal::{closure_env#2}> (panicking.rs:523)
==41511== by 0x13374F: catch_unwind<std::rt::lang_start_internal::{closure_env#2}, isize> (panic.rs:149)
==41511== by 0x13374F: std::rt::lang_start_internal (rt.rs:141)
==41511== by 0x11D009: std::rt::lang_start (rt.rs:158)
==41511== by 0x11CCFD: main (in /home/shaohua/dev/rust/intro-to-rust/target/debug/san-out-of-bounds)
==41511== Address 0x4aa4b13 is 0 bytes after a block of size 3 alloc'd
==41511== at 0x4840808: malloc (in /usr/libexec/valgrind/vgpreload_memcheck-amd64-linux.so)
==41511== by 0x11C73A: alloc::alloc::alloc (alloc.rs:100)
==41511== by 0x11C846: alloc::alloc::Global::alloc_impl (alloc.rs:183)
==41511== by 0x11C677: allocate (alloc.rs:243)
==41511== by 0x11C677: alloc::alloc::exchange_malloc (alloc.rs:332)
==41511== by 0x11CAEA: san_out_of_bounds::main (san-out-of-bounds.rs:9)
==41511== by 0x11C46A: core::ops::function::FnOnce::call_once (function.rs:250)
==41511== by 0x11C5DD: std::sys_common::backtrace::__rust_begin_short_backtrace (backtrace.rs:155)
==41511== by 0x11D030: std::rt::lang_start::{{closure}} (rt.rs:159)
==41511== by 0x13374F: call_once<(), (dyn core::ops::function::Fn<(), Output=i32> + core::marker::Sync + core::panic::unwind_safe::RefUnwindSafe)> (function.rs:284)
==41511== by 0x13374F: do_call<&(dyn core::ops::function::Fn<(), Output=i32> + core::marker::Sync + core::panic::unwind_safe::RefUnwindSafe), i32> (panicking.rs:559)
==41511== by 0x13374F: try<i32, &(dyn core::ops::function::Fn<(), Output=i32> + core::marker::Sync + core::panic::unwind_safe::RefUnwindSafe)> (panicking.rs:523)
==41511== by 0x13374F: catch_unwind<&(dyn core::ops::function::Fn<(), Output=i32> + core::marker::Sync + core::panic::unwind_safe::RefUnwindSafe), i32> (panic.rs:149)
==41511== by 0x13374F: {closure#2} (rt.rs:141)
==41511== by 0x13374F: do_call<std::rt::lang_start_internal::{closure_env#2}, isize> (panicking.rs:559)
==41511== by 0x13374F: try<isize, std::rt::lang_start_internal::{closure_env#2}> (panicking.rs:523)
==41511== by 0x13374F: catch_unwind<std::rt::lang_start_internal::{closure_env#2}, isize> (panic.rs:149)
==41511== by 0x13374F: std::rt::lang_start_internal (rt.rs:141)
==41511== by 0x11D009: std::rt::lang_start (rt.rs:158)
==41511== by 0x11CCFD: main (in /home/shaohua/dev/rust/intro-to-rust/target/debug/san-out-of-bounds)
==41511==
==41511== Invalid read of size 1
==41511== at 0x11CBC2: san_out_of_bounds::main (san-out-of-bounds.rs:21)
==41511== by 0x11C46A: core::ops::function::FnOnce::call_once (function.rs:250)
==41511== by 0x11C5DD: std::sys_common::backtrace::__rust_begin_short_backtrace (backtrace.rs:155)
==41511== by 0x11D030: std::rt::lang_start::{{closure}} (rt.rs:159)
==41511== by 0x13374F: call_once<(), (dyn core::ops::function::Fn<(), Output=i32> + core::marker::Sync + core::panic::unwind_safe::RefUnwindSafe)> (function.rs:284)
==41511== by 0x13374F: do_call<&(dyn core::ops::function::Fn<(), Output=i32> + core::marker::Sync + core::panic::unwind_safe::RefUnwindSafe), i32> (panicking.rs:559)
==41511== by 0x13374F: try<i32, &(dyn core::ops::function::Fn<(), Output=i32> + core::marker::Sync + core::panic::unwind_safe::RefUnwindSafe)> (panicking.rs:523)
==41511== by 0x13374F: catch_unwind<&(dyn core::ops::function::Fn<(), Output=i32> + core::marker::Sync + core::panic::unwind_safe::RefUnwindSafe), i32> (panic.rs:149)
==41511== by 0x13374F: {closure#2} (rt.rs:141)
==41511== by 0x13374F: do_call<std::rt::lang_start_internal::{closure_env#2}, isize> (panicking.rs:559)
==41511== by 0x13374F: try<isize, std::rt::lang_start_internal::{closure_env#2}> (panicking.rs:523)
==41511== by 0x13374F: catch_unwind<std::rt::lang_start_internal::{closure_env#2}, isize> (panic.rs:149)
==41511== by 0x13374F: std::rt::lang_start_internal (rt.rs:141)
==41511== by 0x11D009: std::rt::lang_start (rt.rs:158)
==41511== by 0x11CCFD: main (in /home/shaohua/dev/rust/intro-to-rust/target/debug/san-out-of-bounds)
==41511== Address 0x4aa4b14 is 1 bytes after a block of size 3 alloc'd
==41511== at 0x4840808: malloc (in /usr/libexec/valgrind/vgpreload_memcheck-amd64-linux.so)
==41511== by 0x11C73A: alloc::alloc::alloc (alloc.rs:100)
==41511== by 0x11C846: alloc::alloc::Global::alloc_impl (alloc.rs:183)
==41511== by 0x11C677: allocate (alloc.rs:243)
==41511== by 0x11C677: alloc::alloc::exchange_malloc (alloc.rs:332)
==41511== by 0x11CAEA: san_out_of_bounds::main (san-out-of-bounds.rs:9)
==41511== by 0x11C46A: core::ops::function::FnOnce::call_once (function.rs:250)
==41511== by 0x11C5DD: std::sys_common::backtrace::__rust_begin_short_backtrace (backtrace.rs:155)
==41511== by 0x11D030: std::rt::lang_start::{{closure}} (rt.rs:159)
==41511== by 0x13374F: call_once<(), (dyn core::ops::function::Fn<(), Output=i32> + core::marker::Sync + core::panic::unwind_safe::RefUnwindSafe)> (function.rs:284)
==41511== by 0x13374F: do_call<&(dyn core::ops::function::Fn<(), Output=i32> + core::marker::Sync + core::panic::unwind_safe::RefUnwindSafe), i32> (panicking.rs:559)
==41511== by 0x13374F: try<i32, &(dyn core::ops::function::Fn<(), Output=i32> + core::marker::Sync + core::panic::unwind_safe::RefUnwindSafe)> (panicking.rs:523)
==41511== by 0x13374F: catch_unwind<&(dyn core::ops::function::Fn<(), Output=i32> + core::marker::Sync + core::panic::unwind_safe::RefUnwindSafe), i32> (panic.rs:149)
==41511== by 0x13374F: {closure#2} (rt.rs:141)
==41511== by 0x13374F: do_call<std::rt::lang_start_internal::{closure_env#2}, isize> (panicking.rs:559)
==41511== by 0x13374F: try<isize, std::rt::lang_start_internal::{closure_env#2}> (panicking.rs:523)
==41511== by 0x13374F: catch_unwind<std::rt::lang_start_internal::{closure_env#2}, isize> (panic.rs:149)
==41511== by 0x13374F: std::rt::lang_start_internal (rt.rs:141)
==41511== by 0x11D009: std::rt::lang_start (rt.rs:158)
==41511== by 0x11CCFD: main (in /tmp/san-out-of-bounds)
==41511==
==41511==
==41511== HEAP SUMMARY:
==41511== in use at exit: 0 bytes in 0 blocks
==41511== total heap usage: 10 allocs, 10 frees, 2,163 bytes allocated
==41511==
==41511== All heap blocks were freed -- no leaks are possible
==41511==
==41511== For lists of detected and suppressed errors, rerun with: -s
==41511== ERROR SUMMARY: 2 errors from 2 contexts (suppressed: 0 from 0)
可以看到, valgrind 只检测出了堆内存读写相关的两处错误, 但并没能发现栈内存写入越界问题:
==41511== by 0x11CB89: san_out_of_bounds::main (san-out-of-bounds.rs:15)==41511== at 0x11CBC2: san_out_of_bounds::main (san-out-of-bounds.rs:21)
访问已被释放的内存 use after free
以下的代码示例中, 错误地访问了已经被释放的堆内存:
use std::ptr;
fn main() {
let mut msg = String::from("Hello, Rust");
let msg_ptr = msg.as_mut_ptr();
// 释放 msg 的堆内存
drop(msg);
unsafe {
// 将 msg 中的字符 `R` 转为小写
ptr::write_bytes(msg_ptr.offset(8), b'r', 1);
}
}现在使用 valgrind 来检测, valgrind ./san-use-after-free, 输出了以下日志:
==48059== Memcheck, a memory error detector
==48059== Copyright (C) 2002-2022, and GNU GPL'd, by Julian Seward et al.
==48059== Using Valgrind-3.20.0 and LibVEX; rerun with -h for copyright info
==48059== Command: ./san-use-after-free
==48059== Parent PID: 24939
==48059==
==48059== Invalid write of size 1
==48059== at 0x484AD19: memset (in /usr/libexec/valgrind/vgpreload_memcheck-amd64-linux.so)
==48059== by 0x11CFCB: write_bytes<u8> (intrinsics.rs:3153)
==48059== by 0x11CFCB: san_use_after_free::main (san-use-after-free.rs:13)
==48059== by 0x11D08A: core::ops::function::FnOnce::call_once (function.rs:250)
==48059== by 0x11DA4D: std::sys_common::backtrace::__rust_begin_short_backtrace (backtrace.rs:155)
==48059== by 0x11CB60: std::rt::lang_start::{{closure}} (rt.rs:159)
==48059== by 0x1340BF: call_once<(), (dyn core::ops::function::Fn<(), Output=i32> + core::marker::Sync + core::panic::unwind_safe::RefUnwindSafe)> (function.rs:284)
==48059== by 0x1340BF: do_call<&(dyn core::ops::function::Fn<(), Output=i32> + core::marker::Sync + core::panic::unwind_safe::RefUnwindSafe), i32> (panicking.rs:559)
==48059== by 0x1340BF: try<i32, &(dyn core::ops::function::Fn<(), Output=i32> + core::marker::Sync + core::panic::unwind_safe::RefUnwindSafe)> (panicking.rs:523)
==48059== by 0x1340BF: catch_unwind<&(dyn core::ops::function::Fn<(), Output=i32> + core::marker::Sync + core::panic::unwind_safe::RefUnwindSafe), i32> (panic.rs:149)
==48059== by 0x1340BF: {closure#2} (rt.rs:141)
==48059== by 0x1340BF: do_call<std::rt::lang_start_internal::{closure_env#2}, isize> (panicking.rs:559)
==48059== by 0x1340BF: try<isize, std::rt::lang_start_internal::{closure_env#2}> (panicking.rs:523)
==48059== by 0x1340BF: catch_unwind<std::rt::lang_start_internal::{closure_env#2}, isize> (panic.rs:149)
==48059== by 0x1340BF: std::rt::lang_start_internal (rt.rs:141)
==48059== by 0x11CB39: std::rt::lang_start (rt.rs:158)
==48059== by 0x11D01D: main (in /tmp/san-use-after-free)
==48059== Address 0x4aa4b18 is 8 bytes inside a block of size 11 free'd
==48059== at 0x48431EF: free (in /usr/libexec/valgrind/vgpreload_memcheck-amd64-linux.so)
==48059== by 0x11CA6F: dealloc (alloc.rs:119)
==48059== by 0x11CA6F: <alloc::alloc::Global as core::alloc::Allocator>::deallocate (alloc.rs:256)
==48059== by 0x11D1AD: <alloc::raw_vec::RawVec<T,A> as core::ops::drop::Drop>::drop (raw_vec.rs:583)
==48059== by 0x11D109: core::ptr::drop_in_place<alloc::raw_vec::RawVec<u8>> (mod.rs:514)
==48059== by 0x11D0DA: core::ptr::drop_in_place<alloc::vec::Vec<u8>> (mod.rs:514)
==48059== by 0x11D099: core::ptr::drop_in_place<alloc::string::String> (mod.rs:514)
==48059== by 0x11CEB5: core::mem::drop (mod.rs:938)
==48059== by 0x11CF68: san_use_after_free::main (san-use-after-free.rs:10)
==48059== by 0x11D08A: core::ops::function::FnOnce::call_once (function.rs:250)
==48059== by 0x11DA4D: std::sys_common::backtrace::__rust_begin_short_backtrace (backtrace.rs:155)
==48059== by 0x11CB60: std::rt::lang_start::{{closure}} (rt.rs:159)
==48059== by 0x1340BF: call_once<(), (dyn core::ops::function::Fn<(), Output=i32> + core::marker::Sync + core::panic::unwind_safe::RefUnwindSafe)> (function.rs:284)
==48059== by 0x1340BF: do_call<&(dyn core::ops::function::Fn<(), Output=i32> + core::marker::Sync + core::panic::unwind_safe::RefUnwindSafe), i32> (panicking.rs:559)
==48059== by 0x1340BF: try<i32, &(dyn core::ops::function::Fn<(), Output=i32> + core::marker::Sync + core::panic::unwind_safe::RefUnwindSafe)> (panicking.rs:523)
==48059== by 0x1340BF: catch_unwind<&(dyn core::ops::function::Fn<(), Output=i32> + core::marker::Sync + core::panic::unwind_safe::RefUnwindSafe), i32> (panic.rs:149)
==48059== by 0x1340BF: {closure#2} (rt.rs:141)
==48059== by 0x1340BF: do_call<std::rt::lang_start_internal::{closure_env#2}, isize> (panicking.rs:559)
==48059== by 0x1340BF: try<isize, std::rt::lang_start_internal::{closure_env#2}> (panicking.rs:523)
==48059== by 0x1340BF: catch_unwind<std::rt::lang_start_internal::{closure_env#2}, isize> (panic.rs:149)
==48059== by 0x1340BF: std::rt::lang_start_internal (rt.rs:141)
==48059== Block was alloc'd at
==48059== at 0x4840808: malloc (in /usr/libexec/valgrind/vgpreload_memcheck-amd64-linux.so)
==48059== by 0x11C73A: alloc::alloc::alloc (alloc.rs:100)
==48059== by 0x11C846: alloc::alloc::Global::alloc_impl (alloc.rs:183)
==48059== by 0x11CAC8: <alloc::alloc::Global as core::alloc::Allocator>::allocate (alloc.rs:243)
==48059== by 0x11D6C0: alloc::raw_vec::RawVec<T,A>::try_allocate_in (raw_vec.rs:230)
==48059== by 0x11D91D: with_capacity_in<u8, alloc::alloc::Global> (raw_vec.rs:158)
==48059== by 0x11D91D: with_capacity_in<u8, alloc::alloc::Global> (mod.rs:699)
==48059== by 0x11D91D: <T as alloc::slice::hack::ConvertVec>::to_vec (slice.rs:162)
==48059== by 0x11CD5B: to_vec<u8, alloc::alloc::Global> (slice.rs:111)
==48059== by 0x11CD5B: to_vec_in<u8, alloc::alloc::Global> (slice.rs:441)
==48059== by 0x11CD5B: to_vec<u8> (slice.rs:416)
==48059== by 0x11CD5B: to_owned<u8> (slice.rs:823)
==48059== by 0x11CD5B: to_owned (str.rs:211)
==48059== by 0x11CD5B: <alloc::string::String as core::convert::From<&str>>::from (string.rs:2711)
==48059== by 0x11CEEB: san_use_after_free::main (san-use-after-free.rs:8)
==48059== by 0x11D08A: core::ops::function::FnOnce::call_once (function.rs:250)
==48059== by 0x11DA4D: std::sys_common::backtrace::__rust_begin_short_backtrace (backtrace.rs:155)
==48059== by 0x11CB60: std::rt::lang_start::{{closure}} (rt.rs:159)
==48059== by 0x1340BF: call_once<(), (dyn core::ops::function::Fn<(), Output=i32> + core::marker::Sync + core::panic::unwind_safe::RefUnwindSafe)> (function.rs:284)
==48059== by 0x1340BF: do_call<&(dyn core::ops::function::Fn<(), Output=i32> + core::marker::Sync + core::panic::unwind_safe::RefUnwindSafe), i32> (panicking.rs:559)
==48059== by 0x1340BF: try<i32, &(dyn core::ops::function::Fn<(), Output=i32> + core::marker::Sync + core::panic::unwind_safe::RefUnwindSafe)> (panicking.rs:523)
==48059== by 0x1340BF: catch_unwind<&(dyn core::ops::function::Fn<(), Output=i32> + core::marker::Sync + core::panic::unwind_safe::RefUnwindSafe), i32> (panic.rs:149)
==48059== by 0x1340BF: {closure#2} (rt.rs:141)
==48059== by 0x1340BF: do_call<std::rt::lang_start_internal::{closure_env#2}, isize> (panicking.rs:559)
==48059== by 0x1340BF: try<isize, std::rt::lang_start_internal::{closure_env#2}> (panicking.rs:523)
==48059== by 0x1340BF: catch_unwind<std::rt::lang_start_internal::{closure_env#2}, isize> (panic.rs:149)
==48059== by 0x1340BF: std::rt::lang_start_internal (rt.rs:141)
==48059==
==48059==
==48059== HEAP SUMMARY:
==48059== in use at exit: 0 bytes in 0 blocks
==48059== total heap usage: 10 allocs, 10 frees, 2,171 bytes allocated
==48059==
==48059== All heap blocks were freed -- no leaks are possible
==48059==
==48059== For lists of detected and suppressed errors, rerun with: -s
==48059== ERROR SUMMARY: 1 errors from 1 contexts (suppressed: 0 from 0)
可以看出, valgrind 确定发现了 use-after-free 的错误, 而且给出了精准定位:
==48059== by 0x11CFCB: san_use_after_free::main (san-use-after-free.rs:13)
访问未初始化的内存 uninit
以下的代码片段包含了未初始化内存的错误:
use std::mem;
fn main() {
let x_uninit = mem::MaybeUninit::<i32>::uninit();
let x = unsafe {
x_uninit.assume_init()
};
if x == 2 {
println!("x is 2");
}
}使用 valgrind 来检测, valgrind ./san-memory-uninit, 得到了以下日志:
==57348== Memcheck, a memory error detector
==57348== Copyright (C) 2002-2022, and GNU GPL'd, by Julian Seward et al.
==57348== Using Valgrind-3.20.0 and LibVEX; rerun with -h for copyright info
==57348== Command: ./san-memory-uninit
==57348== Parent PID: 24939
==57348==
==57348== Conditional jump or move depends on uninitialised value(s)
==57348== at 0x11C50B: san_memory_uninit::main (san-memory-uninit.rs:12)
==57348== by 0x11C65A: core::ops::function::FnOnce::call_once (function.rs:250)
==57348== by 0x11C4DD: std::sys_common::backtrace::__rust_begin_short_backtrace (backtrace.rs:155)
==57348== by 0x11C6D0: std::rt::lang_start::{{closure}} (rt.rs:159)
==57348== by 0x132D1F: call_once<(), (dyn core::ops::function::Fn<(), Output=i32> + core::marker::Sync + core::panic::unwind_safe::RefUnwindSafe)> (function.rs:284)
==57348== by 0x132D1F: do_call<&(dyn core::ops::function::Fn<(), Output=i32> + core::marker::Sync + core::panic::unwind_safe::RefUnwindSafe), i32> (panicking.rs:559)
==57348== by 0x132D1F: try<i32, &(dyn core::ops::function::Fn<(), Output=i32> + core::marker::Sync + core::panic::unwind_safe::RefUnwindSafe)> (panicking.rs:523)
==57348== by 0x132D1F: catch_unwind<&(dyn core::ops::function::Fn<(), Output=i32> + core::marker::Sync + core::panic::unwind_safe::RefUnwindSafe), i32> (panic.rs:149)
==57348== by 0x132D1F: {closure#2} (rt.rs:141)
==57348== by 0x132D1F: do_call<std::rt::lang_start_internal::{closure_env#2}, isize> (panicking.rs:559)
==57348== by 0x132D1F: try<isize, std::rt::lang_start_internal::{closure_env#2}> (panicking.rs:523)
==57348== by 0x132D1F: catch_unwind<std::rt::lang_start_internal::{closure_env#2}, isize> (panic.rs:149)
==57348== by 0x132D1F: std::rt::lang_start_internal (rt.rs:141)
==57348== by 0x11C6A9: std::rt::lang_start (rt.rs:158)
==57348== by 0x11C54D: main (in /tmp/san-memory-uninit)
==57348==
==57348==
==57348== HEAP SUMMARY:
==57348== in use at exit: 0 bytes in 0 blocks
==57348== total heap usage: 10 allocs, 10 frees, 3,184 bytes allocated
==57348==
==57348== All heap blocks were freed -- no leaks are possible
==57348==
==57348== Use --track-origins=yes to see where uninitialised values come from
==57348== For lists of detected and suppressed errors, rerun with: -s
==57348== ERROR SUMMARY: 1 errors from 1 contexts (suppressed: 0 from 0)
日志里显示了完整的错误:
==57348== Conditional jump or move depends on uninitialised value(s)==57348== at 0x11C50B: san_memory_uninit::main (san-memory-uninit.rs:12)
检测循环引用 Cyclic references
循环引用的问题常出现在 Rc/Arc 等以引用计数的方式来管理对象的地方. 以下一个示例展示了二叉树中的循环引用问题:
use std::cell::RefCell;
use std::rc::Rc;
#[derive(Default)]
struct TreeNode {
left: Option<Rc<RefCell<TreeNode>>>,
right: Option<Rc<RefCell<TreeNode>>>,
val: i32,
}
impl TreeNode {
#[must_use]
#[inline]
pub const fn is_leaf(&self) -> bool {
self.left.is_none() && self.right.is_none()
}
}
impl Drop for TreeNode {
fn drop(&mut self) {
println!("Will drop node with value: {}", self.val);
}
}
fn main() {
let leaf_node = Rc::new(RefCell::new(TreeNode::default()));
assert!(leaf_node.borrow().is_leaf());
let node1 = Rc::new(RefCell::new(TreeNode {
left: None,
right: Some(leaf_node.clone()),
val: 42,
}));
let node2 = Rc::new(RefCell::new(TreeNode {
left: Some(leaf_node.clone()),
right: Some(node1.clone()),
val: 12,
}));
// 制造一个循环引用
node1.borrow_mut().left = Some(node2.clone());
// 程序运行结束后, node1 和 node2 都不会被正确的释放
}循环引用会导致节点上的对象不能被正常的释放, 内存不会回收并出现内存泄露的问题.
使用 valgrind 来检测, valgrind --check-leak=full ./san-cyclic-references, 得到了以下日志:
==165066== Memcheck, a memory error detector
==165066== Copyright (C) 2002-2022, and GNU GPL'd, by Julian Seward et al.
==165066== Using Valgrind-3.20.0 and LibVEX; rerun with -h for copyright info
==165066== Command: ./san-cyclic-references
==165066== Parent PID: 24939
==165066==
==165066==
==165066== HEAP SUMMARY:
==165066== in use at exit: 144 bytes in 3 blocks
==165066== total heap usage: 12 allocs, 9 frees, 2,304 bytes allocated
==165066==
==165066== 144 (48 direct, 96 indirect) bytes in 1 blocks are definitely lost in loss record 3 of 3
==165066== at 0x4840808: malloc (in /usr/libexec/valgrind/vgpreload_memcheck-amd64-linux.so)
==165066== by 0x11E32A: alloc::alloc::alloc (alloc.rs:100)
==165066== by 0x11E436: alloc::alloc::Global::alloc_impl (alloc.rs:183)
==165066== by 0x11E267: allocate (alloc.rs:243)
==165066== by 0x11E267: alloc::alloc::exchange_malloc (alloc.rs:332)
==165066== by 0x11D56C: new<alloc::rc::RcBox<core::cell::RefCell<san_cyclic_references::TreeNode>>> (boxed.rs:218)
==165066== by 0x11D56C: alloc::rc::Rc<T>::new (rc.rs:398)
==165066== by 0x11DA0A: san_cyclic_references::main (san-cyclic-references.rs:33)
==165066== by 0x11CF3A: core::ops::function::FnOnce::call_once (function.rs:250)
==165066== by 0x11E67D: std::sys_common::backtrace::__rust_begin_short_backtrace (backtrace.rs:155)
==165066== by 0x11E6F0: std::rt::lang_start::{{closure}} (rt.rs:159)
==165066== by 0x134E5F: call_once<(), (dyn core::ops::function::Fn<(), Output=i32> + core::marker::Sync + core::panic::unwind_safe::RefUnwindSafe)> (function.rs:284)
==165066== by 0x134E5F: do_call<&(dyn core::ops::function::Fn<(), Output=i32> + core::marker::Sync + core::panic::unwind_safe::RefUnwindSafe), i32> (panicking.rs:559)
==165066== by 0x134E5F: try<i32, &(dyn core::ops::function::Fn<(), Output=i32> + core::marker::Sync + core::panic::unwind_safe::RefUnwindSafe)> (panicking.rs:523)
==165066== by 0x134E5F: catch_unwind<&(dyn core::ops::function::Fn<(), Output=i32> + core::marker::Sync + core::panic::unwind_safe::RefUnwindSafe), i32> (panic.rs:149)
==165066== by 0x134E5F: {closure#2} (rt.rs:141)
==165066== by 0x134E5F: do_call<std::rt::lang_start_internal::{closure_env#2}, isize> (panicking.rs:559)
==165066== by 0x134E5F: try<isize, std::rt::lang_start_internal::{closure_env#2}> (panicking.rs:523)
==165066== by 0x134E5F: catch_unwind<std::rt::lang_start_internal::{closure_env#2}, isize> (panic.rs:149)
==165066== by 0x134E5F: std::rt::lang_start_internal (rt.rs:141)
==165066== by 0x11E6C9: std::rt::lang_start (rt.rs:158)
==165066== by 0x11DDBD: main (in /tmp/san-cyclic-references)
==165066==
==165066== LEAK SUMMARY:
==165066== definitely lost: 48 bytes in 1 blocks
==165066== indirectly lost: 96 bytes in 2 blocks
==165066== possibly lost: 0 bytes in 0 blocks
==165066== still reachable: 0 bytes in 0 blocks
==165066== suppressed: 0 bytes in 0 blocks
==165066==
==165066== For lists of detected and suppressed errors, rerun with: -s
==165066== ERROR SUMMARY: 1 errors from 1 contexts (suppressed: 0 from 0)
可以看到 valgrind 确实检测到了堆内存泄露的问题:
==165066== by 0x11DA0A: san_cyclic_references::main (san-cyclic-references.rs:33)
只是另一个泄露点 (san-cyclic-references.rs:38) 并没有被定位到.
检测数据竞态 Data race
多个线程访问同一块内存时, 应该使用互斥锁等手段, 确保不会发生 data race condition.
另外, 如果使用了线程本地存储 (Thread local storage) 的话, 它在每个线程中被单独保存了一份, 各线程只会访问内部的那一份克隆, 所以不存在 data race.
看下面的例子:
use std::cell::Cell;
use std::thread;
// 初始化为 1.
thread_local!(static TLS_COUNTER: Cell<i32> = const { Cell::new(1) });
// 全局变量, 该变量位于 data segment.
static mut SHARED_COUNTER: i32 = 1;
fn main() {
// 设置主线程的 TLS_COUNTER 实例的值为 2.
TLS_COUNTER.set(2);
let t1 = thread::spawn(move || {
// 线程启动时, TLS_COUNTER 的值是 1.
assert_eq!(TLS_COUNTER.get(), 1);
// 修改线程内部的 TLS_COUNTER 实例.
TLS_COUNTER.set(3);
});
TLS_COUNTER.set(4);
t1.join().unwrap();
// 读取主线程中的 TLS_COUNTER 实例.
assert_eq!(TLS_COUNTER.get(), 4);
// 没有任何保护手段的情况下, 直接访问全局变量.
unsafe { SHARED_COUNTER = 2; }
let t2 = thread::spawn(|| {
unsafe {
// 可能发生 data race
SHARED_COUNTER = 3;
}
});
// 可能发生 data race
unsafe { SHARED_COUNTER = 4; }
t2.join().unwrap();
// 无法确定 SHARED_COUNTER 的值
unsafe { assert!(SHARED_COUNTER == 3 || SHARED_COUNTER == 4); }
let _x = 11;
}使用 valgrind 的 Helgrind 来检测线程相关的问题,
valgrind --tool=helgrind ./san-data-race,
得到了以下日志:
==174647== Helgrind, a thread error detector
==174647== Copyright (C) 2007-2017, and GNU GPL'd, by OpenWorks LLP et al.
==174647== Using Valgrind-3.20.0 and LibVEX; rerun with -h for copyright info
==174647== Command: ./san-data-race
==174647== Parent PID: 24939
==174647==
==174647== ---Thread-Announcement------------------------------------------
==174647==
==174647== Thread #1 is the program's root thread
==174647==
==174647== ---Thread-Announcement------------------------------------------
==174647==
==174647== Thread #3 was created
==174647== at 0x49D086F: clone (clone.S:76)
==174647== by 0x49D09C0: __clone_internal_fallback (clone-internal.c:71)
==174647== by 0x49D09C0: __clone_internal (clone-internal.c:117)
==174647== by 0x494E9EF: create_thread (pthread_create.c:297)
==174647== by 0x494F49D: pthread_create@@GLIBC_2.34 (pthread_create.c:833)
==174647== by 0x484BDD5: ??? (in /usr/libexec/valgrind/vgpreload_helgrind-amd64-linux.so)
==174647== by 0x146971: std::sys::pal::unix::thread::Thread::new (thread.rs:87)
==174647== by 0x126FCC: std::thread::Builder::spawn_unchecked_ (mod.rs:580)
==174647== by 0x12657E: std::thread::Builder::spawn_unchecked (mod.rs:456)
==174647== by 0x1264A1: spawn<san_data_race::main::{closure_env#1}, ()> (mod.rs:388)
==174647== by 0x1264A1: std::thread::spawn (mod.rs:697)
==174647== by 0x124D32: san_data_race::main (san-data-race.rs:27)
==174647== by 0x1234FA: core::ops::function::FnOnce::call_once (function.rs:250)
==174647== by 0x12033D: std::sys_common::backtrace::__rust_begin_short_backtrace (backtrace.rs:155)
==174647==
==174647== ----------------------------------------------------------------
==174647==
==174647== Possible data race during write of size 4 at 0x16ADD0 by thread #1
==174647== Locks held: none
==174647== at 0x124D33: san_data_race::main (san-data-race.rs:34)
==174647== by 0x1234FA: core::ops::function::FnOnce::call_once (function.rs:250)
==174647== by 0x12033D: std::sys_common::backtrace::__rust_begin_short_backtrace (backtrace.rs:155)
==174647== by 0x1226C0: std::rt::lang_start::{{closure}} (rt.rs:159)
==174647== by 0x13F0AF: call_once<(), (dyn core::ops::function::Fn<(), Output=i32> + core::marker::Sync + core::panic::unwind_safe::RefUnwindSafe)> (function.rs:284)
==174647== by 0x13F0AF: do_call<&(dyn core::ops::function::Fn<(), Output=i32> + core::marker::Sync + core::panic::unwind_safe::RefUnwindSafe), i32> (panicking.rs:559)
==174647== by 0x13F0AF: try<i32, &(dyn core::ops::function::Fn<(), Output=i32> + core::marker::Sync + core::panic::unwind_safe::RefUnwindSafe)> (panicking.rs:523)
==174647== by 0x13F0AF: catch_unwind<&(dyn core::ops::function::Fn<(), Output=i32> + core::marker::Sync + core::panic::unwind_safe::RefUnwindSafe), i32> (panic.rs:149)
==174647== by 0x13F0AF: {closure#2} (rt.rs:141)
==174647== by 0x13F0AF: do_call<std::rt::lang_start_internal::{closure_env#2}, isize> (panicking.rs:559)
==174647== by 0x13F0AF: try<isize, std::rt::lang_start_internal::{closure_env#2}> (panicking.rs:523)
==174647== by 0x13F0AF: catch_unwind<std::rt::lang_start_internal::{closure_env#2}, isize> (panic.rs:149)
==174647== by 0x13F0AF: std::rt::lang_start_internal (rt.rs:141)
==174647== by 0x122699: std::rt::lang_start (rt.rs:158)
==174647== by 0x124F3D: main (in /tmp/san-data-race)
==174647==
==174647== This conflicts with a previous write of size 4 by thread #3
==174647== Locks held: none
==174647== at 0x122A30: san_data_race::main::{{closure}} (san-data-race.rs:30)
==174647== by 0x120365: std::sys_common::backtrace::__rust_begin_short_backtrace (backtrace.rs:155)
==174647== by 0x128685: std::thread::Builder::spawn_unchecked_::{{closure}}::{{closure}} (mod.rs:542)
==174647== by 0x121025: <core::panic::unwind_safe::AssertUnwindSafe<F> as core::ops::function::FnOnce<()>>::call_once (unwind_safe.rs:272)
==174647== by 0x12054B: std::panicking::try::do_call (panicking.rs:559)
==174647== by 0x1206FA: __rust_try (in /tmp/san-data-race)
==174647== by 0x120485: std::panicking::try (panicking.rs:523)
==174647== by 0x127D46: catch_unwind<core::panic::unwind_safe::AssertUnwindSafe<std::thread::{impl#0}::spawn_unchecked_::{closure#2}::{closure_env#0}<san_data_race::main::{closure_env#1}, ()>>, ()> (panic.rs:149)
==174647== by 0x127D46: std::thread::Builder::spawn_unchecked_::{{closure}} (mod.rs:541)
==174647== Address 0x16add0 is 0 bytes inside data symbol "_ZN13san_data_race14SHARED_COUNTER17h75b4b0961c850d6dE"
==174647==
==174647==
==174647== Use --history-level=approx or =none to gain increased speed, at
==174647== the cost of reduced accuracy of conflicting-access information
==174647== For lists of detected and suppressed errors, rerun with: -s
==174647== ERROR SUMMARY: 1 errors from 1 contexts (suppressed: 0 from 0)
可以看到 valgrind 确实检测到了堆内存泄露的问题:
Possible data race during write of size 4 at 0x16ADD0 by thread #1at 0x124D33: san_data_race::main (san-data-race.rs:34)This conflicts with a previous write of size 4 by thread #3at 0x122A30: san_data_race::main::{{closure}} (san-data-race.rs:30)
valgrind 的其它模块
除了上面提到的功能,valgrind 还可以检查 CPU 缓存及分支预测的命中率:
valgrind --tool=cachegrind your-app
Miri
内存分配器
默认情况下, Rust 使用系统中的 libc 提供的内存分配器, 对于 linux 平台来说, 就是 glibc 里面的 allocator.
但是, Rust 也支持使用自定义的内存分配器.
这里的 Jemalloc 是实现了 alloca::GlobalAlloc trait 接口的. 该接口只是简单定义了
两个方法:
pub trait GlobalAlloc {
unsafe fn alloc(&self, layout: Layout) -> *mut u8;
unsafe fn dealloc(&self, ptr: *mut u8, layout: Layout);
}参考
- https://doc.rust-lang.org/stable/edition-guide/rust-next/no-jemalloc.html
- https://doc.rust-lang.org/stable/edition-guide/rust-2018/platform-and-target-support/global-allocators.html
- https://doc.rust-lang.org/std/alloc/trait.GlobalAlloc.html
内存分配器关系图
GlobalAlloctraitAllocatortrait- struct System,
impl GlobalAlloc - struct Global,
impl Allocator - allocator-api
内存分配器的基本接口 GlobalAlloc
Allocator trait
目前尽管 allocator api 还是不稳定的 (unstable), 标准库还是提供了几个已经可用的接口, 接下来我们会单独介绍它们.
alloc()
alloc_zeroed()
realloc()
dealloc()
参考
标准库中的内存分配器
自定义内存分配器
自己手动实现一个简单版的内存分配器
Arena 分配器
jemalloc 库
经常被使用的 jemalloc:
首先是引入 jemallocator 这个包:
[dependencies]
jemallocator = "0.3"
之后自己代的根文件中定义一个全局内存分配器变量:
#[global_allocator]
static ALLOC: jemallocator::Jemalloc = jemallocator::Jemalloc;这样就可以让自己的项目使用jemalloc 库了.
遗留的问题
- 系统的内存分配器与jemalloc 可以混用吗? 会出现什么问题?
Linux 下的线程同步
线程的基本操作 Pthread
取消线程 Thread Cancellation
线程相关的更多信息
线程同步 Thread Synchronization
互斥锁 Mutex
读写锁 RwLock
自旋锁 Spinlock
内存屏障 Barrier
信号量 Semaphore
信号量相关的同步方式, 我们放在了下个章节来介绍.
Per-thread Storage
One-time initialization
Thread-Specific Data
Thread-Local Storage
[Thread-Local Storage 是如何实现的
Linux 下的进程间通信 IPC
进程间通信概述 Overview
通信 Communication
同步 Synchronization
- signal
- file locking
- unix domain socket
- system v semaphore
- posix semaphore
信号 Signal
文件锁 File Locking
管道 Pipe
FIFO
FIFO 又称为 具名管道 Named pipe.
eventfd
Unix Domain Socket
System V IPC
System V Message Queue
System V Semaphore
System V Shared Memory
内存映射 Memory Map
POSIX IPC
POSIX Message Queue
POSIX Semaphore
POSIX Shared Memory
并发编程基础 Concurrency
什么是并发?
"Multiple logical threads of execution with unknown iter-task dependencies", by Daisy Hollman
参考
- KAIST CS431: Concurrent Programming
- Rust Atomics and Locks: Low-Level Concurrency in Practice
- Back to Basics: C++ Concurrency - David Olsen - CppCon 2023
- The Art of Multiprocessor Programming - 2nd edition
- Fundamentals of Parallel Multicore Architecture
并发编程模型 concurrency models
根据并发模块之间的通信方式的不同, 可以有两种分类:
- 基于共享内存的并发 shared-memory concurrency
- 基于消息传递的并发 message-passing concurrency
根据并发模块运行方式的不同, 可以有这几种分类:
- 多进程, 进程由内核控制
- 系统级多线程 (os threads), 线程由内核控制
- 事件驱动 (event-driven programming), 与回调 (callback) 相结合, 当事件发生时回调函数被触发
- Coroutines, 与多线程相同,不需要修改编程模型; 与 async 类似, 它们可以支持大量的任务
- actor model, 除了编程语言支持它之外, 例如比较出名的 erlang, 也有不少框架也有实现这种模型, 比如 rust 里的 actix 库
- async/await, 支持基于少数的系统级线程创建大量的任务 (tasks, 有时会被称为用户级线程), 而编写代码的过程与正常的顺序式编程基本一致
要注意的是, rust 并不排斥其它并发模型, 这些模型都有开源的 crate 实现. 接下来几节会对它们单独解释.
参考
- concurrency
- Event-driven programming
- Actor model
- The C11 and C++11 Concurrency Model
- Hands-On Concurrency with Rust
线程
thread spawn
thread scope
线程本地存储 Thread Local Storage
多线程与线程池
Spawn-Join
在线程之间共享不可变更的数据 shared immutable data
在线程之间共享可变更的状态 shared mutable states
Rayon 线程池库
TODO: Move to crates.io/
Send 与 Sync trait
-
Types that implement
Sendare safe to pass by value to another thread. They can be moved across threads. -
Types that implement
Syncare safe to pass by non-mut reference to another thread. They can be shared across threads. -
当一个 struct 中的元素都实现了
Sendtrait 时, 该 struct 类型也自动实现了Sendtrait. -
当一个 struct 中的元素都实现了
Synctrait 时, 该 struct 类型也自动实现了Synctrait.
以下类型实现了 Sync:
i32bool&strStringTcpStreamHashMap<T1, T2>
以下类型实现了 Send:
Cell<T>Receiver<T>
以下类型啥都没实现:
-
Rc<T> -
*mut u8 -
当使用
spawn()创建线程时, 它捕获的闭包 (closure) 必须都实现了Sendtrait. -
当把一个值通过
channel发送给另一个线程时, 该值必须实现Sendtrait.
基于共享内存的并发带来的不确定性
线程之间共享内存 (shared mutable states) 时的不确定性:
- 线程间交错运行 (thread interleaving), 导致线程之间的读写指令被交错执行
- CPU 进行的指令重排 (reordering), 导致线程内部的读写指令被重新排布
线程间交错运行
线程间的交换运行, 是由操作系统内核的调度器 (scheduler) 控制的.
看一个例子:
static COUNTER = AtomicUsize::new(0);
// thread A & B
let c = COUNTER.load();
COUNTER.store(c + 1);问题, 线程A 和 B 交错运行带来的不确定性:
[COUNTER = 0]Thread#A load()Thread#B load()Thread#A store()Thread#B store()[COUNTER = 1]
解决方案, 修改以上指令, 使用原子化的读写内存指令 (atomically reading & writing):
Read-modify-write模式swap()compare-and-swap()fetch-and-add()
基于以上读写模式修改后的代码:
static COUNTER = AtomicUsize::new(0);
// thread A & B
let c = COUNTER.fetch_and_add(1);运行效果如下:
[COUNTER = 0]Thread#A fetch_and_add()Thread#B fetch_and_add()[COUNTER = 2]
CPU 进行的指令重排
线程内读写指令的重新排布, 是 CPU 或者编译器为了优化指令的性能.
举个例子, 下面的代码片段中, FLAG 是在线程 A 和 B 之间共享的, 比如其类型是 AtomicI32 :
Thread# A || Thread# B
||
DATA = 42; || if FLAG.load() {
FLAG.store(1); || assert_eq!(DATA, 42);
|| }
问题, 两个线程的指令被执行时发生了重排:
- 线程 A 或者线程 B 发生指令重排后, 在线程 B 中的断言 (
assert_eq!()) 表达式就会失败
解决方法, 禁止重排:
- 内存屏障 (memory barrier, fence), 在读写指令之间加上内存屏障
- 指定访存顺序 (access ordering)
FLAG.store(1, release)FLAG.load(acquire)
指定访存顺序的方法, 使用 release/acquire 同步原语:
release store, 禁止与前面的指令重排acquire load, 禁止与后面的指令重排
Thread# A || Thread# B
||
DATA = 42; || if FLAG.load(acquire) {
FLAG.store(1, release); || assert_eq!(DATA, 42);
|| }
使用内存屏障的方法, 通过 顺序一致性 sequentially consistent (SC) 同步原语:
- SC 屏障: 禁止在它之前和在它之后的指令, 跨越它被重排, 可以保证在它之前的指令先被执行, 在它之后的指令后被执行
- 访存顺序为 relaxed, 就是说不要求显式地指定访存顺序, 它无关紧要
Thread# A || Thread# B
||
DATA = 42; || if FLAG.load(relaxed) {
fence(SC); || fence(SC);
FLAG.store(1, relaxed); || assert_eq!(DATA, 42);
|| }
参考
消息传递 message passing
对于并发编程, 线程间共享状态, 主要的模式有两种:
- 基于消息传递 (message-passing concurrency), 完全不共享, 编程模型比较简单, 有不错的并发效率
- 基于共享内存 (shared-memory concurrency), 共享可变更状态 (shared mutable state), 而这需要某种同步机制来居间协调
- 基于锁的共享 (lock-based concurrency), 比较简单, 并发成本较高, 效率较低
- 无锁并发模式 (lock-free concurrency), 比较复杂, 并发效率高
本章主要介绍消息传递, 后面的章节陆续介绍基于共享内存的并发.
另外, 基于消息传递的并行计算模型, 在后面的 MPI 一节有详细介绍.
使用 Channel 传递消息
阻塞式
std::sync::mpsc::sync_channel, 可以指定 channel 的容量, 当超出时, sender.send(value) 就会被阻塞.
非阻塞式
Channel 是如何实现的
基于锁的并发 Lock-based Concurrency
基于锁的并发方式, 是一种比较简单的并发模式, 常见的编程语言大都支持基于锁的并发.
锁, 把对数据结构的所有操作串行化 (serializing all operations), 避免并发操作.
锁的特性: 在任何情况下, 只有一个线程持有锁, 锁保护的内存区域只被一个线程访问.
本章的目标:
- 学习标准库中各种锁的安全使用方法
锁相关的 API
在介绍特定的锁类型之前, 我们先针对它们的公共特性做一些说明.
了解这些之后, 接下来学习各种锁的用法时会更容易.
锁的底层接口
Lock::acquire(), 本线程尝试获得锁, 如果获取失败, 本线程将被阻塞, 直到得到锁Lock::try_acquire(), 本线程尝试获得锁, 如果失败, 就直接返回Lock::release(), 释放锁
这种底层接口存在的问题是:
- 使用者只有在获得锁之后才能访问被锁保护的资源
- 锁定和解锁要成对使用, 不能出现忘记解锁的情况
锁的上层接口
针对上面提到的锁的底层接口存在的问题, 社区总结出了锁的上层接口:
- 锁定和解锁自动匹配
- 锁和它保护的资源紧密关联
这种接口风格来自于 C++ 中的 RAII :
- 使用
LockGuard<T>类自动解锁Lock::acquire()函数会返回LockGuard<T>对象- 当
LockGuard<T>对象超出作用域后, 编译器生成的代码自动调用Lock::release()解锁
- 将锁与它保护的资源关联起来, 通过泛型类
Lock<T>, 这样的话只有获得锁之后才能访问被保护的资源
这套接口更加安全易用.
看下面的代码示例:
use std::sync::Mutex;
use std::thread;
fn main() {
let counter: Mutex<i32> = Mutex::new(42);
let num_threads = 10;
thread::scope(|s| {
for _i in 0..num_threads {
s.spawn(|| {
if let Ok(mut guard) = counter.lock() {
*guard += 1;
}
});
}
});
if let Ok(result) = counter.into_inner() {
println!("counter is: {result}");
assert_eq!(result, 52);
}
}有两点要重点关注:
let counter: Mutex<i32> = Mutex::new(42);这里的counter是Mutex<i32>类型, 这把锁保护的数据类型是i32if let Ok(guard) = counter.lock(),Mutex::lock()接口返回的就是LockGuard<T>类型- 当锁定成功后, 就返回
Ok(lock_guard), 这个对象在超出作用域后, 会自动被销毁, 自动解锁 - 当锁定失败时, 就返回
Err(lock_failed)
- 当锁定成功后, 就返回
自旋锁 Spinlock
mutex
C++ 中, mutex 锁与它要锁定的数据是分开存储的, 需要显式地调用 mutext.Acquire(),
之后再访问数据.
RwLock
可重入锁 ReentrantLock
条件变量 Condition Variable
Barrier
Once
OnceLock
LazyLock
信号量 Semaphore
参考
全局变量 Global Variables
Arc 跨线程的引用计数
在线程之间共享同一对象的所有权, 内部使用了原子数来计数.
如果只需要在线程内共享所有权, 可以使用 Rc
Arc 的内存布局
Arc 与 &T 的转换
&T 的转换使用 Arc<Mutex>
使用 Arc<(Mutex, CondVar)>
使用 Arc<RwLock>
使用 Arc<AtomicUsize>
使用 Weak 解决循环引用的问题
无锁并发 Lock-free Concurrency
原子操作内部 Atomic Internals
Atomic
filetime 包里利用了 AtomicBool 来标注某个系统调用是否可用, 当第一次调用该系统
接口时, 如果失败了, 返回的是 ENOSYS 错误的话, 就会修改该 AtomicBool 的值, 并
回退到默认实现. 之后再使用该函数时, 就会直接跳过访问系统调用的步骤:
fn set_times(
p: &Path,
atime: Option<FileTime>,
mtime: Option<FileTime>,
symlink: bool,
) -> io::Result<()> {
let flags = if symlink {
libc::AT_SYMLINK_NOFOLLOW
} else {
0
};
// Same as the `if` statement above.
static INVALID: AtomicBool = AtomicBool::new(false);
if !INVALID.load(SeqCst) {
let p = CString::new(p.as_os_str().as_bytes())?;
let times = [super::to_timespec(&atime), super::to_timespec(&mtime)];
let rc = unsafe {
libc::syscall(
libc::SYS_utimensat,
libc::AT_FDCWD,
p.as_ptr(),
times.as_ptr(),
flags,
)
};
if rc == 0 {
return Ok(());
}
let err = io::Error::last_os_error();
if err.raw_os_error() == Some(libc::ENOSYS) {
INVALID.store(true, SeqCst);
} else {
return Err(err);
}
}
super::utimes::set_times(p, atime, mtime, symlink)
}参考
- LLVM Atomic Instructions and Concurrency Guide
- std::memory_order
- Portable atomic
- Crust of Rust: Atomics and Memory Ordering
内存顺序 Memory Order
在用户空间实现的快速锁 futex
futex 是 fast user-space mutex 的缩写, 这个是 linux 内核实现的系统级的互斥锁.
Rust 标准库里的 Mutex, 在 linux 系统就是基于它构建的, 这个琐比较有特点, 我们单独拿出来介绍一下.
重新实现自旋锁 Spinlock
重新实现互斥锁 Mutex
重新实现读写锁 RwLock
重新实现条件变量 CondVar
重新实现 Arc
重新实现 Channel
crossbeam 库
parking_lot 库
qcell 库
https://docs.rs/qcell/latest/qcell/
并行计算 Parallel Computing
SIMD 基础
SIMD 实践
OpenMP
MPI
CUDA
异步编程 Asynchronous Programming
多线程并发模型, 会耗费很多的 CPU 和内存资源, 创建以及切换线程的成本也很高; 可以使用线程池来缓解部分问题.
async并发模式可以降低对CPU和内存资源的过度使用, 只需要很少的数个系统级线程就可以创建大量的任务(tasks, 或者称作用户级线程), 每个任务的成本都很便宜. 这些任务可以有数以万计甚至是百万级的. 然后, 因为要带有运行时(runtime), 以及存储大量的状态机, async程序的可执行文件会更大.
Rust 实现的异步式(async)并发编程模型, 有这些特点:
- 以
Future为中心, 当调用poll时执行程序, 当把 Future 丢弃时就终止程序 - 零开销 (zero-cost), 不需要分配堆内存, 或者使用动态派发 (dynamic dispatch), 这样的话在嵌入式等资源受限的环境里依然可以使用
- 标准库没有自带运行时 (runtime), 它们有社区提供, 目前使用量较多的有 tokio 和 async-std, 后面我们分别有所介绍
- 运行时可以有单线程的, 也可以是多线程的
语言与第三方库
使用 Rust 编写 async 程序, 通常多少都会用到一些第三方库, 当然也要用到标准库, 我们这里先列一下它们的关系:
- async/await 语法: 由 rustc 编译器直接支持
- 最基础的 traits, 类型以及函数, 比如
Futuretrait, 是由标准库提供的 (std::future 模块) - 许多工具类型, 宏定义以及函数, 则由
futures库提供; 它也是个基础库, 可以在所有的异步程序代码里使用 - 运行时(runtime) 用于执行 async 代码, 调度任务, 绑定IO等, 比如 tokio 及 async-std. 大部分异步程序都要依赖一个这样的运行时库
参考
第一个 async 程序
要创建一个 async 函数时, 只需要在 fn 关键字之前加上 async 即可:
async fn hello() {
...
}首先引入 futures 库, 使用命令 cargo add futures, 会在 Cargo.toml里加入:
[dependencies]
futures = "0.3.30"
之后是 main.rs 里的代码:
use futures::executor::block_on;
async fn say_hello() {
println!("Hello, async rust!");
}
fn main() {
let future = say_hello();
block_on(future);
}以上代码:
async fn函数的返回值是一个Future, 下一节会详细介绍Future相关的.block_on()会阻塞当前线程, 直到Future运行完成
在 async fn 函数内部, 可以使用 .await 来等待另一个实现了 Future trait 的对象运行完成.
剖析 async 程序
Future trait
Task
Executor
Context
Waker
栈结构
理解 Futures 与 Tasks
这节主要讲解 Future trait 以及异步任务如何被调度的.
它们分别属于 std::future 和 std::task 模块, 这两个模块分在后面两节有详细的介绍.
Future trait
在同步式的代码 (synchronous code) 里调用阻塞函数(blocking function), 会阻塞整个线程;
而在异步式的代码里, Future 会把控制权返还给线程, 这样其它的 Future 就可以运行了.
它位于 std::future, async fn 会返回一个Future 对象, 它的接口定义如下:
pub trait Future {
type Output;
fn poll(self: Pin<&mut Self>, cx: &mut Context<'_>) -> Poll<Self::Output>;
}通过调用 poll() 方法, 可以将 Future 对象向前推近到新的进度, 尽量接近任务完成状态.
当 Future 对象完成后, 它返回 Poll::Ready(result) 结果; 如果还没完成, 就返回 Poll::Pending.
然后当 Future 可以推进到新的进度时, 它会调用 Wake::wake() 函数.
当 wake() 被调用后, 运行时会再次调用 Future 的 poll() 方法, 这样就可以更新进度了.
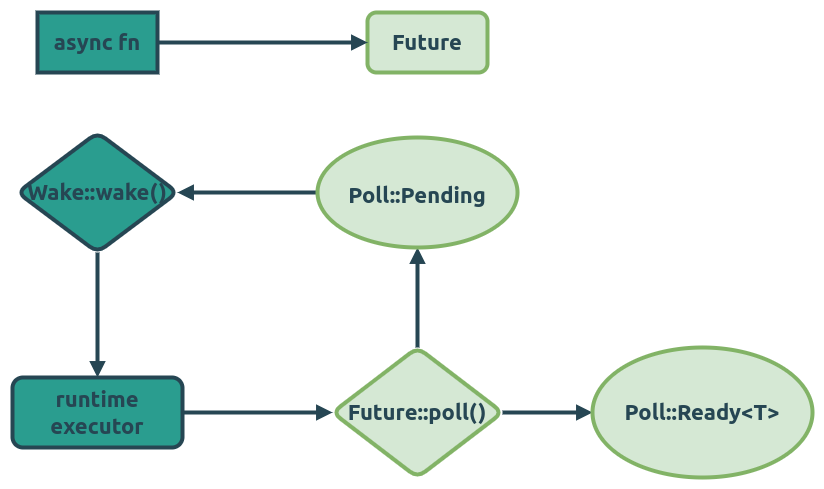
这里, 如果没有 Wake::wake() 方法的话, 每个周期, 运行时都要依次遍历一下所有的 Future 对象,
看看哪个进度有所推进;
引入了 wake() 方法后, 运行时就可以精确地知道在数万个 Future 对象中有哪些的进度是有变化的,
就可以调用它们的 poll() 方法了.
这样的设计可以显著提高运行时的性能.
另外 Future::poll() 方法的第一个参数类型是 Pin<&mut Self>, 这个用到了内存固定 (memory pinning) 相关的,
后面章节会专门介绍它.
Poll 枚举类
它位于 std::task, 定义如下:
pub enum Poll<T> {
Ready(T),
Pending,
}使用 Waker 来通管运行时再次拉取 Future
Wake trait
Waker 结构体
RawWaker 结构体
使用 Context 管理运行时上下文
理解 async/await
rustc 编译器遇到 async 函数时, 会在内部生成对应的状态机代码 (state machine), 这个状态机会实现
Future trait.
async 表达式
async 函数
展开 async 函数
await 表达式
展开 await 表达式
参考
- Understanding Async Await in Rust: From State Machines to Assembly Code
- Nested async/await in Rust: Desugaring and assembly
- Rust async/await: Async executor
coroutine
生命周期与内存保持 Lifetimes and Pinning
Async Drop
异步迭代器 async iterator
futures 库
futures 库的功能可以大致分成两个部分:
- Executor/Context/Waker 等组成基本的 async 运行时
- 对标准库模块的异步实现, 比如 io, lock, channel, iter 等
任务的执行者 Executor
管理任务 Tasks
Context
Waker
Spawn
一次执行多个 Futures
这一节主要是基于 futures::future 模块.
并行运行多个 Future
串起来运行多个 Future
Chain of Future
join!()
try_join!()
select!()
Spawning
使用 channel 传递信息
异步 IO
Stream 与迭代器
同步 Synchronization
tokio
Channel
参考
mio 库
mio 是一个跨平台的IO库, 它对各个主流平台的非阻塞式 (non-blocking) IO 进行了封装, 并提供了统一的事件通知接口. 它是 tokio 的一个核心依赖库.
| 平台 | 接口 |
|---|---|
| linux | epoll |
| freebsd, mac os | kqueue |
| windows | IOCP |
包含的核心功能有:
- 非阻塞式的 TCP, UDP 以及 unix domain socket (UDS) 实现
- 封装了epoll/kqueue/iocp 等事件循环 (event loop)
但是, 跟 libuv 和 libevent 等流行的 IO 库相比, mio 缺少了这些功能:
- 计时器 (timer)
- 线程池
- 非阻塞式的 DNS 查询
- 文件操作 (file operations)
- 信号处理 (signal handling)
epoll 的一个示例程序
先看一下在C语言里调用 epoll 事件循环的一个小例子:
mio 的一个示例程序
mio 在 linux 平台就是对 epoll 的接口进行的封装. 接下来, 看一下同样的代码逻辑, 用 mio 如何实现:
mio 核心数据结构
参考
- rust asynchronous io: 从 mio 到 coroutine
- Tokio internals: Understanding Rust's asynchronous I/O framework from the bottom up
异步IO io-uring
Glommio
如何调试 debug
参考
Actor Model
上面介绍的都是 async/await 异步编程模型, 这一章介绍 Actor Model 并发模型.
这种并发模型是异步的消息传递模式. erlang 语言 就是依照该模型实现的, 它也证明了这种模型有着极强的并发能力.
在 Rust 语言中, actix 是对该模型的完整实现, 其并发性能也 十分突出.
其它异步运行时 Runtime
async-std
smol
Glommio
手动实现一个运行时
错误处理 Error Handling
std::panic::catch_unwind() 可以捕获 unwinding panic, 但不能处理
abort panic.
abort
rustc -C panic=abort
Propagating Errors
这里, 如果返回的是 Ok(t) 就直接得到它的值, 如果返回的是 Err(e), 就将错误
返回给上层调用处.
let weather = get_weather(hometown) ?;参考
Panic
Panic Hook
Error trait
标准库里定义了 Error trait, 用来表示错误值, 可以用作 Result<T, E> 里的 E.
它的接口如下:
pub trait Error: Debug + Display {
fn source(&self) -> Option<&(dyn Error + 'static)> { ... }
fn description(&self) -> &str { ... }
fn cause(&self) -> Option<&dyn Error> { ... }
fn provide<'a>(&'a self, request: &mut Request<'a>) { ... }
}可以看到, 它默认就实现了4个方法, 但要求实现 Debug 和 Display traits. 我们自定义错误类型时,
也应该实现这两个 traits.
接下来看标准库中的一个例子.
ParseIntError
当尝试把字符串转换成整数时, 标准库使用 ParseIntError来记录错误原因.
use std::error::Error;
use std::fmt;
#[derive(Debug, Clone, PartialEq, Eq)]
pub struct ParseIntError {
pub kind: IntErrorKind,
}
#[derive(Debug, Clone, PartialEq, Eq)]
pub enum IntErrorKind {
Empty,
InvalidDigit,
PosOverflow,
NegOverflow,
Zero,
}
impl Error for ParseIntError {
fn description(&self) -> &str {
match self.kind {
IntErrorKind::Empty => "cannot parse integer from empty string",
IntErrorKind::InvalidDigit => "invalid digit found in string",
IntErrorKind::PosOverflow => "number too large to fit in target type",
IntErrorKind::NegOverflow => "number too small to fit in target type",
IntErrorKind::Zero => "number would be zero for non-zero type",
}
}
}
impl fmt::Display for ParseIntError {
#[allow(deprecated)]
fn fmt(&self, f: &mut fmt::Formatter<'_>) -> fmt::Result {
self.description().fmt(f)
}
}自定义错误类型
如果错误原因比较多的话, 通常可以自定义一个错误类型:
#![allow(clippy::module_name_repetitions)]
use std::io;
#[derive(Debug, Clone, Copy, PartialEq, Eq)]
pub enum ErrorKind {
ConfigError,
JwtError,
InvalidToken,
CalibreError,
DbConnError,
DbGeneralError,
DbUniqueViolationError,
DbForeignKeyViolationError,
DbNotFoundError,
IoError,
JsonError,
RingError,
AuthFailed,
ActixBlockingError,
MongoDbError,
MongoDbValueAccessError,
HttpError,
// Invalid form request.
RequestFormError,
}
#[derive(Debug, Clone)]
pub struct Error {
kind: ErrorKind,
message: String,
}
impl std::fmt::Display for Error {
fn fmt(&self, f: &mut std::fmt::Formatter<'_>) -> std::fmt::Result {
write!(f, "{:?}: {}", self.kind, self.message)
}
}
impl std::error::Error for Error {}
impl Error {
#[must_use]
pub fn new(kind: ErrorKind, message: &str) -> Self {
Self {
kind,
message: message.to_owned(),
}
}
#[must_use]
pub const fn from_string(kind: ErrorKind, message: String) -> Self {
Self { kind, message }
}
#[must_use]
pub const fn kind(&self) -> ErrorKind {
self.kind
}
#[must_use]
pub const fn message(&self) -> &str {
self.message.as_str()
}
}
impl From<io::Error> for Error {
fn from(err: io::Error) -> Self {
Self::from_string(ErrorKind::IoError, err.to_string())
}
}
impl From<r2d2::Error> for Error {
fn from(err: r2d2::Error) -> Self {
Self::from_string(ErrorKind::DbConnError, format!("r2d2 err: {err}"))
}
}可以看到, 如果自定义一个 Error 类型, 用来聚合常用的错误, 手动编写这样的代码是很繁琐的, 可以考虑
使用第三方库, 我们下一节会介绍 thiserror 库.
thiserror 库
这个库用于快速给结构体或者枚举实现 Error trait.
使用方法极为简单:
use std::io;
use thiserror::Error;
#[derive(Error, Debug)]
pub enum DataStoreError {
#[error("data store disconnected")]
Disconnect(#[from] io::Error),
#[error("the data for key `{0}` is not available")]
Redaction(String),
#[error("invalid header (expected {expected:?}, found {found:?})")]
InvalidHeader { expected: String, found: String },
#[error("unknown data store error")]
Unknown,
}它会根据宏定义, 自动为结构体实现 Display trait, 它们跟让文介绍的手写的错误类型是兼容的, 可以
随时进行互相替换.
参考
anyhow
上一节讲到的 thiserror 库, 比较适合应用在自定义的库中; 这节介绍的 anyhow 更适合用在最终发布的可执行程序里.
Error
这个库里提供的 anyhow::Error trait, 用于简化动态的错误类型, 它类似于 Box<dyn std::error::Error>,
但有以下的区别:
anyhow::Error要求错误实现了Send + Sync + 'staticanyhow::Error要求实现代码回溯(backtrace)anyhow::Error表示一个瘦指针(narrow pointer), 只需要占用一个 word size; 而胖指针(fat pointer) 需要占两个 word size
Result
anyhow::Result<T> 类似于标准库里定义的 std::io::Result<T>.
要注意的是, Result<T, E>? 将错误类型转换为 anyhow::Error时, 会丢去一部分类型信息,
需要用 downcast() 等方法才能访问被包装在内部的错误内型;
如果需要对不同的错误类型单独处理时, 应该考虑用 thiserror 库.
anyhow::Result::context() 方法, 可以给错误对象添加上下文描述信息.
比如文件无法访问时, 可以打印出文件路径:
let content = fs::read(path)
.with_context(|| format!("Failed to read instrs from {}", path.display()))?;Chain
anyhow::Chain 用于在一个位置处理所有的错误, 它本身实现了迭代器 Iterator 接口.
参考
日志与追踪 Logging && Tracing
其实将本章的名称改为 "可观测性" (observability) 更合适些, 因为它不单包括了日志模块, 还包括了 metrics/tracing 以及 open telemetry 相关的信息.
打印日志到终端
保存日志到文件
保存日志到系统
结构化日志
metrics
追踪 Tracing
遥测 Telemetry
OpenTelemetry
Sentry
GlitchTip
崩溃报告 Breakpad
测试 Test
运行测试程序:
cargo testcargo test --doc
dev-dependencies
如果在运行测试实例时, 需要额外的库, 可以在 Cargo.toml 中的 [dev-dependencies] 中加入需要的库.
文档测试 Doc Test
直接位于函数注释中的测试代码, 也是一种常用的单元测试, 通常还用于展示该函数或者类型的用法.
/// Some comments.
///
/// ```rust
/// assert_eq!(fibonacci(10), 89);
/// ```
pub fn fibonacci(n: u32) -> u32 {
if n == 0 || n == 1 {
1
} else {
fibonacci(n - 1) + fibonacci(n - 2)
}
}单元测试 Unit Test
在模块内部直接编写的, 用于测试各个函数的功能.
pub fn fibonacci(n: u32) -> u32 {
if n == 0 || n == 1 {
1
} else {
fibonacci(n - 1) + fibonacci(n - 2)
}
}
#[cfg(test)]
mod tests {
use super::fibonacci;
#[test]
fn test_fibonacci() {
assert_eq!(fibonacci(10), 89);
}
}可以使用这样的命令来编译和运行:
cargo testrustc --test xxx
集成测试 Integrated Test
将集成测试代码放在独立的 tests/ 目录里, 它们也是普通的 .rs 文件.
代码覆盖率 Code Coverage
运行时 Runtime
main() 函数
一个crate 包含一个 main() 函数时, 它可以被编译成可执行文件.
main() 函数作为用户编写的代码入口, 它有好几条限制.
它不接受任何参数. 这个跟 c/c++ 程序里的 main() 函数很不一样, 因为后者会接收 (int argc, char** argv).
在 rust 中, 如果需要读取程序启动时的命令行参数, 可以通过 std::env::Args 来访问
中不绑定生命周期(lifetime bounds); 也不绑定 trait, 不能有 where 语句.
因为调用 main() 函数的过程是固定的, 传入的参数也都是固定的.
它的返回值默认为空 (), 而 c/c++ 程序要返回 int, 确切来说, 是返回 -128..=127 之间的整数.
但在 rust 中比较灵活, 它真正的返回值类型是 std::process::Termination trait:
pub trait Termination {
// Required method
fn report(self) -> ExitCode;
}而 struct ExitCode 又实现了 to_i32() 方法, 用于返回一个 i32 整数:
impl ExitCode {
#[inline]
pub fn to_i32(self) -> i32 {
self.0.as_i32()
}
}在标准库中, 为以下几种类型实现了 Termination trait:
(), 它返回的是ExitCode::SUCCESS!, never type, 表示函数没有返回值, 进程直接退出- 比如
std::process::exit()函数声名是:pub fn exit(code: i32) -> ! - 它不会调用任何线程上的任何对象的析构函数, 而是直接退出进程; 并将 exit code 返回给父进程
- 这个类似于调用了内核的系统调用接口
exit_group(0)
- 比如
ExitCodeimpl<T: Termination, E: Debug> Termination for Result<T, E>, 所以 main() 是可以返回一个Reuslt<T, E>的
比如, 下面的一个例子:
use std::fs::File;
use std::io::{self, Read};
fn main() -> io::Result<()> {
let mut file = File::open("/etc/passwd")?;
let mut content = String::new();
file.read_to_string(&mut content)?;
assert!(content.starts_with("root:"));
Ok(())
}参考
调用 main() 函数之前发生了什么
TODO(Shaohua): Rename to runtime service (rt), see std/src/rt.rs
unwind
运行时检查
本节会总结一下 Rust 语言依赖于运行时期间进行实时和动态检查, 才能完成的功能模块.
通常很多动作都是在编译器间就静态确定的, 但这并不够灵活; 所以才有了运行时期间进行的检查, 当然这些 都是有运行成本的.
Trait 的动态派发
内部可变性
RefCell
引用计数
Rc
各种锁
Mutex
原子操作 Atomics
调试与性能优化
调试模式 Debug
编译 debug 模式
可以用 cargo 生成:
cargo build --debug foo_bar
也可以手动调用 rustc, 生成 debug 模块的目标:
rustc -g foo.rs
如果感觉性能不好的话, 可以加上 O2 选项:
rustc -g -O foo.rs
debug_assert!() 宏
debug_assert!() 宏类似于 C 语言中的 assert() 宏, 只在 debug 模式下有效.
在 release 模式下, 被展开为空白代码.
debug_assertions 属性
#[cfg(debug_assertions)] 用于判断是否处于 debug 编译模式, 通常在调试模式下, 会打印出更多的调试代码.
看下面的例子:
#[allow(unused_variables)]
fn main() {
let keys = [1, 1, 2, 3, 5, 8, 13, 21];
#[cfg(debug_assertions)]
for i in 1..keys.len() {
assert!(keys[i - 1] <= keys[i]);
}
}dbg 宏
这个宏用于打印表达式本身的内容, 代码位置以及其返回值到错误输出 (stderr), 比 eprintln!() 等要更为快捷,
而且它并不会影响表达式本身的执行 (但是有副作用). 先看几个例子:
fn fibonacci(n: i32) -> i32 {
if dbg!(n == 1 || n == 2) {
return 1;
}
dbg!(fibonacci(n - 1) + fibonacci(n - 2))
}
fn main() {
let fib = fibonacci(5);
assert_eq!(fib, 5);
}上面的代码, 输出如下调试信息:
[code/perf/src/bin/dbg-macro.rs:6:8] n == 1 || n == 2 = false
[code/perf/src/bin/dbg-macro.rs:6:8] n == 1 || n == 2 = false
[code/perf/src/bin/dbg-macro.rs:6:8] n == 1 || n == 2 = false
[code/perf/src/bin/dbg-macro.rs:6:8] n == 1 || n == 2 = true
[code/perf/src/bin/dbg-macro.rs:6:8] n == 1 || n == 2 = true
[code/perf/src/bin/dbg-macro.rs:9:5] fibonacci(n - 1) + fibonacci(n - 2) = 2
[code/perf/src/bin/dbg-macro.rs:6:8] n == 1 || n == 2 = true
[code/perf/src/bin/dbg-macro.rs:9:5] fibonacci(n - 1) + fibonacci(n - 2) = 3
[code/perf/src/bin/dbg-macro.rs:6:8] n == 1 || n == 2 = false
[code/perf/src/bin/dbg-macro.rs:6:8] n == 1 || n == 2 = true
[code/perf/src/bin/dbg-macro.rs:6:8] n == 1 || n == 2 = true
[code/perf/src/bin/dbg-macro.rs:9:5] fibonacci(n - 1) + fibonacci(n - 2) = 2
[code/perf/src/bin/dbg-macro.rs:9:5] fibonacci(n - 1) + fibonacci(n - 2) = 5
可以发现, dbg! 宏对于跟踪递归代码非常有效, 它能打印出类似函数调用栈的信息.
获取当前代码的位置信息
标准库中带了好几个宏, 用于返回当前源代码的位置信息:
file!(), 当前源代码文件的文件名line!(), 当前代码所在的行号, 从 1 开始计数column!(), 当前代码所在的列号, 从 1 开始计数
看一个代码示例:
// Copyright (c) 2024 Xu Shaohua <shaohua@biofan.org>. All rights reserved.
// Use of this source is governed by GNU General Public License
// that can be found in the LICENSE file.
fn main() {
let filename = file!();
let line_num = line!();
let column_num = column!();
println!("filename: {filename}, line num: {line_num}, column num: {column_num}");
}filename: code/perf/src/bin/file-macro.rs, line num: 7, column num: 22
但是, 如何获取函数名呢? 目前标准库还不支持, 但我们可以使用第三方的库:
获取函数调用者的信息
除了上面介绍的获取当前代码信息信息之外, 在函数体内部, 也可以跟踪哪个地方在调用它, 这对于追踪较复杂的 函数调用关系链比较有效.
use std::panic::Location;
fn noop() {
let caller = Location::caller();
println!("caller is: {caller:?}");
dbg!(caller);
}
fn main() {
let _x = 42;
noop();
}上述代码, 会输出 noop() 函数的调用者的信息:
caller is: Location { file: "code/perf/src/bin/get-caller-location.rs", line: 8, col: 18 }
[code/perf/src/bin/get-caller-location.rs:10:5] caller = Location {
file: "code/perf/src/bin/get-caller-location.rs",
line: 8,
col: 18,
}
在标准库的引用计数类型的指针中, 经常用它来追踪函数的调用者信息. 比如 RefCell<T>:
//! From `core/src/cell.rs`
impl RefCell {
#[inline]
#[cfg_attr(feature = "debug_refcell", track_caller)]
pub fn try_borrow(&self) -> Result<Ref<'_, T>, BorrowError> {
match BorrowRef::new(&self.borrow) {
Some(b) => {
#[cfg(feature = "debug_refcell")]
{
// `borrowed_at` is always the *first* active borrow
if b.borrow.get() == 1 {
self.borrowed_at.set(Some(crate::panic::Location::caller()));
}
}
// SAFETY: `BorrowRef` ensures that there is only immutable access
// to the value while borrowed.
let value = unsafe { NonNull::new_unchecked(self.value.get()) };
Ok(Ref { value, borrow: b })
}
None => Err(BorrowError {
// If a borrow occurred, then we must already have an outstanding borrow,
// so `borrowed_at` will be `Some`
#[cfg(feature = "debug_refcell")]
location: self.borrowed_at.get().unwrap(),
}),
}
}
#[stable(feature = "try_borrow", since = "1.13.0")]
#[inline]
#[cfg_attr(feature = "debug_refcell", track_caller)]
pub fn try_borrow_mut(&self) -> Result<RefMut<'_, T>, BorrowMutError> {
match BorrowRefMut::new(&self.borrow) {
Some(b) => {
#[cfg(feature = "debug_refcell")]
{
self.borrowed_at.set(Some(crate::panic::Location::caller()));
}
// SAFETY: `BorrowRefMut` guarantees unique access.
let value = unsafe { NonNull::new_unchecked(self.value.get()) };
Ok(RefMut { value, borrow: b, marker: PhantomData })
}
None => Err(BorrowMutError {
// If a borrow occurred, then we must already have an outstanding borrow,
// so `borrowed_at` will be `Some`
#[cfg(feature = "debug_refcell")]
location: self.borrowed_at.get().unwrap(),
}),
}
}
}参考
GDB
DWARF 格式
TUI
变量及其格式化
内存
符号
快捷键
远程调试
LLDB
GDB 到 LLDB 的命令映射
参考
性能测试 Benchmark
divan 库
criterian 库
perf-tools
加快编译速度
codegen-units
参考
优化二进制文件大小
codegen-units = 1
panic = "abort"
strip = true
strip -R .rustc
Profile-guided Optimization: pgo
Link Time Optimization: lto
参考
MIR
参考
汇编 Assembly
内联汇编 Inline Assembly
稳定版(stable)的 rust , 目前支持在这些架构上使用行汇编:
- x86
- x86_64
- arm
- aarch64
- riscv64
- loongarch64
其它架构 (target_arch) 下在编译时就会报错.
当然了, 不稳定版(unstable)的 rust, 支持所有架构上使用行汇编.
宏 Macros
在很早的版本中, C 语言就提供了宏 (macro), 但是那里的宏只是简单的宏展开(macro expansion), 进行字符串替换; 宏本身 并没有语法检查, 容易出错, 尤其是处理参数时; 只是在使用时把宏展开, 再由编译器检查. 比如:
#ifndef MAX
#define MAX(a, b) (((a) > (b)) ? (a) : (b))
#endif
上面用了非常多的括号, 因为宏可能被用在各种地方, 需要做好参数的保护, 保证代码被展开后依然是正确的.
但 Rust 语言中的宏与语言本身结合得更紧密, 更不容易出错, 它不单单是字符串替换而已.
调用宏与一般的函数调用类似, 比如: debug_assert!(!s.is_empty());.
使用宏的好处:
- 可以获取宏调用处的位置信息, 比如
file!(),line!(),column()`, 方便定位到代码; 而函数调用就不能直接得到函数调用位置的信息 - 可以重用代码, 比如标准库中的
num模块, 为整数类型实现的各种方法, 大都由宏定义提供, 然后为所有整数一并实现, 可以看下面的代码片段:
macro_rules! from_str_radix_int_impl {
($($t:ty)*) => {$(
#[stable(feature = "rust1", since = "1.0.0")]
impl FromStr for $t {
type Err = ParseIntError;
fn from_str(src: &str) -> Result<Self, ParseIntError> {
from_str_radix(src, 10)
}
}
)*}
}
from_str_radix_int_impl! { isize i8 i16 i32 i64 i128 usize u8 u16 u32 u64 u128 }
macro_rules! impl_helper_for {
($($t:ty)*) => ($(impl FromStrRadixHelper for $t {
const MIN: Self = Self::MIN;
#[inline]
fn from_u32(u: u32) -> Self { u as Self }
#[inline]
fn checked_mul(&self, other: u32) -> Option<Self> {
Self::checked_mul(*self, other as Self)
}
#[inline]
fn checked_sub(&self, other: u32) -> Option<Self> {
Self::checked_sub(*self, other as Self)
}
#[inline]
fn checked_add(&self, other: u32) -> Option<Self> {
Self::checked_add(*self, other as Self)
}
})*)
}
impl_helper_for! { i8 i16 i32 i64 i128 isize u8 u16 u32 u64 u128 usize }但是, 只应该在必要时才使用宏; 如果考虑代码重用, 可以优先考虑使用泛型, 或者 traits:
- 宏代码更难阅读, 也就更难维护
- 宏支持的传入参数很丰富, 也更复杂
本章先介绍一些常用的宏, 随后介绍 Rust 支持的两种宏写法:
- 声明宏 Declarative Macros
- 过程宏 Proc Macros
最后, 会介绍一个第三方库, syn, 用于解析过程宏用到的 TokenStream.
常用的宏 Common Macros
在学习如何编写宏代码之前, 我们先熟悉一下如何调用宏. 本节主要介绍常用到的标准库中的宏.
dbg!()
std::dbg!() 宏用于调试代码, 尤其是使用递归调用时:
fn factorial(n: u32) -> u32 {
if dbg!(n <= 1) {
dbg!(1)
} else {
dbg!(n * factorial(n - 1))
}
}
fn main() {
let x = 42;
dbg!(x);
dbg!(factorial(5));
}声明宏 Declarative Macros
声明宏(又被翻译成 "声明式宏"), 是 Rust 早期引入的宏语法, 目前仍被支持.
Fragment Types
| fragment type | matches | can be followed by |
|---|---|---|
| expr | an expression: 2 + 2, "udo", x.len() | => , ; |
| stmt | An expression or declaration, no trailing semicolon: | => , ; |
| (hard to use, try expr or block instead) | ||
| ty | A type: String, Vec | => , ; = { [ : > as where |
| path | A path: ferns, std::sync::mpsc | => , ; = { [ : > as where |
| pat | A pattern: _, Some(ref x) | => , = if in |
| item | An item: | Anything |
| struct Point {x: f64, y: f64}, mod ferns | ||
| block | A block: { s += "ok\n"; true; } | Anything |
| meta | The body of an attribute: | Anything |
| inline, derive(Copy, Clone), doc="3D model" | ||
| ident | An identifier: std, Json, var_name | Anything |
| tt | A token tree: ; >=, {}, [0 1 (+ 0 1)] | Anything |
模式 Patterns
以下表格列出了宏内部可以用到的匹配模式:
| 写法 | 含义 |
|---|---|
$( ... )* | 匹配0次到多次, 不包含分隔符 |
$( ... ),* | 用来匹配一列参数, 以逗号来分隔 |
$( ... );* | 匹配0次到多次, 用分号作为分隔 |
$( ... )+ | 匹配1次到多次, 没有分隔符 |
$( ... ),+ | 匹配1次到多次, 用逗号作为分隔 |
$( ... );+ | 匹配1次到多次, 用分号作为分隔 |
函数内部的宏
可以在函数内部定义宏并调用它.
下面的示例代码来自 termcolor :
fn write_color(
&mut self,
fg: bool,
c: &Color,
intense: bool,
) -> io::Result<()> {
macro_rules! write_intense {
($clr:expr) => {
if fg {
self.write_str(concat!("\x1B[38;5;", $clr, "m"))
} else {
self.write_str(concat!("\x1B[48;5;", $clr, "m"))
}
};
}
macro_rules! write_normal {
($clr:expr) => {
if fg {
self.write_str(concat!("\x1B[3", $clr, "m"))
} else {
self.write_str(concat!("\x1B[4", $clr, "m"))
}
};
}
if intense {
match *c {
Color::Black => write_intense!("8"),
Color::Blue => write_intense!("12"),
Color::Green => write_intense!("10"),
Color::Red => write_intense!("9"),
Color::Cyan => write_intense!("14"),
Color::Magenta => write_intense!("13"),
Color::Yellow => write_intense!("11"),
Color::White => write_intense!("15"),
Color::__Nonexhaustive => unreachable!(),
}
}
}libgit2-sys 递归调用
看第一个例子, 这个是 libgit2-sys 项目中使用的, 它用于批量定义枚举类:
macro_rules! git_enum {
(pub enum $name:ident { $($variants:tt)* }) => {
#[cfg(target_env = "msvc")]
pub type $name = i32;
#[cfg(not(target_env = "msvc"))]
pub type $name = u32;
git_enum!(gen, $name, 0, $($variants)*);
};
(pub enum $name:ident: $t:ty { $($variants:tt)* }) => {
pub type $name = $t;
git_enum!(gen, $name, 0, $($variants)*);
};
(gen, $name:ident, $val:expr, $variant:ident, $($rest:tt)*) => {
pub const $variant: $name = $val;
git_enum!(gen, $name, $val+1, $($rest)*);
};
(gen, $name:ident, $val:expr, $variant:ident = $e:expr, $($rest:tt)*) => {
pub const $variant: $name = $e;
git_enum!(gen, $name, $e+1, $($rest)*);
};
(gen, $name:ident, $val:expr, ) => {}
}
git_enum! {
pub enum git_revparse_mode_t {
GIT_REVPARSE_SINGLE = 1 << 0,
GIT_REVPARSE_RANGE = 1 << 1,
GIT_REVPARSE_MERGE_BASE = 1 << 2,
}
}这个宏的特殊之处在于它内部使用了递归调用.
参考
过程宏 Procedure Macro
过程宏基本上分为三类:
- 函数式宏,
println!() - 继承宏,
#[derive(Debug)] - 属性宏,
#[serde(rename("foo"))]
rustversion 库大量使用了过程宏; 另外 getset 库也是, 而且这个库的代码量很小, 就几百行, 基于 proc-macro 实现的.
第三方库
- syn, 解析 AST 里的 token
- quote, 重构 AST
- proc-macro/2, 支持过程宏的编写
- darling, 帮助解析属性
基本编写过程
- 解析 AST
- 处理 Tokens
- 生成 AST
参考
函数式宏 Function-like Macro
继承宏 Derive Macro
属性宏 Attribute Macro
syn 库
书接上文, 过程宏经常要对 TokenStream 进行解析处理, 每次都手动操作非常无聊, 还容易出错;
可以用 syn 库来专门处理 TokenStream.
Quote 库
不安全的代码 Unsafe code
编写不安全的代码, 一定要当心出现未定义的行为.
参考
unsafe 块表达式
unsafe 的函数
unsafe trait
参考
访问原始指针 Dereference raw pointers
访问 Union 内的元素
在前面的章节 有联合体相关的介绍, 我们不再重复说明.
访问静态变量
调用外部函数接口 FFI
实际上, 不可能所有的程序以及库都由 Rust 编写, 但有时又想在 Rust 代码里直接调用这些外部库. 比如, 访问操作系统的系统调用接口(syscall), 它们通常都是 C 函数声明的; 或者调用 opencv 这个视觉库; 或者 mkl 进行矩阵操作.
Rust 提供的调用外部函数 (FFI, foreign function interface) 机制, 可以在 Rust 代码里访问外部库里的 C 函数, 以及部分的 C++ 函数. 比如 libc 这个 crate 就是对 C 标准库进行的绑定, 它在 Rust 的标准库内部有广泛的使用.
参考
声明外部函数
C ffi
Box 指针
在生成 C/C++ 库时, 会经常使用 Box 来包装内部的类, 将其导出为C语言可访问的指针.
比如 sysinfo 库, 它大量地运用了这种写法:
use std::ffi::{c_char, c_void};
use libc::pid_t;
/// Equivalent of [`System`][crate::System] struct.
pub type CSystem = *mut c_void;
/// Equivalent of [`Process`][crate::Process] struct.
pub type CProcess = *const c_void;
/// C string returned from `CString::into_raw`.
pub type RString = *const c_char;
/// Callback used by [`get_processes`][crate::System#method.processes].
pub type ProcessLoop = extern "C" fn(pid: pid_t, process: CProcess, data: *mut c_void) -> bool;
/// Equivalent of [`System::new()`][crate::System#method.new].
#[no_mangle]
pub extern "C" fn sysinfo_init() -> CSystem {
let system = Box::new(System::new());
Box::into_raw(system) as CSystem
}
/// Equivalent of `System::drop()`. Important in C to cleanup memory.
#[no_mangle]
pub extern "C" fn sysinfo_destroy(system: CSystem) {
assert!(!system.is_null());
unsafe {
Box::from_raw(system as *mut System);
}
}
/// Equivalent of [`System::refresh_system()`][crate::System#method.refresh_system].
#[no_mangle]
pub extern "C" fn sysinfo_refresh_system(system: CSystem) {
assert!(!system.is_null());
let mut system: Box<CSystem> = unsafe { Box::from_raw(system as *mut CSystem) };
{
let system: &mut System = system.borrow_mut();
system.refresh_system();
}
Box::into_raw(system);
}这里要注意的是, 当从C语言中传入的指针被强制转为 Box 指针类型后, 可以安全地进行操作;
当这些工作完成后, 需要显式地调用 Box::into_raw() 再将 Box 类型的指针转回到 raw pointer.
不然后话, 在当前作用域结束时, 这个 Box 指针会被释放掉.
与C语言兼容的基础数据类型
C 语言中定义的一些基础数据类型, 在不同的平台上可能对应着不同的内容大小, 比如 int, 通常占用4个字节, 但有些平台上会占用2个字节; 而 char 类型可能对应着 signed char 或者 unsigned char. (所以, 比较可靠的跨平台C程序通常使用 stdint.h 里定义的基础数据类型, 或者程序内部重新实现一遍, 比如 nginx.)
Rust 标准库提供了一些定义, 以便于与C语言中的类型保持一致, 方便实现 ffi 接口.
os::raw 模块
std::os::raw 模块定义了一些能与C语言兼容的基础数据类型, 这个模块是对 core::ffi 模块的封装.
详细的类型对比见下表:
| C 中的类型 | os::raw 中对应的类型 |
|---|---|
| char | c_char |
| signed char | c_schar |
| unsigned char | c_uchar |
| float | c_float |
| double | c_double |
| short, signed sort | c_short |
| unsigned short | c_ushort |
| int, signed int | c_int |
| unsigned, unsigned int | c_uint |
| long | c_long |
| unsigned long | c_ulong |
| long long | c_longlong |
| unsigned long long | c_ulonglong |
| void | () |
| void * | *mut c_void |
| const void * | *const c_void |
指针类型比较特殊, 在 rust 里被独立处理的.
布尔类型
Rust 中的 bool 类型与 C 或者 C++ 中的完全一致, 没有额外的转换步骤
结构体指针及引用
- C/C++ 中定义的结构体指针
*T, 对应于 rust 中的*mut T - C++ 中的对象引用
&T, 对应于 rust 中的*const T
其它类型
core::ffi 模块还定义了一些仍在实验中的类型, 我们也介绍一下:
| C 中的类型 | core::ffi 中对应的类型 |
|---|---|
| ptrdiff_t | c_ptrdiff_t |
| size_t | c_size_t |
| ssize_t | c_ssize_t |
同时还提供了 NonZero 版本的类型:
| C 中的类型 | core::ffi 中对应的NonZero类型 |
|---|---|
| char | NonZero_c_char |
| signed char | NonZero_c_schar |
| unsigned char | NonZero_c_uchar |
| float | NonZero_c_float |
| double | NonZero_c_double |
| short, signed sort | NonZero_c_short |
| unsigned short | NonZero_c_ushort |
| int, signed int | NonZero_c_int |
| unsigned, unsigned int | NonZero_c_uint |
| long | NonZero_c_long |
| unsigned long | NonZero_c_ulong |
| long long | NonZero_c_longlong |
| unsigned long long | NonZero_c_ulonglong |
与C语言兼容的结构体
使用 #repr(C)] 标志, 可以让 Rust 中定义的结构体的内存布局与 C 编译器生成的保持一致.
除了使用相同的内存排布方式外, 其结构体中的元素, 也应该选用与C语言兼容的类型.
对于结构体内存排布, C/C++编译器里的规则概括如下:
- 结构体里的元素顺序, 与其声明顺序保持一致
- 毎个元素都要占用独立的内存地址
- 内存对齐规则(待补充)
use std::ffi::{c_int, c_ulong};
#[repr(C)]
#[derive(Debug, Default, Clone, Copy)]
#[allow(non_camel_case_types)]
pub struct shm_info_t {
pub used_ids: c_int,
/// total allocated shm
pub shm_tot: c_ulong,
/// total resident shm
pub shm_rss: c_ulong,
/// total swapped shm
pub shm_swp: c_ulong,
swap_attempts: c_ulong,
swap_successes: c_ulong,
}与之对应的, 在C语言中的定义是:
struct shm_info {
int used_ids;
__kernel_ulong_t shm_tot; /* total allocated shm */
__kernel_ulong_t shm_rss; /* total resident shm */
__kernel_ulong_t shm_swp; /* total swapped shm */
__kernel_ulong_t swap_attempts;
__kernel_ulong_t swap_successes;
};
枚举类型
枚举类型与结构体的声明方式类似, 看一个linux/perf_event.h 中的例子:
/// attr.type
#[repr(u8)]
#[allow(non_camel_case_types)]
pub enum perf_type_id_t {
PERF_TYPE_HARDWARE = 0,
PERF_TYPE_SOFTWARE = 1,
PERF_TYPE_TRACEPOINT = 2,
PERF_TYPE_HW_CACHE = 3,
PERF_TYPE_RAW = 4,
PERF_TYPE_BREAKPOINT = 5,
/// non-ABI
PERF_TYPE_MAX = 6,
}默认情况下, C语言中的枚举类型使用 int 作为基础类型, 但也可以手动指定别的类型, 比如:
#include <stdint.h>
enum perf_type_id_t : uint16_t {
PERF_TYPE_HARDWARE = 0,
PERF_TYPE_SOFTWARE = 1,
PERF_TYPE_TRACEPOINT = 2,
PERF_TYPE_HW_CACHE = 3,
PERF_TYPE_RAW = 4,
PERF_TYPE_BREAKPOINT = 5,
// non-ABI
PERF_TYPE_MAX = 6,
};
此时, 在 Rust 中, 可以使用 #[repr(u16)] 标记来实现一致的定义:
#[repr(u16)]
#[allow(non_camel_case_types)]
pub enum perf_type_id_t {
PERF_TYPE_HARDWARE = 0,
PERF_TYPE_SOFTWARE = 1,
PERF_TYPE_TRACEPOINT = 2,
PERF_TYPE_HW_CACHE = 3,
PERF_TYPE_RAW = 4,
PERF_TYPE_BREAKPOINT = 5,
// non-ABI
PERF_TYPE_MAX = 6,
}Union 类型
Rust 里定义 union 与在 C 语言中类似:
use std::ffi::c_void;
#[repr(C)]
#[derive(Clone, Copy)]
#[allow(non_camel_case_types)]
pub union sigval_t {
pub sival_int: i32,
pub sival_ptr: *mut c_void,
}原始的 sigval_t 是这样定义的:
// From <siginfo.h>
typedef union sigval {
int sival_int;
void *sival_ptr;
} sigval_t;
C 语言格式的字符串
C 语言中的字符串有这些特点:
- 以空字符
\0结尾; 字符串中间不能包含空字符 - 不记录字符串长度
- 字符串本身是指向一个字符数组的指针
Rust 语言中的字符串 String 或者 &str 有这些特点:
- 字符串可以在任意位置包含空字符
- 有单独的元素记录字符串长度
可以发现, 这两种语言中的字符串并不能直接互相传递给对方.
CString 与 CStr
为此, Rust 标准库里单独定义了与C语言兼容的字符串类型.
CStr 对 CString 的关系就像 &str 与 String 的关系.
CString拥有字符串的所有权CStr是对后者的引用
它们之间是可以相互转换的.
CStr 与 *const c_char 之间可以用 as_ptr() 以及 from_ptr() 进行相互的转换.
看下面的示例程序:
use std::ffi::{c_char, CStr, CString};
extern "C" {
fn getenv(name: *const c_char) -> *const c_char;
}
pub fn getenv_safe(name: &str) -> String {
let name_cstr = CString::new(name).unwrap();
let cstr = unsafe { CStr::from_ptr(getenv(name_cstr.as_ptr())) };
cstr.to_string_lossy().to_string()
}
fn main() {
let path = getenv_safe("PATH");
println!("PATH:{path}");
}这里:
CString::new<T: Into<Vec<u8>>(t: T)会创建一个空字符结尾的 C 字符串CString::as_ptr()返回的是*const c_char, 等同于 C 语言中的const *char, 可以用于FFI函数
声明外部函数以及变量
使用 extern 可以声明函数及变量, 它们定义在其它库中. 在编译期间由链接器(linker) 将 rust 代码
与它们这些库链接起来.
这些库可以是静态库, 或者动态库.
举个例子, 声明C库中的 strlen, 最终会与 libc.so 或者 libc.a 链接:
use std::os::raw::c_char;
extern {
fn strlen(s: *const c_char) -> usize;
}
extern "C" {
fn strerror(error_num: i32) -> *const c_char;
}这里, rust 默认 extern 代码块使用的是 C 语言的转换方式, 所以 extern "C" 可以简写为 extern.
如果是外部变量的话, 也是类似做法, 比如 environ 保存着进程当前的环境变量列表:
use std::ffi::{c_char, CStr};
extern "C" {
static mut environ: *const *const c_char;
}
pub fn print_env() {
unsafe {
let mut env = environ;
if !env.is_null() {
while !(*env).is_null() {
let entry = CStr::from_ptr(*env);
println!("env: {}", entry.to_string_lossy());
env = env.add(1);
}
}
}
}
fn main() {
print_env();
}使用外部库中的函数
如果要使用特定库里的函数, 可以给 extern 代码块添加 #[link] 属性, 来声明对方库的名称, 路径及库的类别等.
use std::os::raw::c_int;
#[link(name = "git2", kind = "static")]
extern "C" {
pub fn git_libgit2_init() -> c_int;
}这里, 链接器会在默认的查找路径 (LD_LIBRARY_PATH) 里面尝试寻找 libgit2.a 并与它链接一起;
如果这个库不在默认路径里, 可以这样做:
- 设置环境变量,
export LD_LIBRARY_PATH=/path/to/libgit2.a:$LD_LIBRARY_PATH, 再编译 - 或者添加
build.rs文件, 在里面声明库的路径:
fn main() {
println!(r"cargo:rustc-link-search=native=/path/to//libgit2.a");
} 以 nc 绑定 libsyscall.a 为例:
use super::types::{check_errno, Errno, Sysno};
// 链接到 libsyscall.a, 是静态库
// 以下是该库中的七个函数的声明
#[link(name = "syscall", kind = "static")]
extern "C" {
pub fn __syscall0(n: usize) -> usize;
pub fn __syscall1(n: usize, a1: usize) -> usize;
pub fn __syscall2(n: usize, a1: usize, a2: usize) -> usize;
pub fn __syscall3(n: usize, a1: usize, a2: usize, a3: usize) -> usize;
pub fn __syscall4(n: usize, a1: usize, a2: usize, a3: usize, a4: usize) -> usize;
pub fn __syscall5(n: usize, a1: usize, a2: usize, a3: usize, a4: usize, a5: usize) -> usize;
pub fn __syscall6(
n: usize,
a1: usize,
a2: usize,
a3: usize,
a4: usize,
a5: usize,
a6: usize,
) -> usize;
}
// 以下是对 `libsyscall.a` 库中的几个函数的重新包装, 会检查它们运行后的返回值.
#[inline]
pub unsafe fn syscall0(n: Sysno) -> Result<usize, Errno> {
check_errno(__syscall0(n))
}
#[inline]
pub unsafe fn syscall1(n: Sysno, a1: usize) -> Result<usize, Errno> {
check_errno(__syscall1(n, a1))
}
#[inline]
pub unsafe fn syscall2(n: Sysno, a1: usize, a2: usize) -> Result<usize, Errno> {
check_errno(__syscall2(n, a1, a2))
}
#[inline]
pub unsafe fn syscall3(n: Sysno, a1: usize, a2: usize, a3: usize) -> Result<usize, Errno> {
check_errno(__syscall3(n, a1, a2, a3))
}
#[inline]
pub unsafe fn syscall4(
n: Sysno,
a1: usize,
a2: usize,
a3: usize,
a4: usize,
) -> Result<usize, Errno> {
check_errno(__syscall4(n, a1, a2, a3, a4))
}
#[inline]
pub unsafe fn syscall5(
n: Sysno,
a1: usize,
a2: usize,
a3: usize,
a4: usize,
a5: usize,
) -> Result<usize, Errno> {
check_errno(__syscall5(n, a1, a2, a3, a4, a5))
}
#[inline]
pub unsafe fn syscall6(
n: Sysno,
a1: usize,
a2: usize,
a3: usize,
a4: usize,
a5: usize,
a6: usize,
) -> Result<usize, Errno> {
check_errno(__syscall6(n, a1, a2, a3, a4, a5, a6))
}CC
如果是在自己的库里面想添加一些 C/C++/汇编/CUDA 代码, 并在 Rust 代码里访问它们, 建议使用 cc crate,
它会处理好路径, 名称, 环境变量以及跨平台相关的问题.
确保 gcc/clang 等对应的编译器是可用的, 因为 cc 会在内部调用它们.
CC 的官方文档 有很简单的使用方法, 这里不再介绍.
自动生成语言绑定
库 Crates
参考
文档与注释
- 行注释, 用于注释单行代码,
// single line - 块注释, 用于注释多行代码,
/* multiple lines */ - 模块注释, 通常放在模块的头部, 用于说明本模块的功能等基本信息,
//! - 模块内的代码注释, 用于描述类型或者函数的功能,
/// - 注释支持
markdown格式化
使用 /// 开头的行注释, 就可以转为代码文档.
/// Calculate n!
pub fn factorial(n: u32) -> u64 {
unimplemented!()
}等效于使用 #[doc] 属性:
#[doc = "Calculate n!"]
pub fn factorial(n: u32) -> u64 {
unimplemented!()
}对于 crate/module 级别的注释, 可以使用 //! xxxx 的形式.
生成在线文档:
$ cargo doc
Rust 社区维护了所有开源库的文档, 它们被每天更新, 可以在线查看. 所以, 在编写开源的 rust 库时, 及时更新代码里的文档注释是很关键的.
指定使用特定的工具链 Custom Toolchain
安装不稳定版 (nightly) 工具链
默认情问下, rustup 安装的是稳定版 (stable) 的工具链, 为了使用最新的特性, 我们通常 还会使用不稳定版 (nightly) 的工具链, 可以使用 rustup 来安装:
rustup toolchain add nightly
安装特定版本的工具链
也可以安装指定版本的工具链, 某些库会设置最小兼容的版本号(msrv, Minimum Supported Rust Version), 可以安装这个版本的工具链, 来测试它是否真的兼容指定的 msrv.
rustup toolchain install 1.72
为项目指定工具链
可以在项目根目录运行 rustup show 命令来查看使用哪个工具链来构建当前项目.
修改工具链的方法如下, 它们的优先级从高到低依次是:
- 工具链速记法, 比如说
cargo +nightly build就可以使用 nightly 版的工具链来构建本项目 - 使用
RUSTUP_TOOLCHAIN=nightly cargo build这样的环境变量, 来指定要使用的工具链 - 在项目根目录中运行
rustup override set nightly, 就可以强制指定用 nightly 版的工具链来构建当前项目, 该选项会被写入到~/.rustup/settings.toml文件中 - 在项目根目录创建
rust-toolchain文件, 并在里面写入nightly, 这个文件可以被作为配置文件合并到源代码目录中, 当在另一个环境中构建该项目时, 仍然可以重用这个配置 - 当前用户的默认工具链, 可以用
rustup default来查看, 也可以使用该命令来设置默认的工具链, 比如rustup default nightly
Cargo 基础
目录结构
├── benches
├── Cargo.lock
├── Cargo.toml
├── examples
├── src
├── target
└── tests
tests/集成测试benches/benchmarks 目录examples/示例代码src/main.go默认的可执行文件src/lib.go默认的库文件src/bin/可执行文件目录Cargo.toml包含了项目信息及依赖Cargo.lockcargo 自动生成的依赖信息
src/main.rs 编译生成的可执行文件名称是项目名称;
如果在 examples, tests, benches 以及 src/bin 目录里面有子目录, 里面还有
main.rs 以及相关的其它源码文件, 那么该可执行文件的名称与目录名相同.
Cargo Home
.
├── bin
├── config
├── credentials
├── env
├── git
└── registry
configcargo 全局配置文件credentialscargo login 时生成的本地tokenbin/目录, 包含了cargo install及rustup安装到本地的可执行文件env环境变量设置git/目录包含了以 git 仓库作为依赖(而不是 crates repo)的本地源码缓存registry/目录包括了从 crate registries (比如 crates.io) 下载的 crates 源代码目录
如果需要在 CI 中支持包缓存, 只需要将以下目录缓存到本地即可:
bin/registry/index/registry/cache/git/db/
当然了, 也可以使用 cargo vendor 下载所有的依赖并存储到项目源码中.
Cargo 配置
自动补全
默认情况下, cargo 命令并不会补全输入的子命令, 但是 Rust 工具链提供了 bash 补全
配置脚本, 我们只需要引入它即可. 以 nightly 版本为例, 可以在 ~/.bashrc 文件中
加入以下内容:
if [ -f ~/.rustup/toolchains/nightly-x86_64-unknown-linux-gnu/etc/bash_completion.d/cargo ]; then
source ~/.rustup/toolchains/nightly-x86_64-unknown-linux-gnu/etc/bash_completion.d/cargo
fi
编译相关的常用配置
[profile.bench]
opt-level = 3
debug = false
rpath = false
lto = true
debug-assertions = false
codegen-units = 1
[profile.release]
opt-level = 3
debug = false
rpath = false
lto = true
debug-assertions = false
codegen-units = 1
参考:
- https://github.com/rust-lang/cargo/issues/5596
- https://github.com/rust-lang/cargo/issues/6645
- https://github.com/rust-lang/cargo/issues/7206
引用外部库
声明一个外部库的依赖, 可以有以下几种形式.
最简单的是使用 crates.io 库里的 crates, 至少指定名称及版本号:
[dependencies]
rand = "3.1"
可以使用 cargo add rand 命令, 把 rand 库加入到 Cargo.toml;
也可以使用文本编辑器手动输入这些内容.
或者一个自定义的 git 仓库:
[dependencies]
rand = { git = "https://github.com/rust-lang/rand", branch="master" }
可以指定 git 仓库的分支名, 版本号, 以及 commit id 等, 可用于定位特定的提交.
也可以是本地的一个路径, 比如将一个大仓库拆成几个小库, 都还放在同一个根目录里:
[dependencies]
hello_utils = { path = "hello_utils" }
build.rs 可以使用 [build-dependencies] 里定义的依赖.
examples, tests 以及 benches 可以 使用 [dev-dependencies] 以及 [dependencies]
里定义的依赖.
src 目录里的代码, 只能使用 [dependencies] 里定义的依赖.
更新依赖包
手动更新依赖包到新版本:
$ cargo update # 更新所有依赖包
$ cargo update -p rand # 只更新 rand 包
这里, 只会更新 Cargo.lock, 根据 Cargo.toml 中定义的依赖包的版本, 而不会触动
Cargo.toml 本身. 如果需要更新 Cargo.toml 依赖里的版本, 要么手动去修改, 要么
使用 cargo-upgrade 这个扩展, 自动将它们更新到最新版.
$ cargo upgrade
构建脚本 build.rs
通过编写 build.rs 来自定义 cargo 的编译过程, 可以生成环境变量, cfg 属性, 以及文件.
可以读取环境变量, 标准输出会写入到 target/debug/build/<pkg>/output.
以 cargo: 开头的行也会被 cargo 直接解析并使用, 可以用这种方式来定义一些参数:
let out_dir = format!(...);
println!("cargo:rustc-link-search=native={}", out_dir);
println!("cargo:rustc-link-lib=static=syscall");
println!("cargo:rustc-cfg=nightly");以上代码, 就是定义了三个变量, 前面的两个是给 rustc 用于查找静态库的; 第三个
定义的 config 选项可以在 crates 代码里使用, 相当于条件编译.
工具
Compiler Explorer
Compiler Explorer, 在线查看 Rust 中间代码及汇编等.
它的优点很多:
- 它支持切换到所有版本的 rustc, 对比它们的输出结果, 甚至还支持 rust-lang 仓库的 master 分支
- 它支持 gccrs
- 支持很多的 rustc 选项, 比如
--target aarch64-unknown-linux-musl,--target x86_64-unknown-linux-musl - 它生成的汇编代码也有代码高亮, 方便阅读
- 它支持在 Intel 汇编与 AT&T 汇编之间转换
- 支持在源代码中一键定位到生成的汇编以及 MIR
- 鼠标悬在汇编指令上后, 就会显示该指令的帮助手册, 方便快速学习汇编指令
Rust Playground
Rust Playground 可以很方便地调用各种 rustc 的选项, 也可以 切换不稳定版本, 对比它们的输出. 它也很方便用于在线共享代码片段并调试.
cargo-show-asm
通常我们可以用 rustc --emit asm /path/to/file.rs 来编译生成汇编代码, 但此种方法会生成所有的代码,
阅读起来不算方便. 而 cargo-show-asm 工具
可以很方便地帮我们整理生成的汇编代码, 只打印我们感兴趣的函数.
clippy
rust-clippy 是一个很全面的代码检查工具, 可以配置选项.
它支持的700多条检查规则可以在官网查看.
Evcxr
Evcxr, 直接运行 Rust 代码的交互式终端 (REPL).
安装: cargo install evcxr_repl.
然后就可以在终端里跟它交互了: $ evcxr
同时, 稍加配置, 加入 shebang 后, 可以用这个工具来编写 rust 脚本:
#!/usr/bin/env -S bash -c 'cat $0 | tail -n +2 | evcxr --ide-mode'
println!("Hello, from rust script!");
for i in 0..10 {
println!("{i}");
}sccache
类似于 ccache, sccache 是一个编译缓存工具, 可以加快编译过程.
cargo-audit
cargo audit 用于查询当前项目使用的模块是否存在安全 风险, 通过查询 RustSec 官网, 并给出可能的修复方法.
cargo-edit
cargo-edit 为 cargo 添加 add, rm 以及 upgrade 等命令,
而不用手动编辑 Cargo.toml 文件.
比如 cargo add serde, cargo rm serde_json, 使用起来比较方面.
cargo-watch
cargo watch, 用于监视 cargo 项目的更改, 估然自动执行指定的动作.
比如自动执行 backend 可执行文件:
cargo watch -x 'run --bin backend'
或者自动运行 clippy:
cargo watch -x clippy
在使用 cargo watch 时, 默认会显示很多的 warning 信息, 尤其是在代码重构期间,
可以先禁用 rustc 的 warning:
RUSTFLAGS=-Awarnings cargo watch
目录结构
属性 Attributes
如果属性对整个 crate 都有作用的话, 使用 #![crate_attribute] 写法; 如果只对当前
module, 某个函数等起作用的话, 使用 #[module_attribute] 写法.
设置整个 crate 的属性 #![crate_attribute]; 设置整个 module 的属性, #[crate_attribute], 少了一个 ! 号.
它多种语法形式:
| 语法 | 描述 | 示例 |
|---|---|---|
#[attribute = "value"] | 设定属性值 | #![crate_type = "lib"] |
#[attribute(key = "value")] | key-value 形式, 键值对 | #![cfg(target_os = "linux")] |
#[attribute(value)] | 单个标识符 | #[allow(dead_code)], 对某个模块及函数禁用 dead_code lint |
接下来, 我们介绍一些常用的属性设置.
inline
用于提示 rustc 编译器, 把该函数标记为内联函数(inline function).
所谓的内联函数, 就是把函数体内的代码直接插入到该函数的调用处, 这样可以在代码里减少一个函数调用的成本.
看下面的一个示例代码, 注释部分是编译器可能生成的代码, 它会将 Point 中定义的函数体直接展开:
#[derive(Debug, Clone, Eq, PartialEq, Hash)]
pub struct Point {
x: i32,
y: i32,
}
impl Default for Point {
fn default() -> Self {
Self::new()
}
}
impl Point {
#[must_use]
#[inline]
pub const fn new() -> Self {
Self { x: 0, y: 0 }
}
#[must_use]
#[inline]
pub const fn from_xy(x: i32, y: i32) -> Self {
Self { x, y }
}
#[inline]
pub fn set_x(&mut self, x: i32) {
self.x = x;
}
#[inline]
pub fn set_y(&mut self, y: i32) {
self.y = y;
}
#[must_use]
#[inline]
pub const fn x(&self) -> i32 {
self.x
}
#[must_use]
#[inline]
pub const fn y(&self) -> i32 {
self.y
}
}
fn main() {
// let mut point: Point = Point {x: 3, y: 4};
let mut point: Point = Point::from_xy(3, 4);
// point.x = 2;
point.set_x(2);
// let y: i32 = point.y;
let y: i32 = point.y();
println!("y: {y}");
}除了上面的默认写法之外, 还有另外两种写法:
#[inline(always)], 建议编译器总是把该函数内联#[inline(never)], 建议编译器不把该函数内联
比如标准库里的 Backtrace::capture() 函数, 它就提示编译器不要做内联.
// From: std/src/backtrace.rs
/// Capture a stack backtrace of the current thread.
///
/// ...
///
#[stable(feature = "backtrace", since = "1.65.0")]
#[inline(never)] // want to make sure there's a frame here to remove
pub fn capture() -> Backtrace {
if !Backtrace::enabled() {
return Backtrace { inner: Inner::Disabled };
}
Backtrace::create(Backtrace::capture as usize)
}参考
相关知识
特性 Features
cargo features
条件编译 Conditional compilation
#[cfg(...)]在编译期使用cfg!(...)宏可以在程序运行期动态判断#[cfg_attr(...)]可以根据传入的属性来设置新的属性, 比如根据不同的平台来引入不同的源文件
这三种写法使用同样的配置条件, 配置条件会返回 true 或者 false. 同时可以组合使用多个配置条件:
| 组合 | 逻辑操作 | 描述 | 示例 |
|---|---|---|---|
all() | 逻辑与 | 所有的配置条件都成立, 它才返回 true | all(unix, ) |
any() | 逻辑或 | 只要有其中一个配置条件成立, 就返回 true | any(unix, osx) |
not() | 逻辑非 | 配置条件不成立时, 才返回 true | not(target_os = "linux") |
传入自定义条件
- 编译时传入参数:
rustc --cfg is_nightly foo.rs - 在
build.rs脚本中, 向 stdout 输出配置:println!("cargo:rustc-cfg=is_nightly");
之后就可以在代码中使用这个 is_night 属性了:
#[cfg(is_nightly)]#![cfg_attr(is_nightly, feature(llvm_asm))], 当is_nightly属性被设置时, 引入llvm_asm特性
cfg 属性
cfg 支持作为属性声名及作为宏定义:
#[cfg(target_os = "linux")]
fn are_you_linux() -> bool {
return true;
}
#[cfg(not(target_os = "linux"))]
fn are_you_linux() -> bool {
return false;
}可以设置只编译适合某个目标平台的代码, 比如下面的例子, 指定在 arm64 架构下 platform 模块的源文件:
#[cfg(all(
any(target_os = "linux", target_os = "android"),
target_arch = "aarch64"
))]
#[path = "platforms/linux-aarch64/mod.rs"]
mod platform;cfg_attr 属性
cfg_attr 属性算是 cfg 属性的语法糖, 它根据配置条件来设置相应的属性.
上面的代码片段可以用 cfg_attr 来重写:
#[cfg_attr(all(
any(target_os = "linux", target_os = "android"),
target_arch = "aarch64"
), path = "platforms/linux-aarch64/mod.rs")]
mod platform;另一个示例片段, 当 is_nightly 属性被设置时, 启用 llvm_asm 特性:
#![cfg_attr(is_nightly, feature(llvm_asm))]
cfg!() 宏
在编译时, 所有的分支代码都被编译; 然后在运行期间, 根据 cfg!() 宏返回值是 true 还是 false, 来选择相应的分支条件.
比如下面的代码片段:
fn are_you_linux() -> bool {
if cfg!(target_os = "linux") {
return true;
} else {
return false;
}
}target_arch
键值形选项, 用于判定目标的CPU架构, 常见的值有:
- "x86"
- "x86_64"
- "aarch64"
- "riscv64"
比如为 aarch64 平台指定模块的源文件:
#[cfg_attr(target_arch = "aarch64", path = "platform_aarch64.rs")]
mod platform;target_feature
键值型选择, 用于判定当前的处理器是否支持某些特性, 比如:
- "aes"
- "avx"
- "avx2"
- "crt-static"
- "sha"
- "sse"
- "sse4"
要注意的是, 这些选择都跟 target_arch 紧密相关, 都是平台特有的. 比如 "aes" 只在 "aarch64" CPU 上使用.
#[cfg_attr(target_feature = "aes", path = "aes_aarch64.rs")]
mod aes;
#[cfg_attr(not(target_feature = "aes"), path = "aes_portable.rs")]
mod aes;target_os
键值型选项, 用于判定目标的操作系统类型, 常用的值有:
- "linux"
- "windows"
- "macos"
- "ios"
- "android"
- "freebsd"
#[cfg_attr(target_os = "linux", path = "platforms/linux/mod.rs")]
mod platform
#[cfg_attr(target_os = "freebsd", path = "platforms/freebsd/mod.rs")]
mod platform;target_family
键值型选项, 用于大概指定目标操作系统的类型, 常见的值有:
- "unix", unix-like 系统, 比如 linux, macos, ios, android, freebsd
- "windows", windows 系统
- "wasm", WebAssembly 平台
#![cfg(target_family = "windows")]
use windows::Win32::UI;unix 和 windows
这个是对上面的简写:
- "unix" 相当于
target_family = "unix" - "windows" 相当于
target_family = "windows"
target_endian
键值型选项, 用于判定系统的大小端, 它只有两个可能的值:
- "big"
- "little", linux 平台默认都是小端的
比如, 下面的示例代码, 定义的 tcphdr_t 结构体, 针对大小端不同的机器, 设置了
/// TCP header.
/// Per RFC 793, September, 1981.
#[repr(C)]
pub struct tcphdr_t {
/// source port
pub th_sport: u16,
/// destination port
pub th_dport: u16,
/// sequence number
pub th_seq: tcp_seq,
/// acknowledgement number
pub th_ack: tcp_seq,
#[cfg(target_endian = "big")]
/// data offset
pub th_off: u8,
// (unused)
_th_x2: u8,
#[cfg(target_endian = "little")]
/// data offset
pub th_off: u8,
...
}target_pointer_width
键值型选项, 用于设置目标系统上一个指针的占用的比特数, 常用值有:
- "64", 64 位系统, 比如 "aarch64", "riscv64" 或者 "x86_64", 8个字节
- "32", 32 位系统, 4个字节
- "16"
同时, 要注意的是 usize 和 isize 占用的字节数与它相同, 在64位系统上, 都是8个字节的.
#[cfg(target_pointer_width = "32")]
/// max bytes for an exec function
pub const ARG_MAX: usize = 2 * 256 * 1024;
#[cfg(target_pointer_width = "64")]
/// max bytes for KVA-starved archs
pub const ARG_MAX: usize = 256 * 1024;target_has_atomic
键值型选项, 用于判定目标系统对特定大小的原子操作是否支持, 常见的值有:
- "8", 支持 AtomicI8, AtomicU8, AtomicBool
- "16", 支持 AtomicI16, AtomicU16
- "32", 支持 AtomicI32, AtomicU32
- "64", 支持 AtomicI64, AtomicU64, AtomicIsize, AtomicUsize
- "128", 支持 AtomicI128, AtomicU128
- "ptr", 支持 AtomicPtr
test
启用代码里的测试, 具体看单元测试
debug_assertions
#[cfg(debug_assertions)] 用于判断是否处于 debug 编译模式, 通常在调试模式下, 会打印出更多的调试代码.
看下面的例子:
#[allow(unused_variables)]
fn main() {
let keys = [1, 1, 2, 3, 5, 8, 13, 21];
#[cfg(debug_assertions)]
for i in 1..keys.len() {
assert!(keys[i - 1] <= keys[i]);
}
}debug_assert!() 宏的内部也是使用的这个条件:
macro_rules! debug_assert {
($($arg:tt)*) => {
if $crate::cfg!(debug_assertions) {
$crate::assert!($($arg)*);
}
};
}参考
跨平台相关
跨平台的类
sysinfo 模块支持多个平台, 为此, 它实现了一个比较明晰的代码结构.
我们以系统信息为例来说明.
src
├── c_interface.rs
├── common.rs
├── debug.rs
├── lib.rs
├── linux
│ ├── component.rs
│ ├── disk.rs
│ ├── mod.rs
│ ├── network.rs
│ ├── processor.rs
│ ├── process.rs
│ ├── system.rs
│ ├── users.rs
│ └── utils.rs
├── sysinfo.h
├── system.rs
├── traits.rs
├── utils.rs
以上目录结构, 省去了其它平台相关的代码, 只描述 linux 平台相关的.
它首先在根目录加了 traits.rs, 里面定义了多个 traits, 包含了所有的开放接口.
然后 c_interface.rs 定义了 C FFI 接口, 里面用到的是都 Box 指针.
在 linux/system.rs 里面, 定义了 linux 平台相关的 pub struct System { .. },
同时, 这个结构体实现了 trait SystemExt 要求的接口.
其它几个模块也都是这样组织的, 整个项目的代码结构很明晰.
交叉编译 Cross Compilation
静态编译 Static Compilation
rustc 默认使用的是操作系统里的C库, 比如 linux 里的是 glibc; 这个库与当前的系统平台有强绑定, 如果编译的程序链接到了它, 就很难让二进制程序在别的版本的系统上运行. 常见的一个问题就是链接了高版本的 glibc, 然后在低版本上运行失败, 提供版本不匹配.
此时, 可以考虑用静态编译的形式来处理, 可以使用 musl-libc 作为静态编译时的 libc 库.
musl 库是一个很简洁的 libc 实现, 它不着重于性能, 更关注代码的简洁性和跨平台能力.
在 linux 系统里, 需要安装这两个包:
sudo apt install musl-dev musl-tools
使用 rustup 安装 musl 的目标:
rustup target add x86_64-unknown-linux-musl
之后, 在编译一个 rust 项目时, 修改生成的目标:
cargo build --target=x86_64-unknown-linux-musl
设置 no_std
设计模式 Design Patterns
在计算机领域, 所谓的设计模式, 就是对软件开发中普遍存在的各种问题, 提出的通用的解决方案.
简单来说, 它们就是在特定情况下解决特定问题的一种常用思路.
要意识到设计模式本身的局限性:
- 它们并不是万金油, 可以解决所有问题
- 它们只是对特定问题的一种解决方案, 并不是唯一的解决方案
- 不要生搬硬套地使用它, 否则你的代码可能会很凌乱
"设计模式" 书中把设计模式分成了三大类:
参考
创建型 Creational
这类设计模式, 用于创建对象以及对象组, 并将对象的创建过程与使用过程分离, 只专注于创建对象的过程.
具体包括:
- 简单工厂模式 Simple factory
- 工厂方法模式 Factory method
- 抽象工厂模式 Abstract factory
- 构建器模式 Builder
- 原型模式 Prototype
- 单例模式 Singleton
参考
简单工厂模式 Simple factory
工厂 (factory), 在面向对象编程(OOP)中, 是用于创建其它对象的对象, 根据传入的不同参数, 而返回变化的对象. 这里的工厂, 可能是一个类, 然后这个类有一个工厂函数; 也可能只是一个独立的函数而已.
使用简单工厂, 创建具体的对象; 而使用者并不直接调用类的构造函数.
问题描述
装修房子时, 你需要一个木门. 你并不需要了解这个门是如何制造的, 你只需要把想要的门的尺寸告诉给制作门的 工厂, 然后他们就按要求生产木门了.
程序示例
#![deny(
warnings,
clippy::all,
clippy::cargo,
clippy::nursery,
clippy::pedantic
)]
/// 门的接口
pub trait Door {
fn width(&self) -> f32;
fn height(&self) -> f32;
}
/// 用于保存木门的内部属性, 它们不是 `pub` 的.
struct WoodenDoor {
width: f32,
height: f32,
}
impl WoodenDoor {
/// 木门的构造函数, 要注意, 它并不是 `pub` 的.
#[must_use]
#[inline]
const fn new(width: f32, height: f32) -> Self {
Self { width, height }
}
}
/// 为木门实现门的接口
impl Door for WoodenDoor {
#[inline]
fn width(&self) -> f32 {
self.width
}
#[inline]
fn height(&self) -> f32 {
self.height
}
}
/// 简单工厂函数, 它返回的是一个 trait object
#[must_use]
pub fn make_door(width: f32, height: f32) -> Box<dyn Door> {
Box::new(WoodenDoor::new(width, height))
}
fn main() {
// Make me a new door of 100x200
let door = make_door(100.0, 200.0);
println!("door.width: {}, height: {}", door.width(), door.height());
// Make me a door of 50x100
let _door2 = make_door(50.0, 100.0);
}工厂方法模式 Factory method
在运行时根据条件动态决定所需要的子类, 无需关心子类是如何构造的.
维基百科:
工厂方法模式是一种创建模式, 它使用工厂方法来处理创建对象的问题, 而无需指定将要创建的对象的确切类. 这是通过调用工厂方法来创建对象来完成的, 在接口中指定并由子类实现, 或者在基类中实现并可选地由派生类覆盖, 而不是通过调用构造函数.
问题描述
进行新员工招聘时, 不可都由HR进行面试, 还需要对这个职位比较熟悉的部门人员完成面试的职责. 比如开发人员去 面试新的程序员, 或者市场部经理去面试市场营销人员.
而工厂方法会根据所面试的岗位不同, 分配不同的面试人员, 他们会提问与部门工作相关的问题.
程序示例
#![deny(
warnings,
clippy::all,
clippy::cargo,
clippy::nursery,
clippy::pedantic
)]
pub trait Interviewer {
fn new() -> Self;
fn ask_questions(&self);
}
struct Developer {}
impl Interviewer for Developer {
fn new() -> Self {
Self {}
}
fn ask_questions(&self) {
println!("Asking about design patterns!");
}
}
struct CommunityExecutive {}
impl Interviewer for CommunityExecutive {
fn new() -> Self {
Self {}
}
fn ask_questions(&self) {
println!("Asking about community building");
}
}
pub struct HiringManager<Interviewer> {
interviewer: Box<Interviewer>,
}
impl<T: Interviewer> Default for HiringManager<T> {
fn default() -> Self {
Self::new()
}
}
impl<T: Interviewer> HiringManager<T> {
#[must_use]
pub fn new() -> Self {
let interviewer = Box::new(T::new());
Self { interviewer }
}
pub fn take_interview(&self) {
self.interviewer.ask_questions();
}
}
fn main() {
let dev_manager = HiringManager::<Developer>::new();
// Output: Asking about design patterns!
dev_manager.take_interview();
let marketing_manager = HiringManager::<CommunityExecutive>::new();
// Output: Asking about community building
marketing_manager.take_interview();
}抽象工厂模式 Abstract factory
维基百科:
抽象工厂模式提供了一种封装一组具有共同主题但没有指定其具体类的单个工厂的方法
问题描述
从之前讲到的简单工厂扩展出新的问题. 可以从木门店买木门, 从铁门店买铁门, 或者从别的店买玻璃门. 另外, 在之后的安程过程中, 需要有木匠来 安装木门, 焊工安装铁门等等. 可以看到, 门与安装工之间存在着依赖关系, 木门需要木匠, 铁门需要焊工, 而玻璃门需要别的安装工.
代码示例
#![allow(dead_code)]
pub trait Door {
fn get_description(&self);
}
struct WoodenDoor {}
impl Door for WoodenDoor {
fn get_description(&self) {
println!("I am a wooden door");
}
}
struct IronDoor {}
impl Door for IronDoor {
fn get_description(&self) {
println!("I am an iron door");
}
}
pub trait DoorFittingExpert {
fn get_description(&self);
}
struct Carpenter {}
impl DoorFittingExpert for Carpenter {
fn get_description(&self) {
println!("I can only fit wooden doors");
}
}
struct Welder {}
impl DoorFittingExpert for Welder {
fn get_description(&self) {
println!("I can only fit iron doors");
}
}
pub trait DoorFactory {
fn make_door(&self) -> Box<dyn Door>;
fn make_fitting_expert(&self) -> Box<dyn DoorFittingExpert>;
}
pub struct WoodenDoorFactory {}
impl Default for WoodenDoorFactory {
fn default() -> Self {
Self::new()
}
}
impl WoodenDoorFactory {
#[must_use]
pub const fn new() -> Self {
Self {}
}
}
impl DoorFactory for WoodenDoorFactory {
fn make_door(&self) -> Box<dyn Door> {
Box::new(WoodenDoor {})
}
fn make_fitting_expert(&self) -> Box<dyn DoorFittingExpert> {
Box::new(Carpenter {})
}
}
pub struct IronDoorFactory {}
impl Default for IronDoorFactory {
fn default() -> Self {
Self::new()
}
}
impl IronDoorFactory {
#[must_use]
pub const fn new() -> Self {
Self {}
}
}
impl DoorFactory for IronDoorFactory {
fn make_door(&self) -> Box<dyn Door> {
Box::new(WoodenDoor {})
}
fn make_fitting_expert(&self) -> Box<dyn DoorFittingExpert> {
Box::new(Carpenter {})
}
}
fn main() {
println!("test_dynamic_dispatch()");
{
let wooden_factory = WoodenDoorFactory::new();
let door = wooden_factory.make_door();
door.get_description();
let expert = wooden_factory.make_fitting_expert();
expert.get_description();
}
{
let iron_factory = IronDoorFactory::new();
let door = iron_factory.make_door();
door.get_description();
let expert = iron_factory.make_fitting_expert();
expert.get_description();
}
}建造者模式 Builder
当创建一个对象时, 需要的步骤比较多, 或者要设置的属性比较多时, 可以使用建造者模式.
标准库里有 std::thread::Builder 类实现了建造者模式, 可以看一下它的简单用法:
use std::thread;
fn main() {
let builder = thread::Builder::new()
.name("new-process".to_owned())
.stack_size(32 * 1024);
let handler = builder
.spawn(|| {
// thread code goes here.
println!("From worker thread");
})
.unwrap();
handler.join().unwrap();
}问题描述
比如, 在制作汉堡时, 可以加入酱法, 奶酷或者别的配料, 根据配料的差异, 可以制作出不同口味的汉堡.
代码示例
#[derive(Debug, Clone)]
pub struct Burger {
size: u32,
cheese: bool,
peperoni: bool,
lettuce: bool,
tomato: bool,
}
impl Burger {
pub fn new(size: u32) -> Self {
Self {
size,
cheese: false,
peperoni: false,
lettuce: false,
tomato: false,
}
}
pub fn show_flavors(&self) {
print!("{}", self.size);
if self.cheese {
print!("-cheese");
}
if self.peperoni {
print!("-peperoni");
}
if self.lettuce {
print!("-lettuce");
}
if self.tomato {
print!("-tomato");
}
println!();
}
}
pub struct BurgerBuilder {
burger: Burger,
}
impl BurgerBuilder {
pub fn new(size: u32) -> Self {
Self {
burger: Burger::new(size),
}
}
pub fn add_pepperoni(&mut self) -> &mut Self {
self.burger.peperoni = true;
self
}
pub fn add_lettuce(&mut self) -> &mut Self {
self.burger.lettuce = true;
self
}
pub fn add_cheese(&mut self) -> &mut Self {
self.burger.cheese = true;
self
}
pub fn add_tomato(&mut self) -> &mut Self {
self.burger.tomato = true;
self
}
pub fn build(&mut self) -> Burger {
self.burger.clone()
}
}
fn main() {
let burger = BurgerBuilder::new(14)
.add_pepperoni()
.add_lettuce()
.add_tomato()
.build();
burger.show_flavors();
}原型模式 Prototype
创建(克隆)一个对象的副本, 而不是从头创建一个对象.
问题描述
1995年出现的多莉羊, 是直接从成年羊的体细胞克隆生成的. 而普通的羊则是在精子与卵细胞结合形成授精卵后, 再长成新的羊.
代码示例
#![deny(
warnings,
clippy::all,
clippy::cargo,
clippy::nursery,
clippy::pedantic
)]
#[derive(Debug, Clone)]
pub struct Sheep {
name: String,
category: String,
}
impl Sheep {
#[must_use]
pub fn new(name: &str) -> Self {
Self {
name: name.to_owned(),
category: "Mountain Sheep".to_owned(),
}
}
pub fn set_name(&mut self, name: &str) {
self.name.clear();
self.name.push_str(name);
}
#[must_use]
pub const fn name(&self) -> &str {
self.name.as_str()
}
pub fn set_category(&mut self, category: &str) {
self.category.clear();
self.category.push_str(category);
}
#[must_use]
pub const fn category(&self) -> &str {
self.category.as_str()
}
pub fn show_info(&self) {
println!("Sheep [name: {0}, category: {1}]", self.name, self.category);
}
}
fn main() {
let joe = Sheep::new("Joe");
joe.show_info();
let mut dolly = joe.clone();
dolly.set_name("Dolly");
dolly.show_info();
let mut dolly_clone = joe;
dolly_clone.set_name("Dolly2");
dolly_clone.show_info();
}单例模式 Singleton
问题描述
代码示例
use lazy_static::lazy_static;
use std::sync::Mutex;
lazy_static! {
pub static ref GLOBAL_PRESIDENT: Mutex<President> =
Mutex::new(President::new("LazyStaticMacro"));
}
pub struct President {
name: String,
}
impl President {
#[must_use]
pub const fn empty() -> Self {
Self {
name: String::new(),
}
}
#[must_use]
pub fn new(name: &str) -> Self {
Self {
name: name.to_owned(),
}
}
#[must_use]
pub fn name(&self) -> &str {
&self.name
}
pub fn set_name(&mut self, name: &str) {
self.name.clear();
self.name.push_str(name);
}
}
fn main() {
GLOBAL_PRESIDENT
.lock()
.unwrap()
.set_name("Trump[lazy_static]");
println!(
"President name: {}",
GLOBAL_PRESIDENT.lock().unwrap().name()
);
}结构型 Structural
结构型设计模式, 是通过识别对象之间的关系, 并试图去简化它们.
在这个分类下包含的设计模式有:
适配器模式
比如, 在大陆用的手机充电器, 并不能直接在德国使用, 因为电源接口类型不一致. 如果想使用的话, 需要在充电器上面加一个转接器(适配器), 才能插在插排上.
问题描述
代码示例
#![deny(
warnings,
clippy::all,
clippy::cargo,
clippy::nursery,
clippy::pedantic
)]
#![allow(dead_code)]
pub trait Lion {
fn roar(&self) {
println!("I am a Lion");
}
}
struct AfricanLion {}
impl Lion for AfricanLion {
fn roar(&self) {
println!("I am an African Lion");
}
}
struct AsianLion {}
impl Lion for AsianLion {
fn roar(&self) {
println!("I am an Asian Lion");
}
}
struct Hunter {}
impl Hunter {
#[must_use]
pub const fn new() -> Self {
Self {}
}
#[allow(clippy::unused_self)]
pub fn hunt(&self, lion: &impl Lion) {
lion.roar();
}
}
struct WildDog {}
impl WildDog {
#[allow(clippy::unused_self)]
pub fn bark(&self) {
println!("I am a wild dog");
}
}
struct WildDogAdapter {
dog: WildDog,
}
impl WildDogAdapter {
#[must_use]
pub const fn new(dog: WildDog) -> Self {
Self { dog }
}
}
impl Lion for WildDogAdapter {
fn roar(&self) {
self.dog.bark();
}
}
fn main() {
let dog = WildDog {};
let dog_adapter = WildDogAdapter::new(dog);
let hunter = Hunter::new();
hunter.hunt(&dog_adapter);
}桥梁模式 Bridge
问题描述
代码示例
#![deny(
warnings,
clippy::all,
clippy::cargo,
clippy::nursery,
clippy::pedantic
)]
pub trait WebPage {
fn new(theme: Box<dyn Theme>) -> Self;
fn get_content(&self) -> String;
}
pub struct AboutPage {
theme: Box<dyn Theme>,
}
impl WebPage for AboutPage {
fn new(theme: Box<dyn Theme>) -> Self {
Self { theme }
}
fn get_content(&self) -> String {
format!("About page in {}", self.theme.color())
}
}
pub struct CareersPage {
theme: Box<dyn Theme>,
}
impl WebPage for CareersPage {
fn new(theme: Box<dyn Theme>) -> Self {
Self { theme }
}
fn get_content(&self) -> String {
format!("Careers page in {}", self.theme.color())
}
}
pub trait Theme {
fn color(&self) -> &'static str;
}
#[derive(Debug, Clone)]
pub struct DarkTheme {}
impl Theme for DarkTheme {
fn color(&self) -> &'static str {
"Dark Black"
}
}
#[derive(Debug, Clone)]
pub struct LightTheme {}
impl Theme for LightTheme {
fn color(&self) -> &'static str {
"Off White"
}
}
#[derive(Debug, Clone)]
pub struct AquaTheme {}
impl Theme for AquaTheme {
fn color(&self) -> &'static str {
"Light blue"
}
}
fn main() {
let dark_theme = Box::new(DarkTheme {});
let about_page = AboutPage::new(dark_theme.clone());
let careers_page = CareersPage::new(dark_theme);
println!("{}", about_page.get_content());
println!("{}", careers_page.get_content());
}组合模式
问题描述
代码示例
#![deny(
warnings,
clippy::all,
clippy::cargo,
clippy::nursery,
clippy::pedantic
)]
pub trait Employee {
fn get_name(&self) -> &str;
fn get_salary(&self) -> f64;
fn set_salary(&mut self, salary: f64);
fn get_roles(&self) -> &[String];
}
struct Developer {
name: String,
salary: f64,
roles: Vec<String>,
}
impl Developer {
#[must_use]
pub fn new(name: &str, salary: f64) -> Self {
Self {
name: name.to_owned(),
salary,
roles: vec!["Development".to_owned(), "Employee".to_owned()],
}
}
}
impl Employee for Developer {
fn get_name(&self) -> &str {
&self.name
}
fn get_salary(&self) -> f64 {
self.salary
}
fn set_salary(&mut self, salary: f64) {
self.salary = salary;
}
fn get_roles(&self) -> &[String] {
&self.roles
}
}
pub struct Designer {
name: String,
salary: f64,
roles: Vec<String>,
}
impl Designer {
#[must_use]
pub fn new(name: &str, salary: f64) -> Self {
Self {
name: name.to_owned(),
salary,
roles: vec!["Designer".to_owned(), "Employee".to_owned()],
}
}
}
impl Employee for Designer {
fn get_name(&self) -> &str {
&self.name
}
fn get_salary(&self) -> f64 {
self.salary
}
fn set_salary(&mut self, salary: f64) {
self.salary = salary;
}
fn get_roles(&self) -> &[String] {
&self.roles
}
}
#[derive(Default)]
pub struct Organization {
employees: Vec<Box<dyn Employee>>,
}
impl Organization {
pub fn add_employee(&mut self, employee: Box<dyn Employee>) {
self.employees.push(employee);
}
#[must_use]
pub fn get_net_salaries(&self) -> f64 {
let mut sum = 0.0;
for employee in &self.employees {
sum += employee.get_salary();
}
sum
}
}
fn main() {
let john = Box::new(Developer::new("John Doe", 12_000.0));
let jane = Box::new(Developer::new("Jane Doe", 15_000.0));
let mut organization = Organization::default();
organization.add_employee(john);
organization.add_employee(jane);
let net_salaries = organization.get_net_salaries();
println!("Net salaries: {net_salaries}");
}装饰器模式 Decorator
通过将对象包装在内部, 来动态地更改对象在运行时的行为.
一些现代化的编程语言, 例如 Python, 有提供这样的语言特定, 比如在执行函数之前以及运行完成之后, 都打印出日志, 这样的需求就可以用装饰器模式来实现. 比如下面的例子:
# 定义一个装饰器
def log_decorator(func):
# inner1 是一个包装函数
def inner1():
print("> before function execution")
# 调用真正的函数
func()
print("> after function execution")
return inner1
# 定义一个测试用的函数, 并应有上面定义好的装饰器; `@log_decorator` 等同于下面一行代码的写法:
# say_hello = log_decorator(say_hello)
@log_decorator
def hello():
print("hello()")
# 调用函数
say_hello()
问题描述
代码示例
#![deny(
warnings,
clippy::all,
clippy::cargo,
clippy::nursery,
clippy::pedantic
)]
pub trait Coffee {
fn get_cost(&self) -> f64;
fn get_description(&self) -> String;
}
pub struct SimpleCoffee {}
impl Default for SimpleCoffee {
fn default() -> Self {
Self::new()
}
}
impl SimpleCoffee {
#[must_use]
pub const fn new() -> Self {
Self {}
}
}
impl Coffee for SimpleCoffee {
fn get_cost(&self) -> f64 {
10.0
}
fn get_description(&self) -> String {
"Simple coffee".to_owned()
}
}
pub struct MilkCoffee {
inner: Box<dyn Coffee>,
}
impl MilkCoffee {
#[must_use]
pub const fn new(inner: Box<dyn Coffee>) -> Self {
Self { inner }
}
}
impl Coffee for MilkCoffee {
fn get_cost(&self) -> f64 {
self.inner.get_cost() + 2.0
}
fn get_description(&self) -> String {
let mut desc = self.inner.get_description();
desc.push_str(", milk");
desc
}
}
pub struct WilpCoffee {
inner: Box<dyn Coffee>,
}
impl WilpCoffee {
#[must_use]
pub const fn new(inner: Box<dyn Coffee>) -> Self {
Self { inner }
}
}
impl Coffee for WilpCoffee {
fn get_cost(&self) -> f64 {
self.inner.get_cost() + 5.0
}
fn get_description(&self) -> String {
let mut desc = self.inner.get_description();
desc.push_str(", wilp");
desc
}
}
pub struct VanillaCoffee {
inner: Box<dyn Coffee>,
}
impl VanillaCoffee {
#[must_use]
pub const fn new(inner: Box<dyn Coffee>) -> Self {
Self { inner }
}
}
impl Coffee for VanillaCoffee {
fn get_cost(&self) -> f64 {
self.inner.get_cost() + 3.0
}
fn get_description(&self) -> String {
let mut desc = self.inner.get_description();
desc.push_str(", vanilla");
desc
}
}
fn main() {
let coffee = Box::new(SimpleCoffee::new());
println!("cost: {}", coffee.get_cost());
println!("desc: {}", coffee.get_description());
let coffee = Box::new(MilkCoffee::new(coffee));
println!("cost: {}", coffee.get_cost());
println!("desc: {}", coffee.get_description());
let coffee = Box::new(WilpCoffee::new(coffee));
println!("cost: {}", coffee.get_cost());
println!("desc: {}", coffee.get_description());
let coffee = VanillaCoffee::new(coffee);
println!("cost: {}", coffee.get_cost());
println!("desc: {}", coffee.get_description());
}门面模式 Facade
问题描述
代码示例
#![deny(
warnings,
clippy::all,
clippy::cargo,
clippy::nursery,
clippy::pedantic
)]
#[derive(Default)]
pub struct Computer {}
impl Computer {
pub fn get_electric_shock(&self) {
println!("Ouch!");
}
pub fn make_sound(&self) {
println!("Beep beep!");
}
pub fn show_loading_screen(&self) {
println!("Loading..");
}
pub fn bam(&self) {
println!("Ready to be used!");
}
pub fn close_every_thing(&self) {
println!("Bup bup bup buzzz!");
}
pub fn sooth(&self) {
println!("Zzzzz");
}
pub fn pull_current(&self) {
println!("Haaah!");
}
}
pub struct ComputerFacade {
computer: Computer,
}
impl ComputerFacade {
#[must_use]
pub const fn new(computer: Computer) -> Self {
Self { computer }
}
pub fn turn_on(&self) {
println!("Turning on!");
self.computer.get_electric_shock();
self.computer.make_sound();
self.computer.show_loading_screen();
self.computer.bam();
}
pub fn turn_off(&self) {
println!("Turning off!");
self.computer.close_every_thing();
self.computer.pull_current();
self.computer.sooth();
}
}
fn main() {
let computer = ComputerFacade::new(Computer::default());
computer.turn_on();
computer.turn_off();
}享元模式 Flyweight
问题描述
代码示例
#![deny(
warnings,
clippy::all,
clippy::cargo,
clippy::nursery,
clippy::pedantic
)]
use std::collections::BTreeMap;
#[derive(Debug, Default, Clone)]
pub struct KarakTea {
preference: String,
}
impl KarakTea {
#[must_use]
pub const fn new(preference: String) -> Self {
Self { preference }
}
#[must_use]
pub const fn preference(&self) -> &str {
self.preference.as_str()
}
}
#[derive(Default)]
pub struct TeaMaker {
available_tea: BTreeMap<String, KarakTea>,
}
impl TeaMaker {
#[must_use]
#[allow(clippy::missing_panics_doc)]
pub fn make(&mut self, preference: &str) -> KarakTea {
if let Some(tea) = self.available_tea.get(preference) {
tea.clone()
} else {
let tea = KarakTea::new(preference.to_owned());
self.available_tea
.insert(preference.to_owned(), tea.clone());
tea
}
}
}
pub struct TeaShop {
tea_maker: TeaMaker,
orders: BTreeMap<usize, KarakTea>,
}
impl TeaShop {
#[must_use]
pub const fn new(tea_maker: TeaMaker) -> Self {
Self {
tea_maker,
orders: BTreeMap::new(),
}
}
pub fn take_order(&mut self, tea_preference: &str, table: usize) {
let tea = self.tea_maker.make(tea_preference);
self.orders.insert(table, tea);
}
pub fn serve(&self) {
for (table, tea) in &self.orders {
println!("Serving the tea( {} ) to table {table}", tea.preference());
}
}
}
fn main() {
let tea_maker = TeaMaker::default();
let mut tea_shop = TeaShop::new(tea_maker);
tea_shop.take_order("less sugar", 1);
tea_shop.take_order("more milk", 2);
tea_shop.take_order("without sugar", 3);
tea_shop.serve();
}代理模式 Proxy
问题描述
代码示例
#![deny(
warnings,
clippy::all,
clippy::cargo,
clippy::nursery,
clippy::pedantic
)]
pub trait Door {
fn open(&self);
fn close(&self);
}
pub struct LabDoor {}
impl Door for LabDoor {
fn open(&self) {
println!("Opening lab door");
}
fn close(&self) {
println!("Closing lab door");
}
}
pub struct SecureDoor {
door: LabDoor,
}
impl SecureDoor {
#[must_use]
pub const fn new(door: LabDoor) -> Self {
Self { door }
}
pub fn open(&self, password: &str) {
if Self::authenticate(password) {
self.door.open();
} else {
println!("Big no! It ain't possible!");
}
}
pub fn close(&self) {
self.door.close();
}
fn authenticate(password: &str) -> bool {
password == "$ecr@t"
}
}
fn main() {
let door = SecureDoor::new(LabDoor {});
door.open("Invalid");
door.open("$ecr@t");
door.close();
}行为型 Behavioral
在这个分类下包含的设计模式有:
- 责任链模式 Chain of Responsibilities
- 命令行模式 Command
- 迭代器模式 Iterator
- 中介者模式 Mediator
- 备忘录模式 Memento
- 观察者模式 Observer
- 访问者模式 Visitor
- 策略模式 Strategy
- 装态模式 State
- 模板方法模式 Template Method
责任链模式 Chain of Responsibility
问题描述
代码示例
#![deny(
warnings,
clippy::all,
clippy::cargo,
clippy::nursery,
clippy::pedantic
)]
pub trait Account {
fn name(&self) -> &'static str;
fn pay(&mut self, amount: f64) -> bool {
if self.can_pay(amount) {
println!("Paid {amount} using {}", self.name());
self.pay_money(amount);
return true;
}
let name = self.name().to_owned();
if let Some(successor) = self.get_successor() {
println!("'Cannot pay using {name}. Proceeding ..");
return successor.as_mut().pay(amount);
}
println!("None of the accounts have enough balance");
false
}
fn balance(&self) -> f64;
fn get_successor(&mut self) -> Option<&mut Box<dyn Account>>;
fn pay_money(&mut self, amount: f64);
fn can_pay(&self, amount: f64) -> bool {
self.balance() >= amount
}
}
type AccountNode = Option<Box<dyn Account>>;
pub struct Bank {
balance: f64,
next: AccountNode,
}
impl Bank {
#[must_use]
pub const fn new(balance: f64, next: AccountNode) -> Self {
Self { balance, next }
}
}
impl Account for Bank {
fn name(&self) -> &'static str {
"Bank"
}
fn balance(&self) -> f64 {
self.balance
}
fn get_successor(&mut self) -> Option<&mut Box<dyn Account>> {
self.next.as_mut()
}
fn pay_money(&mut self, amount: f64) {
self.balance -= amount;
}
}
pub struct Paypal {
balance: f64,
next: AccountNode,
}
impl Paypal {
#[must_use]
pub const fn new(balance: f64, next: AccountNode) -> Self {
Self { balance, next }
}
}
impl Account for Paypal {
fn name(&self) -> &'static str {
"Paypal"
}
fn balance(&self) -> f64 {
self.balance
}
fn get_successor(&mut self) -> Option<&mut Box<dyn Account>> {
self.next.as_mut()
}
fn pay_money(&mut self, amount: f64) {
self.balance -= amount;
}
}
pub struct Bitcoin {
balance: f64,
next: AccountNode,
}
impl Bitcoin {
#[must_use]
pub const fn new(balance: f64, next: AccountNode) -> Self {
Self { balance, next }
}
}
impl Account for Bitcoin {
fn name(&self) -> &'static str {
"Bitcoin"
}
fn balance(&self) -> f64 {
self.balance
}
fn get_successor(&mut self) -> Option<&mut Box<dyn Account>> {
self.next.as_mut()
}
fn pay_money(&mut self, amount: f64) {
self.balance -= amount;
}
}
fn main() {
// Let's prepare a chain like below
// $bank->$paypal->$bitcoin
//
// First priority bank
// If bank can't pay then paypal
// If paypal can't pay then bit coin
let bitcoin = Box::new(Bitcoin::new(300.0, None)); // Bitcoin with balance 300
let paypal = Box::new(Paypal::new(200.0, Some(bitcoin))); // Paypal with balance 200
let mut bank = Bank::new(100.0, Some(paypal)); // Bank with balance 100
// Let's try to pay using the first priority i.e. bank
bank.pay(259.0);
}命令行模式 Command
问题描述
代码示例
#![deny(
warnings,
clippy::all,
clippy::cargo,
clippy::nursery,
clippy::pedantic
)]
#![allow(clippy::needless_pass_by_ref_mut)]
use std::cell::RefCell;
use std::rc::Rc;
/// The Receiver
pub struct Bulb {}
impl Bulb {
pub fn turn_on(&mut self) {
println!("Bulb has been lit");
}
pub fn turn_off(&mut self) {
println!("Darkness!");
}
}
pub type BulbNode = Rc<RefCell<Bulb>>;
pub trait Command {
fn execute(&mut self);
fn undo(&mut self);
fn redo(&mut self);
}
pub struct TurnOn {
bulb: BulbNode,
}
impl TurnOn {
pub const fn new(bulb: BulbNode) -> Self {
Self { bulb }
}
}
impl Command for TurnOn {
fn execute(&mut self) {
self.bulb.borrow_mut().turn_on();
}
fn undo(&mut self) {
self.bulb.borrow_mut().turn_off();
}
fn redo(&mut self) {
self.execute();
}
}
pub struct TurnOff {
bulb: BulbNode,
}
impl TurnOff {
#[must_use]
pub const fn new(bulb: BulbNode) -> Self {
Self { bulb }
}
}
impl Command for TurnOff {
fn execute(&mut self) {
self.bulb.borrow_mut().turn_off();
}
fn undo(&mut self) {
self.bulb.borrow_mut().turn_on();
}
fn redo(&mut self) {
self.execute();
}
}
/// The Invoker
pub struct RemoteControl {}
impl RemoteControl {
pub fn submit(&self, command: &mut impl Command) {
command.execute();
}
}
fn main() {
let bulb = Rc::new(RefCell::new(Bulb {}));
let mut turn_on = TurnOn::new(bulb.clone());
let mut turn_off = TurnOff::new(bulb);
let remote = RemoteControl {};
remote.submit(&mut turn_on);
remote.submit(&mut turn_off);
}迭代器模式 Iterator
问题描述
代码示例
#![deny(
warnings,
clippy::all,
clippy::cargo,
clippy::nursery,
clippy::pedantic
)]
#[derive(Debug, Clone, Copy, PartialEq, PartialOrd)]
pub struct RadioStation {
frequency: f64,
}
impl RadioStation {
#[must_use]
pub const fn new(frequency: f64) -> Self {
Self { frequency }
}
#[must_use]
pub const fn frequency(&self) -> f64 {
self.frequency
}
}
pub type StationList = Vec<RadioStation>;
fn main() {
let mut list = vec![
RadioStation::new(89.0),
RadioStation::new(101.0),
RadioStation::new(102.0),
RadioStation::new(103.2),
];
println!("list len: {}", list.len());
for station in &list {
println!("freq: {}", station.frequency());
}
if let Some(index) = list
.iter()
.position(|station| (station.frequency() - 89.0).abs() < f64::EPSILON)
{
list.swap_remove(index);
}
//list.retain(|&station| station.frequency() != 89.0);
println!("list len: {}", list.len());
}中介者模式 Mediator
问题描述
代码示例
#![deny(
warnings,
clippy::all,
clippy::cargo,
clippy::nursery,
clippy::pedantic
)]
use chrono::Local;
use std::cell::RefCell;
use std::rc::Rc;
pub trait ChatRoomMediator {
fn show_message(&mut self, user_name: &str, message: &str);
}
pub struct ChatRoom {
id: i32,
count: usize,
}
impl ChatRoom {
#[must_use]
pub const fn new(id: i32) -> Self {
Self { id, count: 0 }
}
#[must_use]
pub const fn id(&self) -> i32 {
self.id
}
}
impl ChatRoomMediator for ChatRoom {
fn show_message(&mut self, user_name: &str, message: &str) {
self.count += 1;
let now = Local::now();
let now = now.format("%b %d, %H:%M");
println!("{now} [{user_name}]: {message}");
}
}
pub type ChatRoomNode = Rc<RefCell<dyn ChatRoomMediator>>;
pub struct User {
name: String,
chat_room: ChatRoomNode,
}
impl User {
#[must_use]
pub const fn new(name: String, chat_room: ChatRoomNode) -> Self {
Self { name, chat_room }
}
#[must_use]
pub const fn name(&self) -> &str {
self.name.as_str()
}
pub fn send(&self, message: &str) {
self.chat_room
.borrow_mut()
.show_message(&self.name, message);
}
}
fn main() {
let chat_room = Rc::new(RefCell::new(ChatRoom::new(42)));
let john = User::new("John".to_owned(), chat_room.clone());
let jane = User::new("Jane".to_owned(), chat_room);
john.send("Hi there!");
jane.send("Hey!");
}备忘录模式 Memento
问题描述
代码示例
#![deny(
warnings,
clippy::all,
clippy::cargo,
clippy::nursery,
clippy::pedantic
)]
pub struct EditorMemento {
content: String,
}
impl EditorMemento {
#[must_use]
pub const fn new(content: String) -> Self {
Self { content }
}
#[must_use]
pub const fn content(&self) -> &str {
self.content.as_str()
}
}
pub struct Editor {
content: String,
}
impl Default for Editor {
fn default() -> Self {
Self::new()
}
}
impl Editor {
#[must_use]
pub const fn new() -> Self {
Self {
content: String::new(),
}
}
pub fn append(&mut self, new_content: &str) {
self.content.push_str(new_content);
}
#[must_use]
pub const fn content(&self) -> &str {
self.content.as_str()
}
#[must_use]
pub fn save(&self) -> EditorMemento {
EditorMemento::new(self.content.clone())
}
pub fn restore(&mut self, memento: &EditorMemento) {
self.content.clear();
self.content.push_str(memento.content());
}
}
fn main() {
let mut editor = Editor::new();
editor.append("This is the first sentence.\n");
editor.append("This is second.\n");
let saved = editor.save();
editor.append("And this is third.\n");
println!("current content:\n{}", editor.content());
editor.restore(&saved);
println!("current content:\n{}", editor.content());
}观察者模式 Observer
问题描述
代码示例
#![deny(
warnings,
clippy::all,
clippy::cargo,
clippy::nursery,
clippy::pedantic
)]
pub struct JobPost {
title: String,
}
impl JobPost {
#[must_use]
pub fn new(title: &str) -> Self {
Self {
title: title.to_owned(),
}
}
#[must_use]
pub const fn title(&self) -> &str {
self.title.as_str()
}
}
pub trait Observer {
fn on_job_posted(&self, job: &JobPost);
}
pub struct JobSeeker {
name: String,
}
impl JobSeeker {
#[must_use]
pub fn new(name: &str) -> Self {
Self {
name: name.to_owned(),
}
}
}
impl Observer for JobSeeker {
fn on_job_posted(&self, job: &JobPost) {
println!("Hi, {}! New job posted: {}", self.name, job.title());
}
}
#[derive(Default)]
pub struct EmploymentAgency {
observers: Vec<Box<dyn Observer>>,
}
impl EmploymentAgency {
pub fn attach(&mut self, observer: Box<dyn Observer>) {
self.observers.push(observer);
}
pub fn add_job(&self, job: &JobPost) {
self.notify(job);
}
fn notify(&self, job: &JobPost) {
for observer in &self.observers {
observer.as_ref().on_job_posted(job);
}
}
}
fn main() {
let john = Box::new(JobSeeker::new("John Doe"));
let jane = Box::new(JobSeeker::new("Jane Doe"));
let mut job_postings = EmploymentAgency::default();
job_postings.attach(john);
job_postings.attach(jane);
job_postings.add_job(&JobPost::new("Software Engineer"));
}访问者模式 Visitor
问题描述
代码示例
#![deny(
warnings,
clippy::all,
clippy::cargo,
clippy::nursery,
clippy::pedantic
)]
/// Visitee
pub trait Animal {
fn accept(&self, operation: &impl AnimalOperation);
}
/// Visitor
pub trait AnimalOperation {
fn visit_monkey(&self, monkey: &Monkey);
fn visit_lion(&self, lion: &Lion);
fn visit_dolphin(&self, dolphin: &Dolphin);
}
#[derive(Default)]
pub struct Monkey {}
impl Monkey {
pub fn shout(&self) {
println!("Oooh oo aa aa!");
}
}
impl Animal for Monkey {
fn accept(&self, operation: &impl AnimalOperation) {
operation.visit_monkey(self);
}
}
#[derive(Default)]
pub struct Lion {}
impl Lion {
pub fn roar(&self) {
println!("Roaaaar!");
}
}
impl Animal for Lion {
fn accept(&self, operation: &impl AnimalOperation) {
operation.visit_lion(self);
}
}
#[derive(Default)]
pub struct Dolphin {}
impl Dolphin {
pub fn speak(&self) {
println!("Tutt tuttu tuut");
}
}
impl Animal for Dolphin {
fn accept(&self, operation: &impl AnimalOperation) {
operation.visit_dolphin(self);
}
}
#[derive(Default)]
pub struct Speak {}
impl AnimalOperation for Speak {
fn visit_monkey(&self, monkey: &Monkey) {
monkey.shout();
}
fn visit_lion(&self, lion: &Lion) {
lion.roar();
}
fn visit_dolphin(&self, dolphin: &Dolphin) {
dolphin.speak();
}
}
#[derive(Default)]
pub struct Jump {}
impl AnimalOperation for Jump {
fn visit_monkey(&self, _monkey: &Monkey) {
println!("Jumped 20 feet high! on to the tree!");
}
fn visit_lion(&self, _lion: &Lion) {
println!("Jumped 7 feet! Back to the ground!");
}
fn visit_dolphin(&self, _dolphin: &Dolphin) {
println!("Walked on water a little and disappeared!");
}
}
fn main() {
let monkey = Monkey::default();
let lion = Lion::default();
let dolphin = Dolphin::default();
let speak = Speak::default();
let jump = Jump::default();
monkey.accept(&speak);
monkey.accept(&jump);
lion.accept(&speak);
lion.accept(&jump);
dolphin.accept(&speak);
dolphin.accept(&jump);
}策略模式 Strategy
问题描述
代码示例
#![deny(
warnings,
clippy::all,
clippy::cargo,
clippy::nursery,
clippy::pedantic
)]
pub trait SortStrategy {
fn sort(&self, array: &mut [i32]);
}
#[derive(Default)]
pub struct BubbleSort {}
impl SortStrategy for BubbleSort {
fn sort(&self, _array: &mut [i32]) {
println!("Sorting using bubble sort");
}
}
#[derive(Default)]
pub struct QuickSort {}
impl SortStrategy for QuickSort {
fn sort(&self, _array: &mut [i32]) {
println!("Sorting using quick sort");
}
}
pub struct Sorter {
strategy: Box<dyn SortStrategy>,
}
impl Sorter {
#[must_use]
pub fn new(strategy: Box<dyn SortStrategy>) -> Self {
Self { strategy }
}
pub fn sort(&self, array: &mut [i32]) {
self.strategy.sort(array);
}
}
fn main() {
let mut array = [1, 5, 4, 3, 2, 8];
let sorter = Sorter::new(Box::<BubbleSort>::default());
sorter.sort(&mut array);
let sorter = Sorter::new(Box::<QuickSort>::default());
sorter.sort(&mut array);
}状态模式 State
问题描述
代码示例
#![deny(
warnings,
clippy::all,
clippy::cargo,
clippy::nursery,
clippy::pedantic
)]
pub trait WritingState {
fn write(&self, words: &str);
}
#[derive(Default)]
pub struct UpperCase {}
impl WritingState for UpperCase {
fn write(&self, words: &str) {
println!("{}", words.to_ascii_uppercase());
}
}
#[derive(Default)]
pub struct LowerCase {}
impl WritingState for LowerCase {
fn write(&self, words: &str) {
println!("{}", words.to_ascii_lowercase());
}
}
#[derive(Default)]
pub struct DefaultText {}
impl WritingState for DefaultText {
fn write(&self, words: &str) {
println!("{words}");
}
}
pub struct TextEditor {
state: Box<dyn WritingState>,
}
impl TextEditor {
#[must_use]
pub const fn new(state: Box<dyn WritingState>) -> Self {
Self { state }
}
pub fn set_state(&mut self, new_state: Box<dyn WritingState>) {
self.state = new_state;
}
pub fn write(&self, words: &str) {
self.state.write(words);
}
}
fn main() {
let mut editor = TextEditor::new(Box::<DefaultText>::default());
editor.write("First line");
editor.set_state(Box::<UpperCase>::default());
editor.write("Second line");
editor.write("Third line");
editor.set_state(Box::<LowerCase>::default());
editor.write("Fourth line");
editor.write("Fifth line");
}模板方法模式 Template Method
问题描述
代码示例
#![deny(
warnings,
clippy::all,
clippy::cargo,
clippy::nursery,
clippy::pedantic
)]
pub trait Builder {
fn build(&self) {
self.test();
self.lint();
self.assemble();
self.deploy();
}
fn test(&self);
fn lint(&self);
fn assemble(&self);
fn deploy(&self);
}
#[derive(Default)]
pub struct AndroidBuilder {}
impl Builder for AndroidBuilder {
fn test(&self) {
println!("Running android tests");
}
fn lint(&self) {
println!("Linting the android code");
}
fn assemble(&self) {
println!("Assembling the android build");
}
fn deploy(&self) {
println!("Deploying android build to server");
}
}
#[derive(Default)]
pub struct IosBuilder {}
impl Builder for IosBuilder {
fn test(&self) {
println!("Running ios tests");
}
fn lint(&self) {
println!("Linting the ios code");
}
fn assemble(&self) {
println!("Assembling the ios build");
}
fn deploy(&self) {
println!("Deploying ios build to server");
}
}
fn main() {
let android_builder = AndroidBuilder::default();
android_builder.build();
let ios_builder = IosBuilder::default();
ios_builder.build();
}数据结构与算法
用 Rust 语言实现的常见的数据结构与算法, 有不少跟语言相关的限制, 我们有专门的仓库来记录这些知识. 请访问 The Algorithms.
新特性 Unstable Features
Portable simd
这个特性用于编写跨平台的 SIMD (Single Instruction Multiple Data) 代码.
#![feature(portable_simd)]
use std::simd::f32x4;
fn main() {
let a = f32x4::splat(10.0);
let b = f32x4::from_array([1.0, 2.0, 3.0, 4.0]);
println!("{:?}", a + b);
}参考
第三方库 crates.io
本章会陆续介绍一些来自 crates.io 的常用的第三方开源库, 包括它们的用法以及内部实现方式.
dashmap 库: 并发的 HashMap 实现
libloading 库
数据序列化 serde
smallvec
Time
网络编程 network programming
reqwest 库
hyper 库
actix-web 库
websocket 库: tokio-tungstenite
rustls 库
QUIC 协议: quinn 库
gRPC 服务: tonic 库
WebAssembly
WebAssembly 系统接口 wasi
基于 LLVM 的编译器 emscripten
编译器与工具链 binaryen
wasmtime 运行时
wasmer 运行时
参考
WasmEdge 运行时
反编译与调试
web 前端开发
web-sys 库
wasm-bindgen 库
wasm-pack 工具
trunk 工具
yew 库
wgpu
zu 库
其它工具
twiggy
客户端程序 GUI
使用 tauri 替代 electron
gtk
egui
参考资料
书籍:
- Programming Rust, 2nd Edition, Jim Blandy etc
- Rust Atomics and Locks Low-Level Concurrency in Practice, Mara Bos
在线文档:
- Comprehensive Rust
- Learn Rust the Dangerous Way
- Nomicon - dark side of the force
- Rust Playground
- Rust Quiz
- Rust RFC - review new features
- Rust References - the devil is in details
- Rust Standard Library - battery included, be familiar with it
- Rust for C++ programmers
- RustSec - A vulnerability database for the Rust ecosystem
- Rustc book - why compiler throws error
- Rust Compiler Development Guide
- The Cargo Book
- The Rust Programming Language - the book
- The Rust Unstable Book - more features, more power
- algorithms in rust - data structures and algorithms
- cheats.rs - Rust Language Cheat Sheet
- rust by example - rust 101
- rust course
- rustc source - how to implement language features